Recommended resources
The freely available resources this lesson will direct you to.
- How to Create a YouTube Channel for Beginners (The Ultimate Guide)www.youtube.com
- How to Become a YouTuber & Get Paid: 11 Steps for Beginnersriverside.com
- YouTube Channel Description: Crafting the Perfect Onebacklinko.com
- How to Create a YouTube Channel for Beginners in 2025 (Step-By-Step)www.youtube.com
- How to set up a YouTube Channel (step by step tutorial for beginners)www.youtube.com
- How to Start a Successful Youtube Channel in 2024 - Nakisha Wynnwww.nakishawynn.com
Introduction
Welcome back! In our last lesson, you did a fantastic job setting up your profiles on TikTok, X, and Pinterest. You now have a consistent brand presence across multiple platforms, which is a crucial foundation for any influencer.
Today, we're moving on to a major player in the content creation world: YouTube. While other platforms are great for quick updates and short videos, YouTube is where you can build a deep, lasting connection with your audience through more detailed, long-form content. This is where your "cheap and cheerful lifestyle" tips can really shine in longer tutorials, vlogs, and in-depth guides.
Our goal is to set up your YouTube channel with a professional profile photo and a compelling channel description. This will create a welcoming and informative home base for your future video content.
1. Creating Your YouTube Channel
Before you can customize anything, you need to create the channel itself. This process starts with a Google account.
Action Step 1: Create a Google Account and YouTube Channel
If you already have a Google account you want to use for your influencer brand, you can use that. If not, it's best to create a new one to keep your business and personal life separate.
The following video provides a clear, step-by-step guide to both creating a Google account and then using it to launch your YouTube channel.
How to Create a YouTube Channel for Beginners in 2025 (Step-By-Step)
Let's watch 'How to Create a YouTube Channel for Beginners' by Ben Claremont. This will walk you through the essential first steps.
First, watch the segment on creating a Google account (0:00 - 0:57) if you need to create a new one. Then, watch carefully from 0:57 to 01:50 as he shows you how to create the channel, set your Channel Name, and choose your Handle (@YourName). For consistency, use the same name and username/handle you chose for your other social media platforms.
Once you've completed these steps, you will have a basic, live YouTube channel. Now, let's start branding it.
2. Customizing Your Channel's Visuals
Just like on your other profiles, your profile picture is the first thing people will see. It needs to be consistent with the brand you've already established.
Action Step 2: Upload Your Profile Photo
You will upload the same friendly, high-quality photo of yourself that you are using on Instagram, TikTok, and your other accounts. This consistency is key for building recognition.
This image shows you exactly where to go in the YouTube Studio to add your picture. You'll navigate to Customization in the left-hand menu, then select the Branding tab.

For some quick tips on what makes a great profile photo, watch this short clip.
How to set up a YouTube Channel (step by step tutorial for beginners)
In 'How to set up a YouTube Channel,' Modern Millie offers some excellent advice on choosing an effective profile photo.
Watch from 01:42 to 02:16. She emphasizes good lighting and making eye contact, and how the photo should reflect the feel of your channel—in your case, 'cheap and cheerful'.
Go ahead and upload your photo now.
3. Writing a Compelling Channel Description
Your channel description (also known as the "About" page) is one of the most important parts of your channel. It tells new viewers what you're all about and, crucially, it tells the YouTube algorithm what kind of content you create, helping the right audience to find you.
Why Your Description Matters
Before you start writing, it's helpful to understand the core purpose of a great description.
13 YouTube Description Templates That Have Helped Our Videos ...
The article '13 YouTube Description Templates' from HubSpot provides an excellent overview of what makes a description effective.
Read the sections 'What makes a great YouTube description?' and 'YouTube Description Tips'. Focus on the three key goals (explain value, pique interest, present a call-to-action) and the tips on using keywords related to your niche.
Action Step 3: Write and Add Your Description
Now, let's put that theory into practice. You'll write your description in the Basic info tab, right next to the 'Branding' tab you were just in.
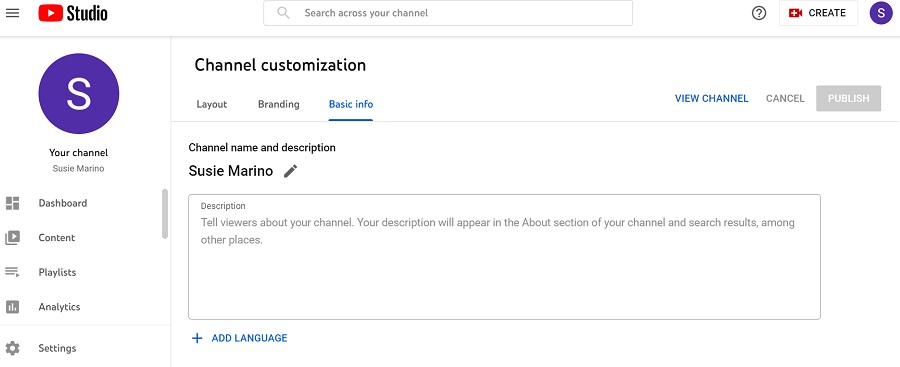
This next video provides a fantastic, practical demonstration of how to turn your brand ideas into a keyword-rich description.
How to set up a YouTube Channel (step by step tutorial for beginners)
Let's return to Modern Millie's tutorial. She shows you exactly how to build a description that works for both humans and search engines.
Watch from 09:56 to 12:52. Pay close attention to how she uses her 'brand pillars' and 'mission statement' to pull keywords. You should do the same with the branding work you did in Module 1. Think about terms like 'frugal living,' 'saving money,' 'budgeting tips,' 'DIY,' and 'cheap and cheerful lifestyle.'
Your Channel Description Checklist:
- Start with a hook: A friendly "Hi, I'm [Your Name]!" works well.
- State your value: Clearly explain who you help and what you help them do (e.g., "On this channel, I share my best tips and tricks for living a cheap and cheerful lifestyle without feeling like you're missing out.").
- List your topics: Weave in your keywords. Mention the types of videos you'll create (e.g., "You'll find videos on budget-friendly recipes, DIY projects, smart shopping hacks, and practical ways to save money every day.").
- Add a Call-to-Action (CTA): End by inviting them to join you. "If that sounds good to you, please subscribe and join our community!"
To make this even easier, you can use a template. The HubSpot article you read earlier has several great ones.
13 YouTube Description Templates That Have Helped Our Videos ...
Let's revisit the HubSpot article for some ready-to-use templates. These provide a great structure to follow.
Scroll to the section 'YouTube Channel Description Templates'. The 'Playful' or 'Niche' templates are a great fit for your brand. Choose one and adapt it using your own name and keywords.
After drafting your description, copy and paste it into the description box in your YouTube Studio and hit Publish.
Conclusion
Congratulations! You now have a fully set up YouTube channel that is branded and ready for content. You've established your presence on one of the most powerful platforms for influencers, using your consistent profile photo and a well-crafted description that clearly communicates your value to both potential subscribers and the YouTube algorithm.
Key Takeaways:
- A Google account is your key to creating a YouTube channel.
- Brand consistency is vital; using the same profile picture helps your audience recognize you instantly.
- Your channel description is a powerful tool for discoverability. It must be clear, viewer-focused, and rich with keywords related to your "cheap and cheerful" niche.
Preview of the Next Lesson:
Your channel is set up, but the top of the page looks a bit empty. To give it a more professional and branded look, our next step will be to create and upload branded YouTube channel art (banner) using Canva. This will be the finishing touch on your channel's visual identity.