Recommended resources
The freely available resources this lesson will direct you to.
- Have 10 minutes? I’ll make you a designer! | Canva for Beginners + Small Business 2025www.youtube.com
- How to Set up your Brand Kit in Canva (2024 updates!)www.youtube.com
- Create Social Media Posts Using Canva - Iconic Marketingwww.iconic.marketing
- How to make branded social media graphics in Canvawhitecanvasdesign.ca
Introduction
Hello! In our last lesson, you mastered the art of enhancing your photos with Snapseed, learning to adjust brightness, contrast, and color to make your images pop. That skill is vital for editing photographs of your "cheap and cheerful" finds.
But not all social media content is a photograph. Sometimes, you need to share a tip, a quote, or a list in a purely graphical format. This is where your brand's visual identity truly comes to life.
Today, we'll transition from editing photos to creating graphics from scratch. The learning outcome for this lesson is to create a branded graphic post (e.g., a money-saving tip) using Canva with consistent fonts and colors. This is a cornerstone skill that will ensure your content is instantly recognizable as yours, building a professional and cohesive feed that attracts and retains followers.
1. Welcome to Canva: Your Design Sidekick
First, let's get you set up with the main tool we'll be using for the rest of this module: Canva. It's a user-friendly design platform made specifically for people who aren't professional graphic designers. It’s perfect for creating high-quality social media content quickly.
Your first step is to create a free account.
How to make branded social media graphics in Canva
This article from White Canvas Design Co. will get you started. You only need to follow the very first step.
Please read 'Step 1: Sign up for Canva' and follow the instructions to create your free Canva account. We recommend using your computer for this lesson, as the interface is easier to navigate.
2. The Power of Consistency: Your Brand Board
The key to a memorable brand is consistency. Every time someone sees one of your posts, they should get a similar feeling. This is achieved by repeatedly using the same colors, fonts, and style.
In Canva, the best way to manage this is with a Brand Kit. This feature allows you to save your brand's colors and fonts so they are always just one click away. While the full Brand Kit is a feature of the paid "Canva Pro," there's a fantastic workaround for free users that is just as effective: creating a "Brand Board."
A Brand Board is simply a single Canva design where you store all your brand elements. Think of it as your personal cheat sheet.
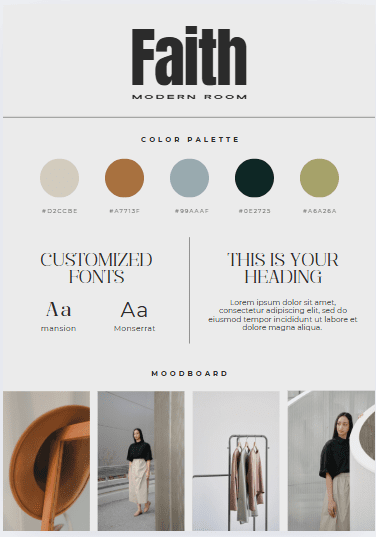
So, how do you create one? The video below explains this "hack" for free users perfectly.
How to Set up your Brand Kit in Canva (2024 updates!)
In this video from Design with Canva, the presenter explains the difference between the free and pro brand kits and then demonstrates how to create a brand board template—an ideal solution for a free account.
Please watch two separate parts of this video: What is a Brand Kit? (00:00:00 - 00:02:47): This will give you a solid understanding of why brand kits are so important for consistency. The Free User 'Hack' (00:30:14 - 00:33:18): This section shows you exactly how to find and use a 'brand board' template as a free user. This is your main action step for this section.
For now, just find a brand board template you like and save it. You don't need to fill it out completely yet, but having it ready will make the next steps much easier.
3. Creating Your First Branded Graphic Post
Now for the main event! Let's create a graphic for a money-saving tip. We'll follow a simple, step-by-step process. This guide provides a great overview of the steps we will take.
How to Create Social Media Posts Using Canva: A Step-by-Step Guide
This guide from Iconic Marketing outlines the fundamental steps of creating a social media post in Canva. We'll be following this workflow.
Read 'Step 2: Choose a Template' and 'Step 3: Customise Your Design'. We'll also touch on the 'Bonus Tips' at the end. Keep this open as a reference while you work.
Let's walk through it together with some video guidance. The following clip covers searching for templates, changing text and fonts, and adding and coloring graphic elements.
Have 10 minutes? I’ll make you a designer! | Canva for Beginners + Small Business 2025
This 'Canva for Beginners' video by Whiskey & Whit provides a quick and clear demonstration of the core skills you'll use to create your post.
Watch from 01:26 to 05:18. The presenter will walk you through: Finding a template (she uses business cards, but the process is the same). Editing text and changing fonts to match your brand. Searching for graphic 'Elements' (like icons or shapes) and changing their colors to match your brand palette.
Here is your step-by-step process, combining everything you've just learned:
- Start a New Design: From the Canva home page, search for "Instagram Post (Square)" and choose a template that has a simple layout with a heading and some body text. Don't worry about the colors or fonts yet.
- Apply Your Brand Colors:
- Click on the background of the template. A color swatch will appear in the top-left corner.
- Click the swatch, then click the "Add a new color" button (the rainbow icon with a plus sign).
- Here, you can paste the hex code for your primary brand color that you chose in Module 1. (e.g.,
#FDF2E9). - Repeat this process for any other colored elements on the template, using colors from your brand palette.
- Add Your Content and Brand Fonts:
- Click on the text boxes to edit them. For the heading, type a money-saving tip like: "Meal prep your lunches for the week."
- For the body text, add a benefit: "Save money, eat healthier, and avoid decision fatigue!"
- With a text box selected, use the font menu at the top to change the font to one of your chosen brand fonts. Do this for both the heading and body text.
- Add a Graphic Element:
- Click on "Elements" in the left-hand menu.
- Search for an icon that matches your tip (e.g., "lunch box," "fork," "money"). Look for simple graphics.
- Click an icon to add it to your design. Resize and position it.
- If the icon's colors can be changed, use your brand colors to make it fit seamlessly.

4. Your Action Step: Create and Download
It's your turn. Follow the four steps above to create your own branded graphic for a money-saving tip.
Your Task:
Create one square Instagram graphic post using a Canva template. The graphic must include:
- A money-saving tip relevant to your niche.
- Your brand colors (for the background and/or elements).
- Your brand fonts (for the heading and body text).
- At least one simple graphic element from the "Elements" tab.
Once you are happy with your design, it's time to save it.
- Click the "Share" button in the top-right corner.
- Select "Download".
- Choose "PNG" as the file type. PNG is the best format for graphics, as it preserves quality.
- Click the "Download" button. The file will save to your computer, ready to be posted!
Conclusion
Excellent work! You've just created your first piece of branded content from scratch. You now know how to use Canva to combine text, colors, and simple graphics into a cohesive post that reinforces your brand identity. This is a skill you will use daily as an influencer.
Key Takeaways:
- Canva is an essential tool for creating social media graphics quickly and easily.
- A Brand Board is a simple but powerful way to keep your colors and fonts organized and consistent, even with a free Canva account.
- To brand a template, systematically change the colors, fonts, and text to match your own style.
- Always download your graphics as a PNG file for the best quality on social media.
Preview of the Next Lesson:
Now that you can create a basic branded graphic, we're going to apply this skill to a platform that is perfect for your money-saving niche: Pinterest. In the next lesson, you will learn how to design a Pinterest pin using Canva that follows best practices for dimensions and readability to maximize its chances of being discovered and shared.