Recommended resources
The freely available resources this lesson will direct you to.
- Understanding the RULE of THIRDS – How to INSTANTLY IMPROVE your Photos & Videos with Framingwww.youtube.com
- Rule of Thirds EXPLAINED: The Secret to Pro-Level Photos!www.youtube.com
- How to Use the Rule of Thirds in Photography (Using Your iPhone)www.mobiography.net
- 10 Ways To Use The Rule Of Thirds In Your iPhone Photosiphonephotographyschool.com
Introduction
Welcome back! In our last lesson, you learned how to find and control the most important element of any good photo: natural light. You now have the skills to ensure your images are bright and clear, which is a massive first step towards creating professional-looking content.
Now that we have good light, our next step is to decide how to arrange the elements within the photo. This is called composition. A well-composed photo guides the viewer's eye and feels balanced and satisfying.
In this lesson, you will learn to apply the Rule of Thirds to compose a visually balanced photo with your smartphone. This is one of the most fundamental and widely used composition guidelines in all of visual arts, from photography to painting. Mastering it will instantly make your photos more dynamic and professional. For your "cheap and cheerful" niche, strong composition is a free way to make simple subjects look fantastic.
1. What is the Rule of Thirds?
Imagine your phone screen is divided into nine equal squares by two horizontal and two vertical lines. It looks like a tic-tac-toe board.
The Rule of Thirds suggests that instead of placing your main subject right in the center, you should place it along these lines, or even better, at the points where the lines intersect.
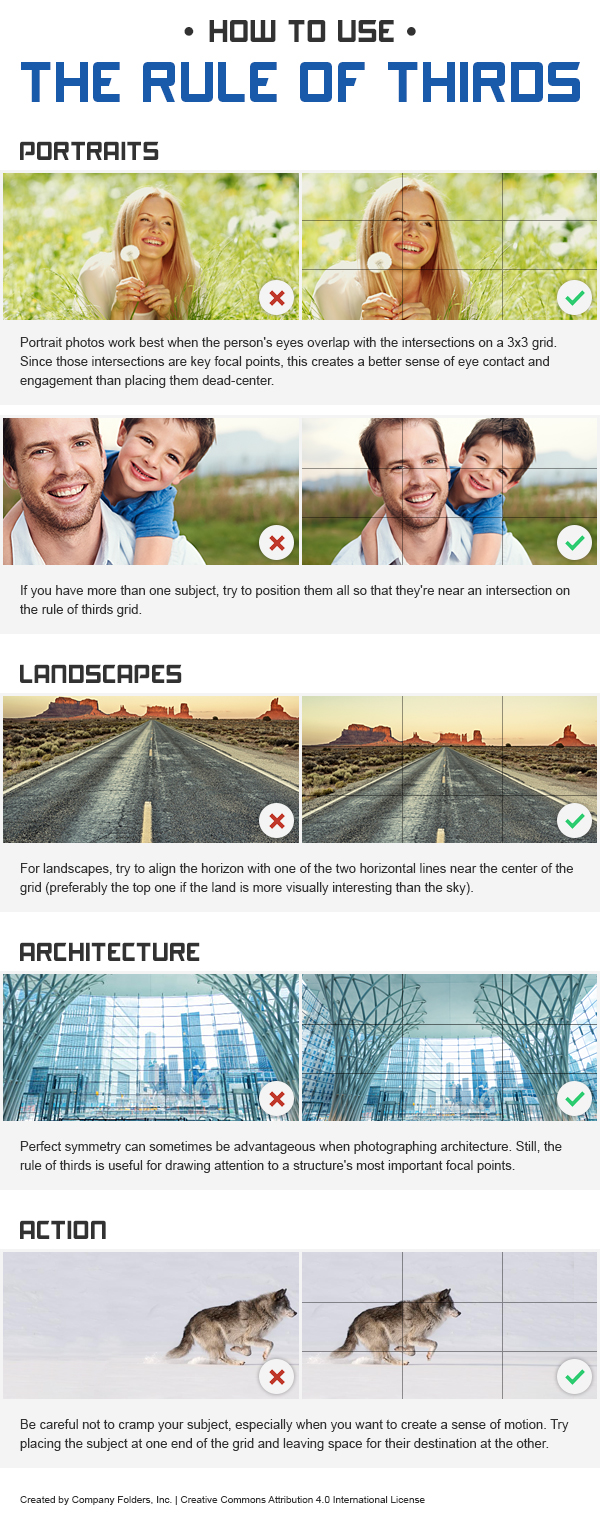
Studies have shown that the human eye is naturally drawn to these intersection points rather than the center of an image. Composing your photos this way creates a more balanced, interesting, and natural-looking image.
To get a clear understanding of this concept in action, let's watch a video that breaks it down.
Rule of Thirds EXPLAINED: The Secret to Pro-Level Photos!
The video 'Rule of Thirds EXPLAINED' from iPhone Photography School provides an excellent introduction. It explains what the rule is and demonstrates its power with a simple, clear example.
Watch from the beginning to 04:17. Pay close attention to: The explanation that this is a 'guideline' or a 'tool,' not a strict rule (0:27). The comparison between the centered photo of the boat and the photo composed using the Rule of Thirds (3:54).
As the video emphasizes, think of this as a powerful tool in your creative toolkit. It's not something you must follow every time, but it's a fantastic starting point for almost any photo you take.
2. Action Step: Enable the Grid on Your Smartphone
The best way to practice the Rule of Thirds is to see the grid right on your screen as you take photos. Nearly every smartphone has this feature built-in. Here’s how to turn it on.
How to Use the Rule of Thirds in Photography (Using Your iPhone)
The article 'How to Use the Rule of Thirds in Photography' from Mobiography gives clear, simple instructions for enabling the grid.
Read the section titled '1. Turn on Your Phone’s Rule of Thirds Grid.' Follow the steps for either iPhone or Android to enable the grid in your camera app. It should only take a moment.
Once enabled, your camera screen should look something like this, with the grid lines overlaid on your view.

3. Applying the Rule of Thirds in Practice
Now that you have your grid enabled, let's look at how to use it in common situations you'll encounter as a lifestyle content creator.
For Portraits and People
When taking a photo of a person (a selfie or a shot of someone else), the most important elements are their eyes.
- Position the eyes along the top horizontal line.
- If the person is looking to the side, place them on the vertical line that leaves more open space in the direction they are looking. This is called "giving them breathing room" and it creates a more comfortable, balanced feel.
The video below demonstrates this principle perfectly.
Rule of Thirds EXPLAINED: The Secret to Pro-Level Photos!
Let's return to the 'Rule of Thirds EXPLAINED' video. The next segment focuses specifically on applying the rule to portraits.
Watch from 04:41 to 06:31. Notice how the composition changes based on which way the subject is looking. This is a key technique for creating engaging portraits.
For Landscapes and Scenery
When shooting a scene with a horizon (like a sunset, a beach, or even a city skyline), avoid placing the horizon in the dead center of the photo.
- If the sky is more interesting (dramatic clouds, beautiful colors), place the horizon on the bottom horizontal line to show more sky.
- If the foreground is more interesting (interesting textures, flowers, a path), place the horizon on the top horizontal line to show more of the foreground.
Understanding the RULE of THIRDS – How to INSTANTLY IMPROVE your Photos & Videos with Framing
The video 'Understanding the RULE of THIRDS' by Camber Film School has a very clear explanation for composing landscapes.
Watch from 03:15 to 03:53. Pay attention to the side-by-side examples showing how placing the horizon on the top or bottom third changes the focus of the photo.
For Objects and Products
When you're creating content about a money-saving product or a DIY project, the object is your hero. Applying the Rule of Thirds helps it stand out.
- Place the object on one of the four intersection points. This is the strongest point of focus.
- Or, align the object with one of the vertical lines.
- Use the empty space in the other two-thirds of the frame to create a clean, uncluttered background. This is known as using "negative space," and it's very effective for making your subject pop.
The article "10 Ways To Use The Rule Of Thirds In Your iPhone Photos" (resource_id LINK) has many great visual examples of this, particularly in sections like "Position The Main Subject Off-Center" and "Leave Negative Space."
4. Your Action Step: The Three-Photo Challenge
It's time to put this into practice! With the grid still enabled on your phone, your task is to take three different photos, focusing on applying the Rule of Thirds in each.
- A Portrait: Take a photo of yourself or a friend. Place the person on the left or right vertical line, with their eyes on or near the top horizontal line. If they are looking sideways, make sure you leave space in front of them.
- An Object Photo: Find an object related to your "cheap and cheerful" niche (e.g., a jar for homemade jam, a reusable shopping bag, a book about budgeting). Place it on one of the four powerful intersection points. Pay attention to the background—keep it simple.
- A Scenery Photo: Go outside or look out a window and take a photo of the scene. Decide whether the sky or the ground is more interesting, and place the horizon on the corresponding top or bottom horizontal line.
Don't worry about perfection! The goal is to get a feel for consciously placing elements within the frame using the grid as your guide.
Conclusion
You've now added a second fundamental skill to your photography toolkit. By combining your knowledge of good lighting with the principles of good composition using the Rule of Thirds, you are well on your way to creating consistently high-quality visual content.
Key Takeaways:
- The Rule of Thirds is a compositional guideline that helps create balanced and visually appealing photos.
- Enable the grid on your smartphone camera to use it as a real-time guide.
- Place important subjects (people, objects) on the grid lines or, ideally, at the intersection points.
- Position horizons on the top or bottom third line, not in the center.
- Give your subjects "breathing room" by leaving empty space in the direction they are looking or moving.
Preview of the Next Lesson:
You've captured a well-lit, well-composed photo. What's next? The final step in creating a polished image is editing. In the next lesson, we'll dive into how to use a free photo editing app to adjust brightness, contrast, and color, giving your photos that final professional touch.