Hello! Let's dive into our next lesson on advanced computer vision.
Introduction
In previous lessons, we've explored two major computer vision tasks. We started with object detection, where models like Faster R-CNN and YOLO learn to draw bounding boxes around objects. Then, we moved to semantic segmentation, where models like FCN and U-Net learn to classify every single pixel in an image into a category, like "road," "sky," or "person."
Today, we'll merge these two ideas to tackle instance segmentation. The goal is no longer just to find the objects (detection) or to label all pixels of a certain class (semantic segmentation), but to do both: detect each instance of an object and generate a unique, pixel-perfect mask for it. For example, instead of labeling all "person" pixels as one class, we want to identify "person 1," "person 2," and "person 3" as distinct objects, each with its own mask.
To achieve this, we will explore one of the most influential models in this domain. Your learning outcome for this lesson is to implement Mask R-CNN for instance segmentation. This model elegantly extends the Faster R-CNN architecture you're familiar with to perform this complex task.
We will cover:
- The core concepts of instance segmentation.
- The Mask R-CNN architecture, focusing on its two key innovations: the mask prediction head and the RoIAlign layer.
- How to implement Mask R-CNN in PyTorch by fine-tuning a pre-trained model on a custom dataset.
1. What is Instance Segmentation?
Instance segmentation provides the richest level of scene understanding we've discussed so far. It tells us the location, class, and exact pixel-wise shape of every object in an image.
To solidify this concept, let's watch a brief introductory video.
Mask Region based Convolution Neural Networks - EXPLAINED!
The video 'Mask Region based Convolution Neural Networks - EXPLAINED!' from the CodeEmporium channel clearly defines instance segmentation by contrasting it with its constituent parts.
Watch from 00:43 to 01:48. Notice how the final output combines the bounding boxes from object detection with the pixel-level masks from semantic segmentation to delineate each distinct object.
As the video explains, instance segmentation is effectively object detection + semantic segmentation. The Mask R-CNN model achieves this by building upon the powerful Faster R-CNN framework.
2. The Mask R-CNN Architecture
Recall the two-stage pipeline of Faster R-CNN:
- A Region Proposal Network (RPN) scans the image and proposes a set of candidate bounding boxes (Regions of Interest, or RoIs) that might contain an object.
- For each RoI, features are extracted (using RoIPool) and passed to two parallel "heads": a classification head (to predict the object's class) and a bounding box regression head (to refine the box's coordinates).
Mask R-CNN extends this by adding a third parallel branch: a mask prediction head.
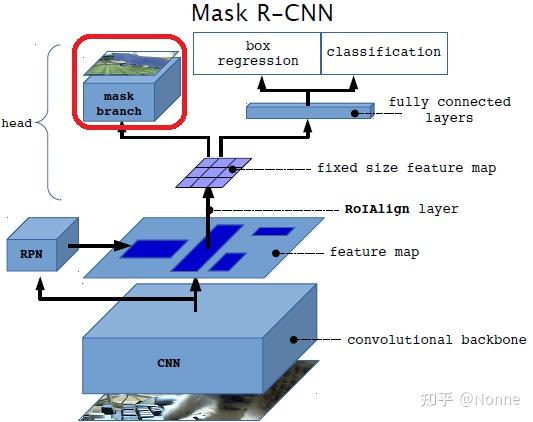
This simple addition is incredibly powerful, but its success hinges on two key architectural innovations.
Innovation 1: The Mask Head
For each RoI proposed by the RPN, the mask head generates a segmentation mask. This head is a small Fully Convolutional Network (FCN) that is applied to the feature map of the RoI.
This approach has a crucial design choice: it decouples mask and class prediction. Instead of predicting a single multi-class mask, the mask head generates one binary (object vs. background) mask for each of the K possible classes. During inference, the model selects the mask corresponding to the class predicted by the classification head. This prevents competition between classes for mask pixels and significantly improves performance.
The following video explains why an FCN is the right tool for this job.
Mask Region based Convolution Neural Networks - EXPLAINED!
The mask is generated by a small FCN applied to each RoI. This video segment explains how this process works and why convolutional layers are essential.
Watch from 05:53 to 07:38. This part explains why using convolutional layers is crucial for the mask head to preserve spatial information, a concept that should be familiar from our last lesson on FCNs and U-Net.
Innovation 2: RoIAlign
A pixel-perfect mask requires highly accurate spatial alignment. The standard RoIPool layer used in Faster R-CNN involves harsh quantization—it rounds floating-point coordinates of the RoI to the nearest integer. This slight misalignment is acceptable for classification but is detrimental for generating precise masks.
Mask R-CNN introduces RoIAlign, a layer that fixes this. Instead of quantizing the box coordinates, RoIAlign uses bilinear interpolation to compute the exact values of input features at four regularly sampled locations within each bin of the RoI, and then aggregates the results (e.g., using max or average). This preserves sub-pixel spatial information, leading to much more accurate masks.
This is the most critical architectural change in Mask R-CNN. The video below gives an excellent visual explanation of the problem and the solution.
Mask Region based Convolution Neural Networks - EXPLAINED!
The biggest challenge in adding a precise mask head is ensuring the features are perfectly aligned with the image pixels. Mask R-CNN introduces RoIAlign to fix the misalignment caused by RoIPooling. This is a must-watch segment.
Watch carefully from 02:59 to 05:53. Focus on understanding the example of quantizing the stride in RoIPooling and how it leads to data loss and misalignment. Then, see how RoIAlign uses bilinear interpolation to sample points precisely, preserving spatial accuracy.
Test your understanding!
Why is the misalignment from RoIPooling a major problem for a segmentation mask head but only a minor issue for a classification head?
Show answer
A classification head's job is to identify "what" is in the RoI. Small shifts or misalignments in the features usually don't change the overall semantic content, so the classifier can still recognize the object. However, a segmentation head's job is to predict the exact "where" for every pixel. A small spatial shift in the feature map can cause the predicted mask boundary to be off by several pixels, drastically reducing the quality and accuracy of the segmentation. RoIAlign ensures the feature map used by the mask head is precisely aligned with the original image pixels, enabling accurate boundary prediction.
3. Implementing Mask R-CNN in PyTorch
Implementing the entire Mask R-CNN architecture from scratch is a significant undertaking. The standard and most effective approach is to take a model pre-trained on a large dataset like COCO and fine-tune it on your own custom dataset. Your background in PyTorch and software engineering makes you well-equipped for this workflow.
We will walk through the three main steps: preparing a custom dataset, modifying a pre-trained model, and setting up the training/inference logic.
Step 1: Defining a Custom Dataset
For instance segmentation, the dataset needs to provide three things for each image: the image itself, the bounding boxes for each object, and the segmentation masks for each object. In PyTorch, this is typically done by creating a custom Dataset class where the __getitem__ method returns a tuple: (image, target). The target is a dictionary containing tensors for boxes, labels, and masks.
The official TorchVision tutorial provides the definitive guide on this format.
TorchVision Object Detection Finetuning Tutorial
To train our model, we first need a custom dataset class that provides images, bounding boxes, and segmentation masks in a format that PyTorch's detection models expect.
Read the sections 'Defining the Dataset' and 'Writing a custom dataset for PennFudan'. The first section lists the required keys for the target dictionary (boxes, labels, masks, etc.). The second section shows a full implementation of a torch.utils.data.Dataset class. Pay close attention to how the __getitem__ method loads an image and its corresponding mask, then processes the mask to generate bounding boxes (masks_to_boxes) and a binary mask for each object instance.
Step 2: Loading and Modifying the Pre-trained Model
TorchVision provides a pre-trained Mask R-CNN model. Our task is to load it and replace its prediction heads to match the number of classes in our custom dataset. Remember, the number of classes must include the background class!
This is a core skill in transfer learning for detection and segmentation tasks.
TorchVision Object Detection Finetuning Tutorial
With our dataset ready, the next step is to load a pre-trained Mask R-CNN model and adapt it. This involves replacing the final prediction layers to match our custom number of classes.
Read the sections 'Defining your model' and 'Object detection and instance segmentation model for PennFudan Dataset'. Focus on the get_model_instance_segmentation function. See how it loads a pre-trained model and then replaces both model.roi_heads.box_predictor and model.roi_heads.mask_predictor with new FastRCNNPredictor and MaskRCNNPredictor layers, passing in our custom num_classes.
Step 3: The Training and Inference Loop
The training loop for Mask R-CNN is simpler than you might expect. The model is designed to handle its complex multi-task loss internally.
- In training mode (
model.train()), you pass it a batch of images and targets. It returns a dictionary of losses (e.g.,loss_classifier,loss_box_reg,loss_mask), which you simply sum up and backpropagate. - In evaluation mode (
model.eval()), you pass it a batch of images. It returns a list of dictionaries, one for each image, containing the final predictedboxes,labels,scores, andmasks.
The following tutorial provides a very clear, complete, and well-commented example of this entire workflow.
Training Mask R-CNN Models with PyTorch - Christian Mills
The final step is to put everything together into a script to train the model and then use it for inference. This tutorial provides a comprehensive walkthrough of a complete pipeline.
This is a longer read, but it provides a fantastic end-to-end example. Skim through these sections to understand the complete workflow: 'Preparing the Data' (Section 9): Glance over this to see how data augmentation transforms and DataLoaders are created. Note the custom collate_fn which is needed for batching together samples with a variable number of objects. 'Fine-tuning the Model' (Section 10): Focus on the run_epoch and train_loop functions. Notice how the total loss is calculated: loss = sum([loss for loss in losses.values()]). This is the combined multi-task loss from the model. 'Making Predictions with the Model' (Section 11): Look at how the model is put in eval() mode, how a sample image is passed to it, and how the output (boxes, labels, scores, masks) is filtered by a confidence threshold before visualization.
Conclusion
Today, we've taken a significant step forward in computer vision, moving from simple boxes and full-image labels to precise, per-object masks.
Key Takeaways:
- Instance Segmentation combines object detection ("where is each object?") and semantic segmentation ("what is the shape of each object?") into a single task.
- Mask R-CNN is a powerful architecture that extends Faster R-CNN by adding a parallel FCN-based mask head to predict a binary mask for each detected object.
- RoIAlign is the critical innovation that replaces RoIPooling. By using interpolation instead of quantization, it preserves the precise spatial alignment needed for accurate pixel-level masks.
- Fine-tuning is the standard way to implement Mask R-CNN. The workflow involves creating a custom
Dataset, replacing the prediction heads of a pre-trained model, and running a training loop where the model itself computes the multi-task loss.
Preview of the next lesson:
Now that we understand how to build and train an instance segmentation model, the next logical question is: how do we know if it's any good? In our next lesson, we will focus on evaluating object detection and segmentation models using appropriate metrics. We'll dive into concepts like Intersection over Union (IoU) and mean Average Precision (mAP), which are the standard benchmarks for these tasks.