Introduction
In our last lesson, you did some excellent detective work, profiling your API service to pinpoint exactly where time is spent during a request's lifecycle. You learned that non-inference CPU overhead can be a major performance bottleneck and developed a method to measure it.
Now that we have a well-understood service, it's time to package it for the real world. Your learning outcome for this lesson is to containerize the complete inference service and deploy it. This process is fundamental to creating scalable, reliable, and portable AI systems. We'll move from a script running on your local machine to a self-contained unit that can be deployed anywhere, from a local GPU to a massive cloud cluster.
This step bridges the gap between local development and production-grade infrastructure, a core competency for an AI Systems Engineer.
Why Containerize Your Inference Service?
As a computer scientist, you're undoubtedly familiar with containerization's benefits for general software development. For LLM inference, these benefits become even more critical, but with a few unique twists.
A production LLM system is rarely a single application. It's typically a set of interacting microservices. Your inference server is one such service.
Large-Scale Production Inference of LLMs
To understand where our service fits in a larger system, let's look at a paper describing a production architecture for large-scale LLM inference. This will provide the architectural context for our work today.
Please read the 'System overview' part of Section 2 and all of Section 2.3, 'Kubernetes configuration and resource allocation'. Focus on two key ideas: the microservices design pattern (API, Orchestration, Processing, Inference layers) and the explicit separation of CPU-intensive containers from GPU-dependent ones. This explains the 'why' behind containerizing our inference logic as a distinct component.
As the paper highlights, splitting the system into distinct, containerized services provides several advantages:
- Dependency Isolation: The GPU-powered inference container has a massive dependency footprint (CUDA, PyTorch, Transformers, etc.), often resulting in images over 10 GB. By isolating it, other services (like a data pre-processing API) can remain lightweight (1-2 GB), making them faster to build, deploy, and scale.
- Resource Optimization: This separation allows you to run GPU containers on expensive, specialized hardware and CPU-only containers on cheaper, general-purpose machines, leading to significant cost savings.
- Portability and Consistency: A container packages the application, its dependencies, and its configuration into a single object. This guarantees that the service runs identically on your local machine, a co-worker's machine, or a cloud server, eliminating "it works on my machine" problems.
The Core Challenge: Making Docker GPU-Aware
By default, a Docker container is a sandboxed user-space environment, completely isolated from the host's hardware—including the GPU. To bridge this gap, NVIDIA developed the NVIDIA Container Toolkit.
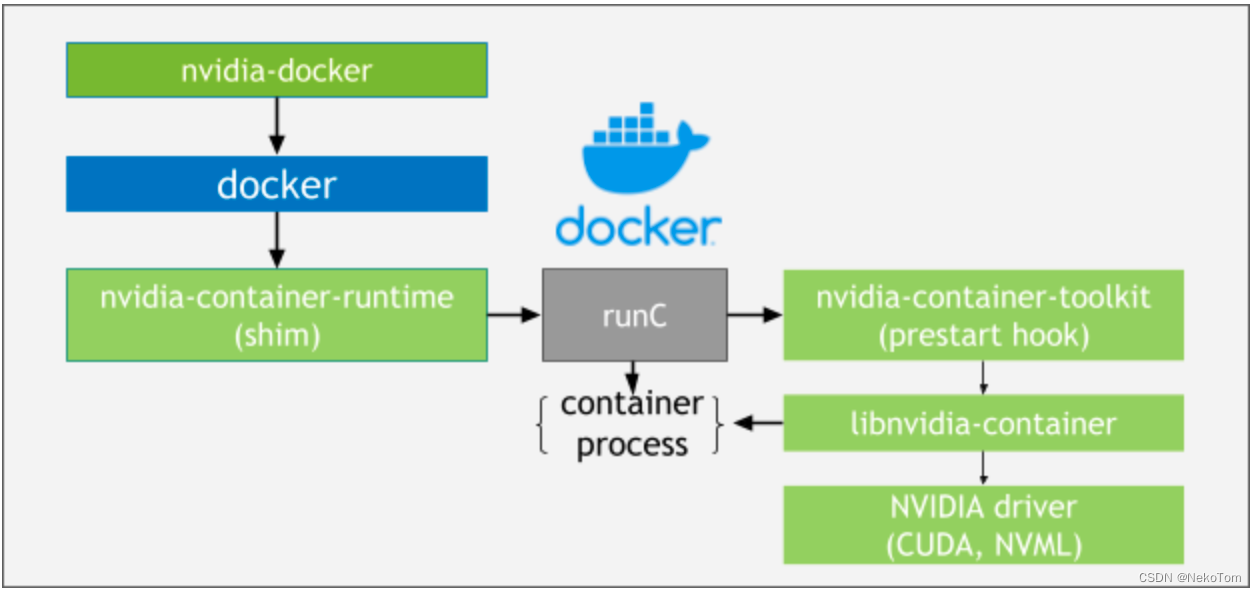
The key takeaway is that you don't need to install NVIDIA drivers inside your container. You only need a base image with the correct CUDA user-space libraries that are compatible with the driver on the host machine.
Let's watch a short clip that reinforces this concept.
Containerizing Huggingface Transformers for GPU inference with Docker and FastAPI on AWS
The video 'Containerizing Huggingface Transformers' provides a concise explanation of this core challenge.
Watch the segment from 00:00:45 to 00:02:02. The speaker clearly explains why GPU-based Docker images are different from CPU-based ones, emphasizing the need for matching CUDA and cuDNN libraries between the base image and the host.
Practical Implementation: Building Your Dockerfile
Now, let's create the Dockerfile for the instrumented FastAPI service from our previous lesson. A Dockerfile is a text file that contains the instructions to assemble a container image.
We will structure our Dockerfile following best practices for building inference services. The process involves selecting a base image, installing dependencies, copying our code, and defining the command to run the service.
Containerizing Huggingface Transformers for GPU inference with Docker and FastAPI on AWS
The same video provides an excellent, step-by-step walkthrough of creating a Dockerfile for a GPU-based inference service. We will follow a similar structure.
Watch the section from 00:18:09 to 00:20:10. Pay close attention to the choice of the base image (nvidia/cuda), the sequence of commands (installing dependencies, copying code), and the final CMD instruction that starts the server. This is a practical template for our own Dockerfile.
Here is the Dockerfile for our service. Create a file named Dockerfile in the same directory as your Python script (main.py) and a requirements.txt file.
1. requirements.txt
Your requirements.txt should contain the necessary libraries:
fastapi
uvicorn[standard]
2. Dockerfile
# 1. Base Image: Use an official NVIDIA image with CUDA and Python.
# We choose a 'runtime' image which is smaller than the 'devel' image.
FROM nvidia/cuda:12.1.1-cudnn8-runtime-ubuntu22.04


```grasp
{
  "type": "exercise",
  "id": "ac03fe03-0718-4572-9a67-4ba5ea172e47"
}
Set up a non-root user for better security
RUN useradd -m -u 1000 user
USER user
ENV HOME=/home/user
WORKDIR $HOME/app
Set the PATH to include user's local bin
ENV PATH="{PATH}"
2. Install Python and dependencies
We run this as root temporarily and then switch back to the user.
USER root
RUN apt-get update &&
apt-get install -y python3 python3-pip &&
rm -rf /var/lib/apt/lists/*
USER user
Copy the requirements file first to leverage Docker's layer caching.
This layer only gets rebuilt if requirements.txt changes.
COPY --chown=user:user requirements.txt .
Install Python dependencies
RUN pip3 install --no-cache-dir --user -r requirements.txt
3. Copy Application Code
This layer will be rebuilt if your application code changes.
COPY --chown=user:user . .
4. Expose Port
Inform Docker that the container listens on port 8000.
EXPOSE 8000
5. Define Run Command
The command to execute when the container starts.
CMD ["uvicorn", "main:app", "--host", "0.0.0.0", "--port", "8000"]
*Note: Replace `main:app` if your Python file is named differently (e.g., `api.py` would be `api:app`).*


### Building and Running the Container

With the `Dockerfile` in place, you can now build and run your container.

1.  **Build the image:** Open a terminal in the directory containing your `Dockerfile`, `main.py`, and `requirements.txt`, and run:
    ```bash
    docker build -t inference-service:0.1 .
    ```
    This command tells Docker to build an image from the current directory (`.`), tagging it as `inference-service` with version `0.1`.

2.  **Run the container:** Once the build is complete, run the service with the following command:
    ```bash
    docker run --rm --gpus all -p 8000:8000 inference-service:0.1
    ```
    Let's break down these flags:
    *   `--rm`: Automatically removes the container when it exits.
    *   `--gpus all`: The critical flag that tells the NVIDIA Container Toolkit to expose all available GPUs to the container.
    *   `-p 8000:8000`: Maps port 8000 on your host machine to port 8000 inside the container, allowing you to access the API from your browser or `curl`.

Your FastAPI service, with all its instrumentation, is now running inside a GPU-enabled container! You can test it using the same `curl` commands or bash scripts from the previous lesson, pointed at `http://localhost:8000/predict`.


### From Single Container to Orchestrated Deployment

Running a single container locally is a great step, but production systems need to manage fleets of containers, handle failures, and balance load. This is the job of a container orchestrator, with **Kubernetes** being the de facto standard.

For an AI Systems Engineer, understanding how to deploy a containerized service to Kubernetes is essential. We won't build a cluster from scratch, but we will examine the configuration files (`manifests`) that define a deployment.

```grasp
{
  "type": "video",
  "title": "vLLM on Kubernetes in Production",
  "id": "[LINK](https://www.youtube.com/watch?v=t0iJGEG0IXk)",
  "video_id": "t0iJGEG0IXk",
  "relevant_section_indices": [
    2,
    3,
    4
  ],
  "par_intro": "The 'vLLM on Kubernetes in Production' video gives a fantastic overview of deploying a real, high-performance inference server (vLLM) on a Kubernetes cluster. We will use the concepts shown here to understand our own deployment.",
  "par_directions": "Watch the segment from 00:11:12 to 00:22:30. Don't worry about every single detail of the YAML. Instead, focus on the high-level components and their purpose:\n1.  **NVIDIA Device Plugin** (00:12:35): The essential component that makes GPUs schedulable resources in Kubernetes.\n2.  **The Deployment/DaemonSet** (00:15:08): The manifest that describes *what* to run (your container image) and *what resources* it needs (e.g., `nvidia.com/gpu: 1`).\n3.  **The Service** (00:20:52): The manifest that creates a stable network endpoint to access your running container(s)."
}
Drawing from the principles in the video and the clean example from the SGLang guide, here's what a basic Kubernetes deployment for our service would look like.
You would have two files: deployment.yaml and service.yaml.
deployment.yaml
This file tells Kubernetes to run a specified number of replicas of your container.
apiVersion: apps/v1
kind: Deployment
metadata:
  name: inference-deployment
spec:
  replicas: 1 # Start with one replica
  selector:
    matchLabels:
      app: inference-server
  template:
    metadata:
      labels:
        app: inference-server
    spec:
      containers:
      - name: inference-container
        image: inference-service:0.1 # Your container image
        resources:
          limits:
            nvidia.com/gpu: 1 # Request 1 GPU for this container
        ports:
        - containerPort: 8000
        livenessProbe: # Checks if the container is healthy
          httpGet:
            path: / # Assuming a base path that returns 200 OK
            port: 8000
          initialDelaySeconds: 120
          periodSeconds: 10
service.yaml
This file creates a stable network entry point that load-balances traffic across all the pods created by the deployment.
apiVersion: v1
kind: Service
metadata:
  name: inference-service-endpoint
spec:
  type: ClusterIP # Exposes the service only within the cluster
  selector:
    app: inference-server # This selector must match the labels in the Deployment
  ports:
  - protocol: TCP
    port: 80 # The port the service will be available on
    targetPort: 8000 # The port the container is listening on
To deploy this, you would use the command kubectl apply -f deployment.yaml and kubectl apply -f service.yaml. Kubernetes would then automatically pull your image, schedule it onto a node with an available GPU, and configure the networking. Other services within the cluster could then reach your API at http://inference-service-endpoint.
Conclusion
You have successfully taken your locally developed and profiled service and turned it into a production-ready artifact. This is a massive leap forward.
Key Takeaways:
- Containers are essential for production ML: They solve dependency, portability, and scalability challenges by isolating GPU-heavy services.
- The NVIDIA Container Toolkit is the key: It bridges the gap between the host's GPU drivers and the isolated container environment.
- A
Dockerfiledefines your service's package: You learned to construct one with a proper base image, dependency management, and run commands. - Kubernetes orchestrates containers at scale: You've seen how
DeploymentandServicemanifests are used to run your container on a cluster and expose it to other applications, requesting specific GPU resources.
Preview of the Next Lesson:
You've now built and deployed a generic API server. The next step is to make it speak the industry-standard language for AI models. In our next lesson, you will implement an OpenAI-compatible chat completions API with streaming support on top of the service you just deployed. This will make your custom engine plug-and-play with a vast ecosystem of existing tools and clients.