
Hello again. In the previous lesson, you made your handwriting measurable by scoring baseline alignment, size, slant, spacing, and potentially ambiguous letterforms. This lesson addresses the physical conditions underneath those visible features.
A handwriting style does not need to conform to one “correct-looking” grip or slant. The practical standard is simpler: you should be able to write legibly, at a workable pace, without unnecessary tension, and reproduce your setup each time. Today you will build that setup through posture, a relaxed grip, and paper placement.
A stable base, not a rigid pose
Good writing posture gives your hand a dependable platform. It does not mean freezing in an idealized position for an hour. You may shift slightly as you write. What matters is that you are supported rather than leaning, stretching, or twisting to reach the page.
Start with these conditions:
- Sit far enough from the desk that your forearms can rest on it without your shoulders creeping upward.
- Keep both feet supported by the floor or a footrest rather than crossing or tucking them away.
- Let your back be comfortably upright and your shoulders settle down rather than hunching toward your ears.
- Keep your head inclined enough to see the page clearly, but avoid folding your neck over the paper.
- As a starting reference, the desk surface should be near elbow height or a little below it. If you must lift your shoulders to write, the desk is effectively too high; if you have to collapse toward the page, it may be too low or too far away.
The point is to make the larger parts of your body quiet and supported. Then your writing arm has enough freedom to guide the pen across the page.
How to hold a pen (or pencil) properly and write without pain
Watch “How to hold a pen (or pencil) properly and write without pain” from Perfect Biscuits. It gives a useful visual demonstration of the tripod grip and, more importantly, of the difference between a controlled hand and a clenched one.
Watch the standard for the practical goal: readable writing without pain. Then watch the tripod grip to see the three contact points in both hands. In signs of tension, look for finger flattening and pale knuckles as visible clues that the pen is being squeezed. Finish with the reset habit: noticing tension, loosening the hand, and continuing rather than trying to force a permanent correction at once.
Before picking up your pen, try a brief shoulder check: raise both shoulders slightly, then let them drop. Rest your forearms on the desk where they land naturally. If the desk, chair, or body position prevents that relaxed placement, adjust the setup first. Trying to solve a posture problem by gripping the pen harder rarely works.
A grip that controls the pen without squeezing it
The dynamic tripod grip is a useful default because the thumb, index finger, and middle finger share control of the pen. The thumb and index finger guide it; the pen rests against the middle finger. Your ring and little finger can rest lightly on the page or curl gently toward the palm, helping steady the hand.

how to start, posture, paper and pencil grasp - Handwriting - HSE
Read the Health Service Executive’s concise guide for a clear starting position. Although it is written for children and caregivers, its posture, paper-position, and grip principles apply well as practical starting points for any writer.
In the “Posture” section, read the seating guidance. Treat the angles and desk-height measurement as adjustable reference points, not rules to enforce at the expense of comfort. In “Paper position,” read the paper-tilt guidance. Then read the full “Pencil grip” subsection, especially the grip description. Notice that the purpose is support and control, not finger strain.
How to set the grip
Place the pen in your writing hand and make these small adjustments:
- Let the barrel rest against the side of your middle finger.
- Rest your thumb pad on one side and your index finger on the other. Avoid pinching only with the fingertips.
- Keep a small open space in the web between thumb and index finger; do not collapse it into a tight fist.
- Let the pen angle back toward the space between thumb and index finger.
- Allow the wrist and forearm to rest lightly rather than holding the entire arm in the air.
Use only enough pressure to produce a reliable line. A useful test is to write a short row of slow ovals, then turn the page over. Heavy indentation, whitening fingertips, nail marks, or a cramped feeling are signs that you are pressing or squeezing more than necessary.
A tripod grip is not an entrance requirement for good handwriting. Some people write well with a four-finger grip or a personal variation. Do not change a functional grip merely because it looks unusual. A change is worth testing when your current grip creates pain, rapid fatigue, very inconsistent pressure, or prevents you from writing legibly at a comfortable pace.
The key distinction is this:
| Relaxed control | Excess tension |
|---|---|
| Fingers guide the pen while the hand remains soft. | Fingers clamp around the pen to stop every tiny movement. |
| Pressure is firm enough to make a clear mark. | Pressure digs into the page or makes the hand tire quickly. |
| You can pause, loosen, and resume easily. | Your fingers feel locked, flattened, or sore after a few lines. |
| The forearm and paper can contribute to movement. | The wrist and fingertips must do all the work. |
As you write, check your grip once per line rather than constantly staring at it. If you notice tension, pause at the end of the line, open and close your hand once, reset the pen lightly, and continue. That brief interruption teaches the new habit more effectively than trying to endure a cramped grip.
Position the paper for the direction of your arm
The paper should be placed so that your hand can travel across a line without forcing the wrist into an extreme bend. Paper angle is not decoration; it changes the direction in which your forearm and hand can move comfortably.
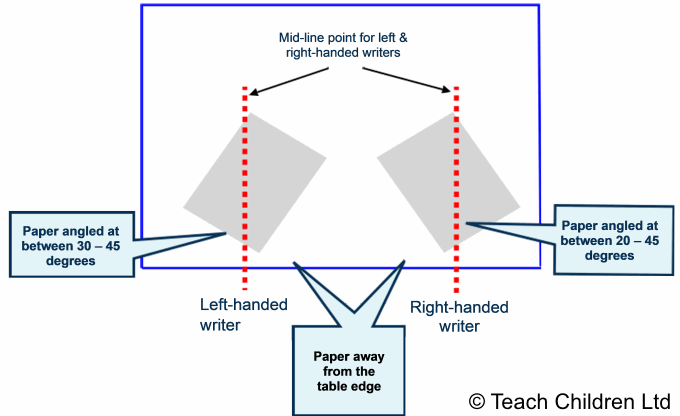
Use these as starting positions:
- Right-handed writer: tilt the sheet so the top-right corner is slightly higher than the top-left corner.
- Left-handed writer: tilt the sheet so the top-left corner is slightly higher than the top-right corner.
The exact angle is less important than the result. The page should allow your writing arm to follow the line with a mostly comfortable wrist. If you find yourself sharply bending your wrist, twisting your torso, or repeatedly dragging the paper back into place, alter the angle a little and test again.
Keep the page a short distance away from the front edge of the desk. This gives your forearm room to rest on the surface. Use your non-writing hand near the upper or outer edge of the page to stop it sliding. That hand is part of the setup: it stabilizes the sheet while the writing hand concentrates on forming letters.
For left-handed writers, placing the sheet slightly lower on the desk can create additional room for the hand. The goal is to see the line you are writing and move across it comfortably, rather than curling the wrist around the top of the writing.
Make the setup repeatable
You do not need to measure an angle every time you write. Instead, create simple landmarks:
- Place the middle of the top edge of the page roughly in front of your body.
- Angle the page toward your writing hand using the appropriate raised corner.
- Keep the bottom edge away from the desk edge.
- Rest the non-writing hand on the page before you begin.
- When you move to a new line or region of the page, slide or rotate the paper rather than contorting your wrist to reach it.
Think of the paper as something you are allowed to move. A common source of fatigue is treating the sheet as fixed and trying to reach every part of it with the fingers alone.
A 15-minute setup calibration
Use lined paper and your usual pen or pencil. The purpose is not to produce a beautiful practice page. It is to find a configuration you can recreate.
First three minutes: establish the starting position
- Set both feet on a supported surface.
- Sit at a distance where the forearms can rest on the desk without raised shoulders.
- Place the paper at the appropriate angle for your writing hand.
- Hold the top or outer edge of the paper with your non-writing hand.
- Set the pen in a light tripod grip, or in your comfortable variation of it.
- Take one relaxed breath before writing.
Write one ordinary line at your natural pace. Do not try to improve letterforms yet.
Next six minutes: compare two paper angles
Write the same short sentence three times:
Keep the hand loose and the page steady.
For the first line, use your normal paper angle. For the second, use the recommended angle. For the third, adjust that recommended angle slightly in whichever direction makes the wrist feel more natural.
After each line, notice only three things:
- Did your hand tighten before the line ended?
- Did the paper stay still without being held down by the writing hand?
- Could your forearm travel along the line without a sharp wrist bend?
Choose the angle that gives the calmest movement, not necessarily the most dramatic tilt.
Final six minutes: practise resetting, not gripping
Copy four to six short lines from any nearby book, article, or notes. At the start of every line, use the same small routine:
- feet supported;
- shoulders lowered;
- page angled;
- non-writing hand steadying the page;
- pen held lightly.
If your fingers tense during a line, do not restart or criticize the line. Finish the word if comfortable, pause, loosen the grip, and begin the next line with the setup routine again. The skill you are building is the ability to detect and release tension early.
At the end, write a short note at the bottom of the page:
- Best paper angle: upright, slight tilt, or stronger tilt
- Grip cue that helped: for example, “soft thumb” or “do not whiten fingertips”
- One setup problem to solve next time: for example, chair too low, page too near the edge, or shoulders rising
This note is your personal setup recipe. Use it for the next several practice sessions before changing anything again.
When to adjust and when to seek help
Some discomfort from a long writing session can occur, particularly while changing an established habit. But sharp pain, numbness, persistent pain after writing, or pain that worsens should not be treated as something to practise through. Stop and consult an appropriate healthcare professional, such as a clinician or occupational therapist, for individual advice.
For ordinary technique changes, make one adjustment at a time. If you change chair height, paper angle, grip, and pen all at once, you will not know which change actually helped. Begin with paper position and tension, since those are usually easy to observe and reproduce.
Key takeaways
A useful handwriting setup is stable, comfortable, and repeatable:
- Support your feet, sit at a workable distance from the desk, and let your shoulders remain low.
- Use a relaxed tripod grip as a starting point, but judge a grip by comfort, endurance, and legibility rather than appearance alone.
- Hold the pen firmly enough to make a clear mark, not tightly enough to flatten your fingers or indent the paper.
- Angle the paper toward the writing hand, keep it back from the desk edge, and steady it with the non-writing hand.
- When tension appears, pause, release it, and reset at the next line rather than forcing your way through it.
Next, you will use this setup to practise the simplest movements behind handwriting: straight strokes, curves, ovals, and loops with even pressure and a steady rhythm.
Can't find a good explanation? Sign up and we'll make it for you
Sign up