
Good to see you again. In the previous lesson, you turned a broad social-app feature into a small vertical slice and independently checkable coding tasks. That planning work gives your commands a purpose: soon, you will use the terminal to move into the folder for one of those tasks and start the app or a check script.
This lesson introduces that working environment. You will learn how to identify your current folder, inspect its contents, move safely between folders, and understand how a project script is run. Plan for about 35–45 minutes. Node.js is configured in the next lesson, so the script-running section establishes the workflow you will use once npm is available.
The terminal: a text-based way to work in a folder
A terminal is a place to type commands for your computer. On Windows, Visual Studio Code commonly opens a PowerShell terminal. It may look unfamiliar at first, but most everyday use follows a small routine:
- Check where you are.
- List what is in that folder.
- Move into the folder you need.
- Run the command intended for that project.
The folder you are currently “standing in” is called the current working directory. This is crucial because a command usually applies to that folder.
For example, npm run start is meaningful only when you run it in the folder containing the app’s package.json file. If you run it from the wrong folder, the terminal cannot know which project you mean.
Terminal Basics - Visual Studio Code
Read Visual Studio Code’s short “Terminal Basics” guide to see how the integrated terminal relates to the folder open in the editor.
In the “Terminal Basics” introduction, read the opening explanation. Then find the “Working directory” section and read the default-folder rule. Focus on the idea that the VS Code Explorer and terminal should normally point to the same project folder.
Open the integrated terminal in VS Code
When you have a folder open in VS Code:
- Select Terminal then New Terminal from the menu, or
- Press **Ctrl +
**. The backtick key is usually to the left of the1` key.
A panel opens near the bottom of the VS Code window. You should see a prompt similar to:
PS C:\Users\YourName\Documents\social-app-learning>
The exact path will differ. The important part is that it tells you your current location. Do not type the PS, the path, or the final > yourself. Type only after the prompt.
If VS Code asks whether you trust the folder, read the folder name carefully and trust it only if it is a folder you created or recognize. VS Code can block terminals in untrusted workspaces as a safety measure.
Three commands for finding your way
For this course, use PowerShell in the VS Code terminal. The following commands are the core navigation set.
| Command | Meaning | Example |
|---|---|---|
pwd | Print the current working directory. | pwd |
dir or ls | List the files and folders in the current directory. | dir |
cd folder-name | Change into a child folder. | cd social-app |
cd .. | Move up to the parent folder. | cd .. |
In PowerShell, dir and ls both list a folder’s contents. Use whichever feels more memorable. This course will often use dir because it is familiar on Windows, while you will also encounter ls in tutorials and project documentation.
Relative paths and full paths
A path is an address for a file or folder.
A relative path is interpreted from your current location. Suppose you are in:
C:\Users\YourName\Documents
and dir shows a folder named social-app-learning. You can enter it with:
cd social-app-learning
You can return one level with:
cd ..
An absolute path gives the full address from the drive letter:
cd "C:\Users\YourName\Documents\social-app-learning"
Use quotation marks when a folder name contains spaces, such as My Projects. Quoting a path is harmless even when it has no spaces, and it prevents a common error.
The terminal does not guess what you intended. Before moving into a folder, list the current folder with dir and copy its spelling exactly. A folder name and a file name are different: cd works with folders, not with a file such as package.json.
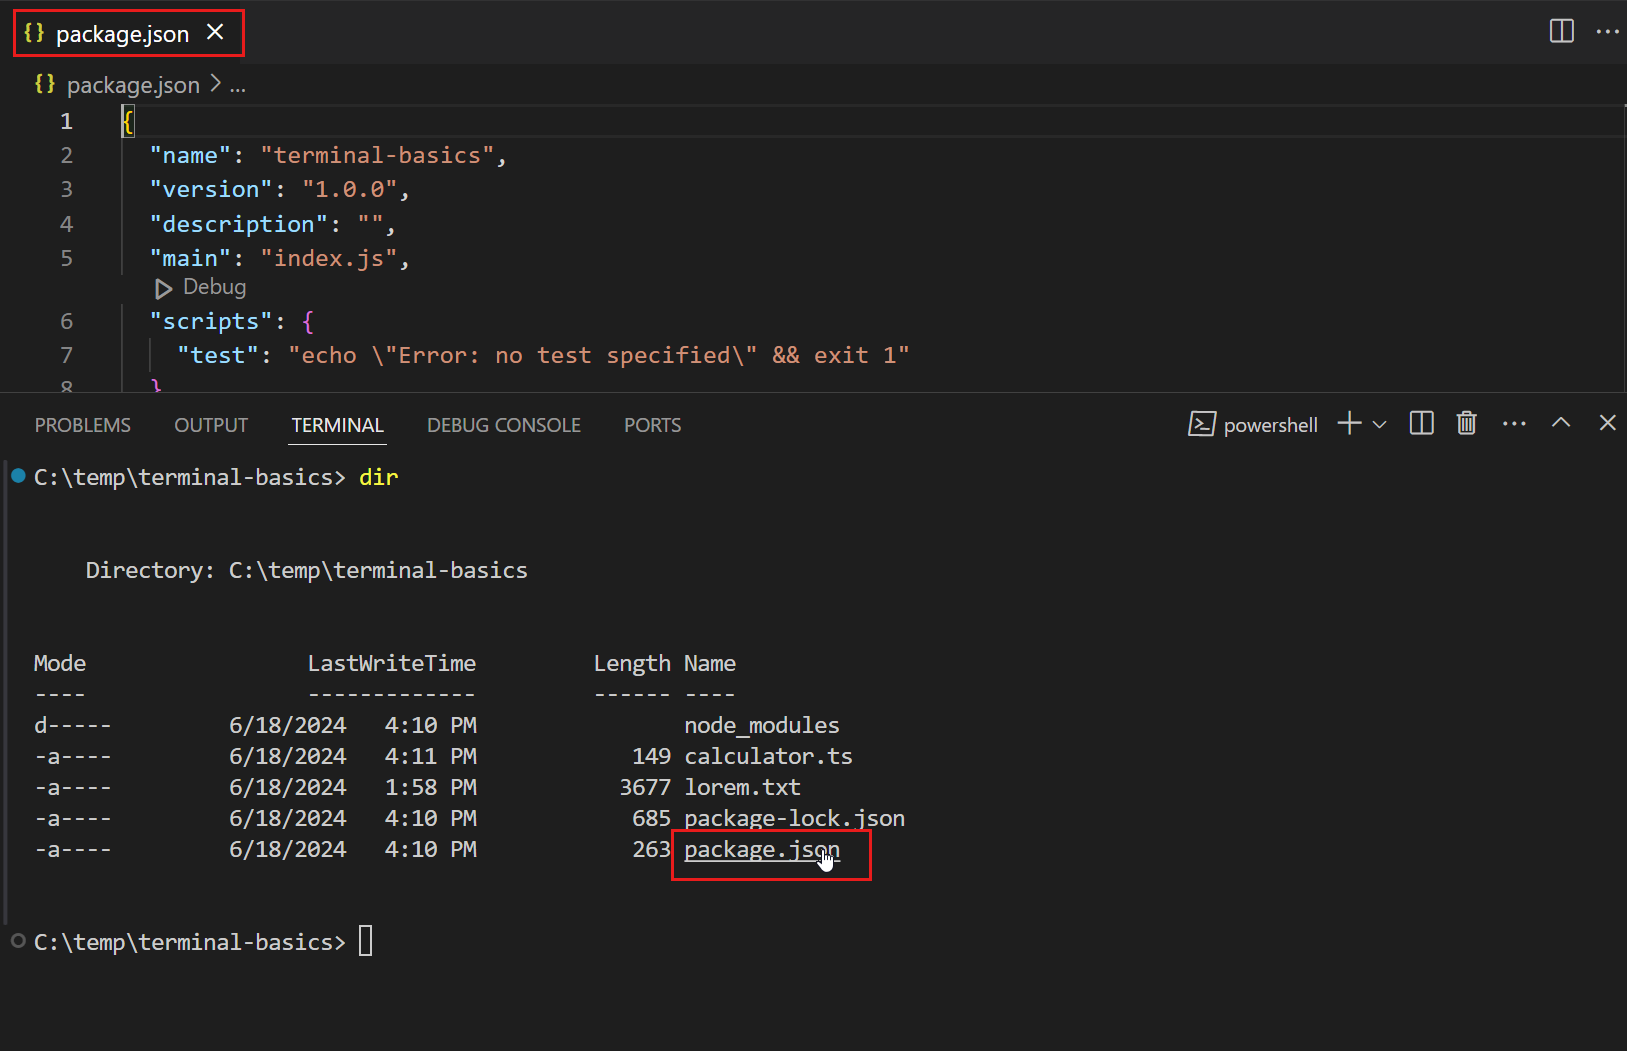
The image demonstrates a useful habit: the terminal output and VS Code’s Explorer are two views of the same project folder. In a future app project, dir should show files such as package.json, and the Explorer should show them too.
Small keyboard habits that save time
You do not need to type every long path perfectly.
- Press Tab after typing the first part of a folder name to complete it. Press Tab again if more than one item has the same beginning.
- Press the Up Arrow to bring back your previous command. This is useful when you want to rerun a script.
- Press Ctrl + C to stop a development server that is actively running. Do not use it merely to copy text while a server is running; it tells the server to stop.
Guided terminal drill
Do this with a harmless practice folder, not a system folder such as C:\Windows.
1. Open a known folder
In File Explorer, create or choose a folder in Documents called social-app-learning. Open that folder in VS Code with File then Open Folder.
Open a new terminal with Ctrl + `. It should start in that folder. Confirm by typing:
pwd
You should see a path ending in social-app-learning.
2. Inspect the folder
Run:
dir
The output may be sparse if the folder is new. That is fine. The point is to establish the pattern:
diranswers: “What is here?”
3. Create one practice folder and enter it
Run the following commands one at a time:
mkdir terminal-practice
cd terminal-practice
pwd
mkdir means “make directory.” It creates a folder. If you see an error saying that terminal-practice already exists, do not worry; simply continue with cd terminal-practice.
The last command should show a path ending in:
social-app-learning\terminal-practice
Now ask what is in this new folder:
dir
4. Return to the parent folder
Run:
cd ..
pwd
dir
You should now be back in social-app-learning, and dir should list terminal-practice.
Leave the practice folder in place. It gives you a safe location for later terminal experiments. At this stage, avoid commands that delete files or folders. A strong basic habit is to navigate and inspect first, rather than treating the terminal as a place to guess.
A recovery routine for navigation errors
If a command says that a path cannot be found:
- Run
pwdto confirm where you are. - Run
dirto see the exact names available there. - Use
cd ..if you are one level too deep. - Use Tab completion rather than retyping a long name.
- Use a quoted full path when necessary.
This is more reliable than repeatedly changing commands at random.
Project scripts: named jobs stored in package.json
A JavaScript or TypeScript project normally has a file named package.json. Think of it as a small project information file. Among other things, it can define scripts: short, memorable names for commands the project needs to run.
A script might start a development server, run tests, check formatting, or build a release version. The script’s name is chosen by the project, so there is no universal command such as “always type npm run dev.”
The general workflow is:
- Navigate into the project folder.
- Confirm that
dirshowspackage.json. - Open
package.jsonand inspect its"scripts"section. - Run the script by name with
npm run script-name.
For example, if a project has a script named dev, you would run:
npm run dev
If it has a script named test, you would run:
npm run test
The name after npm run must match a name listed under "scripts" in that specific project.
Watch Kevin Powell’s “npm for absolute beginners” for a visual demonstration of moving through folders and then running a named npm script. The project tool in the video is Vite, not the Expo app you will create later, but the terminal workflow is the same.
Watch folder navigation to see cd, cd .., and navigating to a deeper folder. Notice the distinction between the location shown by the terminal and the folder the presenter wants to reach. Then watch running a script for the npm run pattern. Treat dev as an example script name, not a command to copy into every future project.
Why the current folder matters for scripts
Imagine that your future app lives here:
C:\Users\YourName\Documents\social-app-learning\social-app
If you open the terminal in social-app-learning, then you are one level above the project. First enter the app folder:
cd social-app
Then verify the project file is there:
dir
Only after you can see package.json should you run a script such as:
npm run start
The order matters. Running a script from the wrong folder is like trying to publish a post without specifying which account or which app it belongs to: there is not enough context.
What you can expect before Node.js is installed
The next lesson configures Node.js and npm. Until then, if you type an npm command, PowerShell may report that npm is not recognized. That does not mean you have navigated incorrectly; it means the Node.js tools are not installed or not yet available in the terminal.
For today, your success criteria are simpler:
- You can open VS Code’s integrated terminal.
- You can use
pwdto identify the current folder. - You can use
dirto inspect it. - You can use
cd folder-nameandcd ..to move through it. - You understand that
npm runexecutes a script defined by the current project’spackage.json.
A repeatable routine for future app sessions
When you return to the social-app project, use this brief startup checklist:
pwd
dir
Read the result before doing anything else. If the displayed folder is not your project folder, navigate to it with cd. If dir does not show package.json, you are not yet in the correct project root.
Once Node.js is installed and a project exists, your standard development sequence will be:
cd "path-to-your-project"
dir
npm run script-name
Replace path-to-your-project with your actual folder path and script-name with a name listed in that project’s scripts. Keep the terminal open while a development server is running. You can open another terminal in VS Code later if you need a separate place to run a different command.
Key takeaways
The terminal works relative to your current working directory. Use pwd to see where you are, dir or ls to inspect the current folder, cd folder-name to enter a folder, and cd .. to go back one level.
A project script is a named command defined in package.json. Before running one, navigate to the project root and confirm that dir shows package.json. Then run the exact script name with npm run script-name.
Next, you will configure Node.js, Visual Studio Code, Git, and Expo on Windows. That setup will make the npm commands introduced here usable for your own cross-platform social-app project.
Can't find a good explanation? Sign up and we'll make it for you
Sign up