
Welcome back. In the previous lesson, you installed and verified Node.js, VS Code, Git, and Expo Go. You also practiced the key terminal habit for every project: check where you are before running commands.
Today you will create the first codebase for your social app and open it in a desktop web browser. This is not yet a public website or a finished social platform. It is a local development version running on your own laptop, but it establishes the project that you will gradually turn into a cross-platform app.
Allow roughly 40–50 minutes, including the initial download of project packages.
What Expo creates for you
An Expo project is a React Native application set up to run from one shared codebase on multiple platforms. In this course, that will eventually mean:
- a web app for PCs and laptops;
- an Android app you can test on your phone;
- an iOS build later, using cloud build tools because you develop on Windows.
The starter project already includes configuration files, installed packages, TypeScript support, and example screens. You do not need to understand all those files today. Your goal is to create the project successfully, recognize its important parts, and run it in a browser.
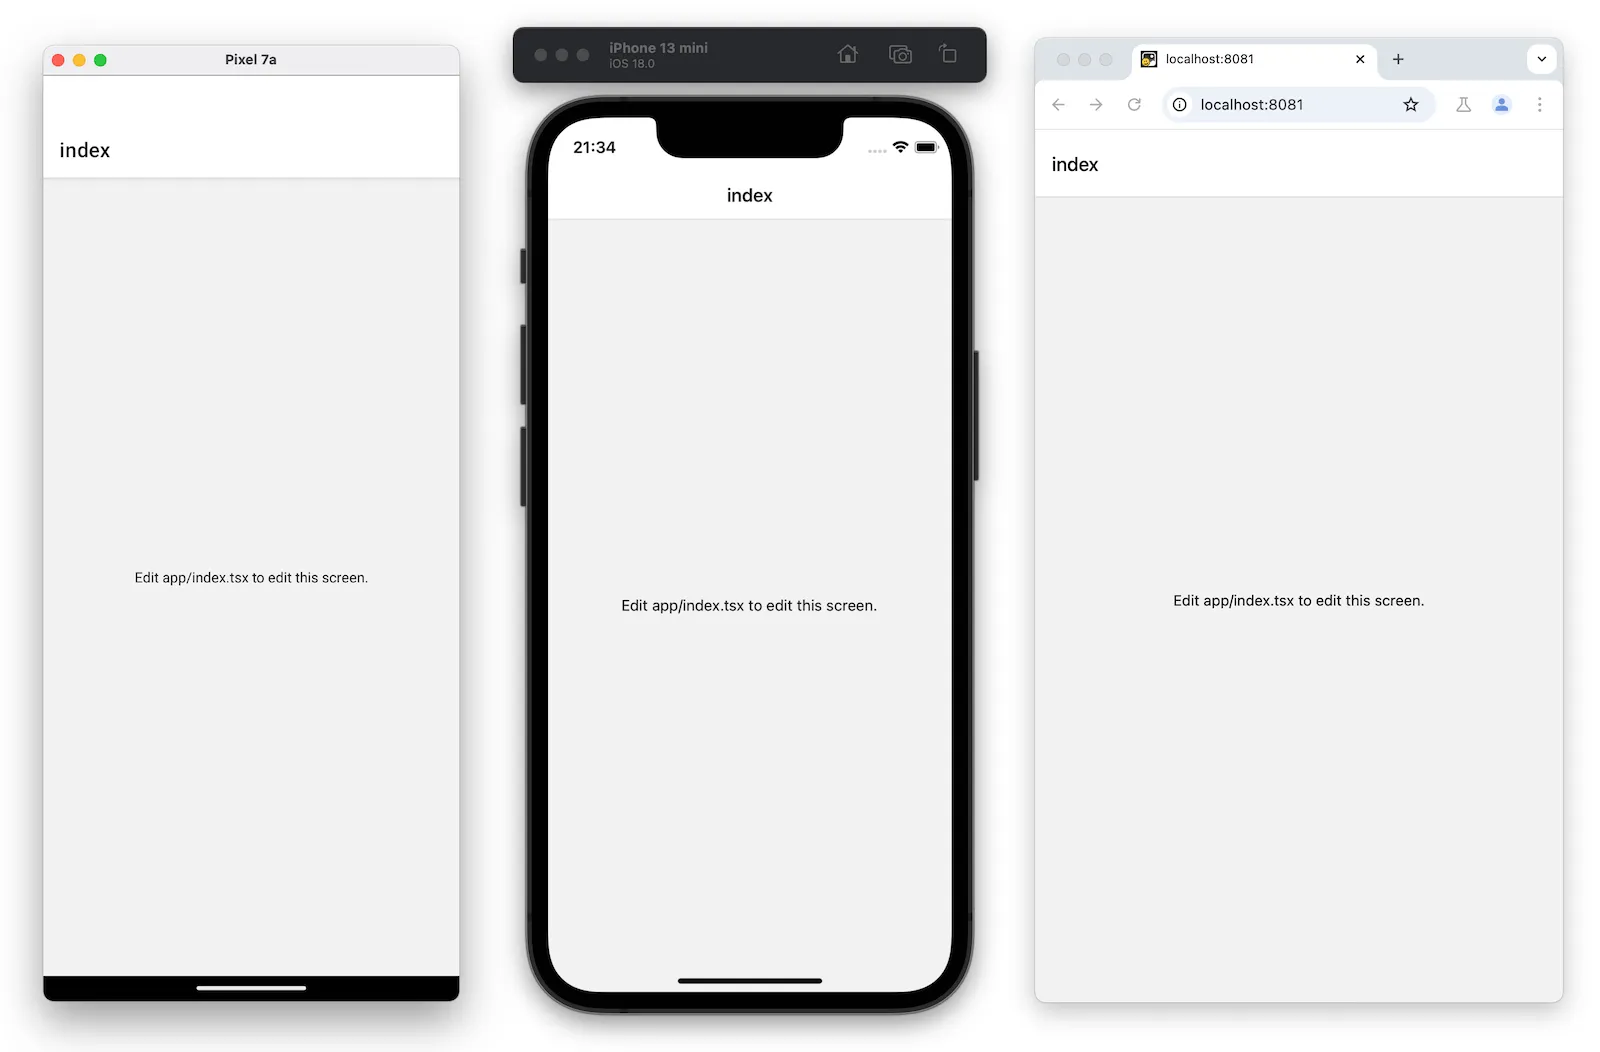
Expo’s official documentation calls this starter a “default project.” It is a useful starting point because it comes with the basic tools and structure needed for web and mobile development.
Create your first app - Expo Documentation
Read the relevant parts of Expo’s official tutorial before creating the project. It introduces the default template, explains why it includes TypeScript and Expo Router, and shows the development-server workflow you will use today.
In the section “Initialize a new Expo app,” read the template explanation. Look at the terminal command shown there, but do not run the tutorial’s project name or its later reset script. Then go to “Run the app on mobile and web.” Read the launch procedure, including the terminal block and the numbered instructions beneath it. Today you will use the web-browser part only; Android testing is the next lesson.
A small compatibility choice matters here. The course will use Expo Go on your physical Android device soon, so we will explicitly create an SDK 54 project. Expo Go must support the SDK version of the app it opens.
Create the project folder
Open VS Code and open your workspace folder from the previous lesson:
Documents\social-app-learning
Then open a fresh terminal with Terminal, then New Terminal.
First, confirm that the terminal is in your workspace folder:
pwd
If it is not, move there:
cd "$HOME\Documents\social-app-learning"
Now create the Expo project. Type this command exactly, then press Enter:
npx create-expo-app@latest social-app --template default@sdk-54
Let’s break down what that command means:
| Part | Meaning |
|---|---|
npx | Runs a development tool without you installing an old global Expo CLI. |
create-expo-app@latest | Gets the current project-creation tool. |
social-app | The new project folder’s name. It will be created inside social-app-learning. |
--template default@sdk-54 | Requests Expo’s default starter template compatible with the SDK version we are using for Expo Go. |
The first run may ask permission to install the project-creation tool temporarily. If you see a prompt such as “Need to install,” type:
y
Then press Enter.
While the command runs
The creator downloads packages and writes many files. It may take several minutes, depending on your connection. A busy-looking terminal is normal. Do not close it while downloads or installation messages are still appearing.
When it completes, you should have a new folder named social-app.
If the terminal says that the social-app directory already exists, do not delete it blindly. It may contain work from an earlier attempt. Instead, either inspect it first or create a differently named empty project folder, such as:
npx create-expo-app@latest social-app-starter --template default@sdk-54
If you use a different name, substitute that name in every later command.
Open and inspect your new project
Enter the new project folder:
cd .\social-app
Now confirm your location and list its files:
pwd
dir
You should see a collection of files and folders. The exact list can vary as Expo updates its templates, but several items have stable roles:
| Item | Role today |
|---|---|
package.json | Describes the project, its installed packages, and scripts such as the command used to start it. |
app | Holds screen files for the app. You will learn this file-based routing structure later. |
assets | Holds images, fonts, and similar static files. |
node_modules | Contains downloaded package code. Do not edit files here. |
tsconfig.json | Configures TypeScript for this project. |
A filename ending in .ts contains TypeScript. A filename ending in .tsx contains TypeScript plus React interface markup. The default project is therefore a TypeScript starter app even though you have not written any TypeScript yourself yet.
Open this project as its own VS Code workspace:
code .
Here, the dot means “the current folder.” If code . is not recognized on your laptop, use File, then Open Folder, and choose:
Documents\social-app-learning\social-app
In VS Code’s Explorer panel, locate package.json, app, and assets. Merely inspect them for now. Avoid deleting or reorganizing files: the starter is working code, and understanding its structure will come gradually.
The official Expo video provides a quick visual walkthrough. It is recorded on macOS, but the project-creation idea and the Expo workflow are the same; use the PowerShell commands in this lesson on Windows.
How to create your first Expo app | Universal App tutorial #1
Watch Expo’s “How to create your first Expo app | Universal App tutorial #1” for a brief visual view of creating a project, opening its folder in VS Code, and launching the web version.
Watch project creation to see the project folder being generated and entered from a terminal. Continue with opening the folder to see why the editor must open the newly created project directory. Finally, watch web launch, focusing on the use of the W keyboard shortcut after the Expo development server is running.
Start the Expo development server
In VS Code, make sure your terminal is still inside the social-app folder. You can verify with:
pwd
The displayed path should end with:
social-app
Now start Expo:
npx expo start
This command starts a development server. In practical terms, it is a program running on your laptop that prepares your app for testing and watches for changes while you work.
After a short wait, the terminal should display Expo information, including a QR code and a list of keyboard shortcuts. The terminal may look “stuck,” but that is correct: the server is actively running.
With that same terminal selected, press:
w
Use the lowercase letter w; do not type it into a new PowerShell prompt. Expo should build the web version and open your default browser.
What you should see
Your browser should open a page whose address begins with localhost. The port number may vary, so do not worry if it differs from examples online.
The screen itself may show a simple starter interface, tabs, an “index” screen, or an Expo welcome screen, depending on the exact default template version. What matters is this:
- the page is served from
localhost; - it displays an Expo starter app rather than a browser error;
- the terminal reports that the web build completed;
- the terminal remains running.
A localhost address means the app is accessible only on your own laptop. It is not deployed to the public internet and cannot yet be opened by other people. Later in the course, you will create a production web build and deploy it properly.
Understand the development loop
You have now used the basic loop that will support most of your project work:
- Open the project folder in VS Code.
- Start Expo from that project’s terminal with
npx expo start. - Press
wto open the web version. - Keep the terminal server running while you test.
- Eventually, edit code and save it; Expo will usually refresh the browser automatically.
This automatic update behavior is often called Fast Refresh. You do not need to use it yet, but it is why development with Expo can feel immediate: change a screen file, save, and observe the result in the browser.
When you are finished testing, return to the terminal that runs Expo and press:
Ctrl+C
If Expo asks whether to stop the process, confirm it. After stopping the server, the browser page at localhost will no longer work until you run npx expo start again. That is expected.
If something does not work
Most first-run problems have a straightforward cause. Work through the relevant check rather than installing random packages or copying commands from unrelated tutorials.
npx or node is not recognized
This indicates that Node.js is not available in the current terminal session. Close VS Code completely, reopen it, create a new terminal, and run:
node --version
npx --version
If those still fail, restart Windows and repeat the checks from the previous lesson.
Expo says it cannot find a project
You probably ran npx expo start from the wrong folder. Stop the command with Ctrl+C, then run:
pwd
dir
The folder must contain package.json. If you are in social-app-learning, enter the project folder:
cd .\social-app
Then run:
npx expo start
The browser does not open after pressing w
Keep the Expo terminal running and press w again while its terminal has focus. If it still does not open automatically, look in the terminal output for the local web address and open that address manually in your browser.
A browser page opens but shows an error
First, read the terminal output above the prompt for the first meaningful error message. Then stop Expo with Ctrl+C and start it again:
npx expo start
Do not delete node_modules or change configuration files during a first troubleshooting attempt. Restarting from the correct project folder resolves many setup issues.
Completion check
This lesson is complete when you can truthfully check all of these:
- A
social-appfolder exists insideDocuments\social-app-learning. - VS Code is opened on that project folder.
- The project contains
package.jsonand TypeScript configuration. -
npx expo startruns successfully from the project folder. - Pressing
wopens the starter app in a desktop browser. - You understand that
localhostis a development version running on your own laptop. - You can stop the development server with
Ctrl+C.
Key takeaways
You created a real Expo TypeScript project rather than a single loose file. The default template provides a working foundation: packages, TypeScript configuration, starter screens, and a structure that can later support navigation and your social-app features.
You also ran the app’s local development server with npx expo start and launched its web version by pressing w. Keep the distinction clear: the browser version is a fast local testing environment, not a public deployment.
Next, you will run this same starter project on your physical Android device using Expo Go.
Can't find a good explanation? Sign up and we'll make it for you
Sign up