Hello! Welcome back to our module on Efficient AI: Deployment and Optimization.
In our last lesson, you mastered the low-level essentials of running LLMs locally. You took a model from Hugging Face, built the llama.cpp engine from source, and manually converted, quantized, and deployed it as a GGUF file. This gave you a fundamental understanding of the entire pipeline.
While that process provides maximum control, it's not always the most efficient for day-to-day use. Today, we'll explore powerful, user-friendly tools that abstract away that complexity. These tools act as sophisticated wrappers around engines like llama.cpp, providing streamlined interfaces for managing and interacting with local models.
Your learning outcome for this lesson is to: Set up local inference servers using tools like Ollama and text-generation-webui.
We will cover two of the most popular tools in the local AI ecosystem:
- Ollama: A minimalist, API-first tool that makes running LLMs as a backend service incredibly simple.
- text-generation-webui: A feature-rich, browser-based UI that provides a comprehensive "cockpit" for interacting with and managing local models.
By the end of this lesson, you'll be able to choose the right tool for your needs, whether it's for programmatic integration into your applications or for deep, interactive experimentation.
1. Ollama: The "It Just Works" Inference Server
Ollama has gained immense popularity by simplifying local LLM inference down to a few simple commands. It bundles llama.cpp, a model registry, and a server into a single, polished application.
The Complete Guide to Ollama: Local LLM Inference Made ...
To start, let's get a high-level overview of what Ollama is and its core value proposition. The article 'The Complete Guide to Ollama' from Multimodal AI provides an excellent introduction.
Please read the following sections: 'What is Ollama, and why does it matter': This section outlines the key benefits: Privacy, Accessibility, Customization, and Quantization. 'The High-Level Architecture': This is a crucial section that connects directly to our previous lesson. Pay close attention to Figure 4 and Figure 5, which show how Ollama acts as an abstraction layer on top of the llama.cpp and GGUF pipeline you've already learned. This demystifies what Ollama does under the hood.
As you read, the key takeaway is that Ollama isn't a new inference engine; it's a beautifully designed orchestrator. When you run a model, it handles downloading the correct GGUF file and starting a llama.cpp process in the background, exposing it through a clean API.
Installation and Core Commands
Let's get Ollama up and running. The process is remarkably straightforward.
Learn Ollama in 15 Minutes - Run LLM Models Locally for FREE
This video from Tech With Tim will guide us through the entire process of installing Ollama and using its core features. We'll start with installation and running your first model.
Watch the following segments: Installation (00:29 - 01:36): Follow the steps to download and install Ollama for your operating system. Note that after installation, it runs as a background service. Running Models (01:36 - 04:22): This part shows how to find models on the Ollama library, and use the ollama run <model_name> and ollama list commands. Compare this one-command approach to the multi-step conversion and quantization process from the previous lesson.
Interacting with the Ollama Server API
The real power of Ollama for a developer is its built-in HTTP server. By default, it runs on http://localhost:11434 and provides an OpenAI-compatible API. This means you can integrate local models into your Python applications using the same patterns you would for calling GPT-4.
Learn Ollama in 15 Minutes - Run LLM Models Locally for FREE
Now, let's see how to interact with this server programmatically. The next part of the video demonstrates this from first principles, which should resonate with your software engineering background.
Watch these two segments to understand programmatic interaction: Manual API Request (06:41 - 10:13): Pay attention to how a request is constructed manually using Python's requests library. This shows there's no magic—it's just a standard REST API. Using the Python Package (10:13 - 11:12): This demonstrates the official ollama Python package, which provides a convenient client for the API. This is the recommended way for most projects.
Here is a quick example of using the OpenAI client with Ollama, which you'll find very familiar:
import openai

# Point the OpenAI client to the Ollama server
client = openai.OpenAI(
    base_url='http://localhost:11434/v1',
    api_key='ollama' # required, but can be any string
)

response = client.chat.completions.create(
    # 'llama3' is an example, this should be a model you've pulled with 'ollama pull'
    model='llama3',
    messages=[
        {"role": "system", "content": "You are a helpful assistant."},
        {"role": "user", "content": "Explain the importance of the GGUF format for local LLMs."},
    ]
)

print(response.choices[0].message.content)
Customizing Models with Modelfiles
Ollama also allows for customization through Modelfiles, which are conceptually similar to a Dockerfile. You can use them to define a new model variant with a specific system prompt, parameters, or even a custom template.
Learn Ollama in 15 Minutes - Run LLM Models Locally for FREE
To wrap up our look at Ollama, let's see how to create custom model configurations using a Modelfile.
Watch the final segment on Modelfiles (11:12 - 13:44). This will show you how to define a system prompt and other parameters to create a new, custom model entry that you can run with ollama run.
This feature is particularly useful for creating specialized agents or ensuring consistent behavior without having to inject a large system prompt into every API call.
2. text-generation-webui: The Power User's Cockpit
If Ollama is the minimalist's choice for a backend server, then oobabooga/text-generation-webui is the maximalist's choice for an all-in-one interactive environment. It provides a highly configurable Gradio web interface with extensive support for different models, loaders, and extensions.

Text Generation Web UI GitHub Repository
Let's start by looking at the feature set of text-generation-webui. Its GitHub repository README gives a great summary of its capabilities.
Read the 'Features' section on the main page of the repository. Note the wide range of supported backends (including llama.cpp), multimodal (vision) capabilities, and the built-in extension system. This tool is designed for experimentation and control.
Installation and Setup
The installation for text-generation-webui is more involved than Ollama's, as it requires setting up a dedicated Python environment and dependencies. This gives you more control but requires more initial effort.
How To Install TextGen WebUI - Use ANY MODEL Locally!
The following video from Matthew Berman provides a detailed walkthrough of the manual installation using Conda. Given your background, this detailed approach is valuable as it covers common pitfalls and GPU-specific configurations.
Follow the installation process shown in the video, which covers: Conda Environment Setup (00:36 - 02:15): Creating a Conda environment and installing PyTorch. Cloning and Dependencies (02:06 - 02:53): Cloning the repository and installing requirements. GPU Configuration & Troubleshooting (02:53 - 05:07): This section is particularly useful, as it shows how to resolve common dependency and CUDA errors. Even if you don't encounter these specific issues, seeing the troubleshooting process is instructive.
Running the Server and Loading Models
Once installed, you can launch the UI and start loading models. It supports various formats, including the GGUF models we worked with in the last lesson.
How To Install TextGen WebUI - Use ANY MODEL Locally!
With the environment set up, let's launch the server and load a model.
Watch the final parts of the video: Starting the Server & Downloading Models (04:56 - 07:11): See how to start the server with python server.py and the three methods for downloading models from Hugging Face. Exploring the UI (07:04 - 09:29): Get a quick tour of the key settings, such as prompt templates, interface modes (chat vs. instruct), and the parameters tab. This gives you a sense of the fine-grained control available.
Test your understanding!
You have downloaded a GGUF model file named my-awesome-model-Q5_K_M.gguf. Where should you place this file so that text-generation-webui can find and load it?
Show answer
You should place the single GGUF file directly inside the text-generation-webui/user_data/models/ directory. After placing it there, you need to click the refresh button in the 'Model' tab of the UI to make it appear in the model list.
3. Comparing the Tools: Which One to Use?
Ollama and text-generation-webui are both fantastic tools for running local LLMs, but they serve different primary use cases.
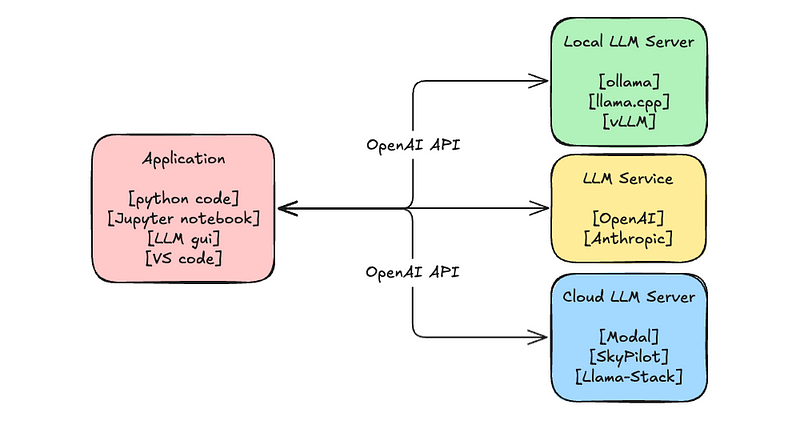
Here's a breakdown to help you decide when to use which:
Use Ollama when:
- You need a reliable, lightweight backend service for an application.
- You prefer a simple, clean command-line interface.
- You are working in a containerized environment (Ollama has an official Docker image).
- Your primary goal is programmatic access via an API.
Use text-generation-webui when:
- You want a rich, interactive chat experience with lots of configurable parameters.
- You are experimenting with different models, loaders, and prompt formats.
- You need to use extensions for advanced functionality like Text-To-Speech (TTS), image generation, or web search.
- You want a graphical interface for managing models and fine-tuning settings.
Ultimately, these tools are not mutually exclusive. Many developers use Ollama for stable application backends and text-generation-webui for research, testing, and creative exploration. Both tools allow you to run any compatible model, including uncensored ones, free from external content moderation, which will be relevant for our future lessons on specialized generation.
Conclusion
You have now moved up the stack from the low-level mechanics of llama.cpp to the high-level, user-friendly interfaces of Ollama and text-generation-webui. You are now equipped to quickly and efficiently run virtually any open-source LLM on your local machine.
Key Takeaways:
- Ollama provides a minimalist, API-driven solution for running LLMs as a background service. Its simplicity and OpenAI-compatible API make it ideal for application development.
- text-generation-webui offers a comprehensive, feature-rich graphical interface for deep interaction and experimentation with LLMs, acting as a control panel for power users.
- Both tools are powerful abstractions over underlying inference engines like
llama.cpp, automating the process of downloading, loading, and serving models. - Choosing the right tool depends on your primary goal: streamlined API access (Ollama) versus interactive experimentation and control (text-generation-webui).
Preview of the Next Lesson:
In the last two lessons, we've focused on inference—running pre-trained models efficiently. Now, we will shift our focus back to the other side of the equation: training. Training large models presents its own unique set of hardware challenges. In the next lesson, you will learn to "Apply mixed-precision training and gradient accumulation for training large models on limited hardware", two essential techniques for fitting large-scale training jobs onto consumer-grade GPUs.