Hello! Let's dive into the next lesson in our module on Efficient AI: Deployment and Optimization.
In our previous lessons, we explored two powerful strategies for creating more efficient models. We started with quantization, which shrinks a model's weights after training. Then, we moved to knowledge distillation, which trains a smaller "student" model to mimic a larger "teacher" model. Both approaches aim to make large models more manageable.
Today, we'll focus on the final, crucial step: deploying these models on ubiquitous hardware. Your powerful models are only useful if they can be run where they are needed, and often, that means running them without a high-end GPU. This lesson tackles how to make LLMs accessible on standard CPUs.
Your learning outcome for this lesson is to: Convert and deploy models in GGUF format for CPU-based inference using llama.cpp.
We will cover the entire workflow, from building the necessary tools to running your own local AI model:
- An introduction to
llama.cppand the GGUF model format. - The full pipeline: building
llama.cpp, converting a standard model to GGUF, and quantizing it for efficiency. - Deploying the model through both a command-line interface and a local web server.
- A deeper look into the GGUF format and its advanced quantization schemes.
1. The Tools for CPU Inference: llama.cpp and GGUF
While powerful GPUs are the standard for training and large-scale inference, running models locally for personal use, development, or in resource-constrained environments often requires leveraging the CPU. This is where llama.cpp shines.
llama.cpp: The Ultimate Guide to Efficient LLM Inference
To understand the role of llama.cpp and its dedicated file format, GGUF, let's start with the article 'llama.cpp: The Ultimate Guide to Efficient LLM Inference' from PyImageSearch. It provides a great overview of what these tools are and why they are so effective.
Please read the following sections: Understanding llama.cpp: This section introduces the library, its purpose, and its creator, Georgi Gerganov. Unique Selling Point (USP) of llama.cpp: Pay attention to the key advantages listed here, particularly its efficiency on CPUs and cross-platform support. What Is the llama.cpp Model File Format?: This is a crucial section. Focus on understanding the characteristics of the GGUF (GPT-Generated Unified Format), such as its single-file nature and built-in support for quantization.
To summarize the key points from your reading:
llama.cppis a high-performance C++ library designed for running large language models with minimal resources. Its primary advantage is its exceptional performance on CPUs, but it can also leverage GPUs (NVIDIA, Apple, AMD) when available. It's the engine that will run our model.- GGUF is the file format
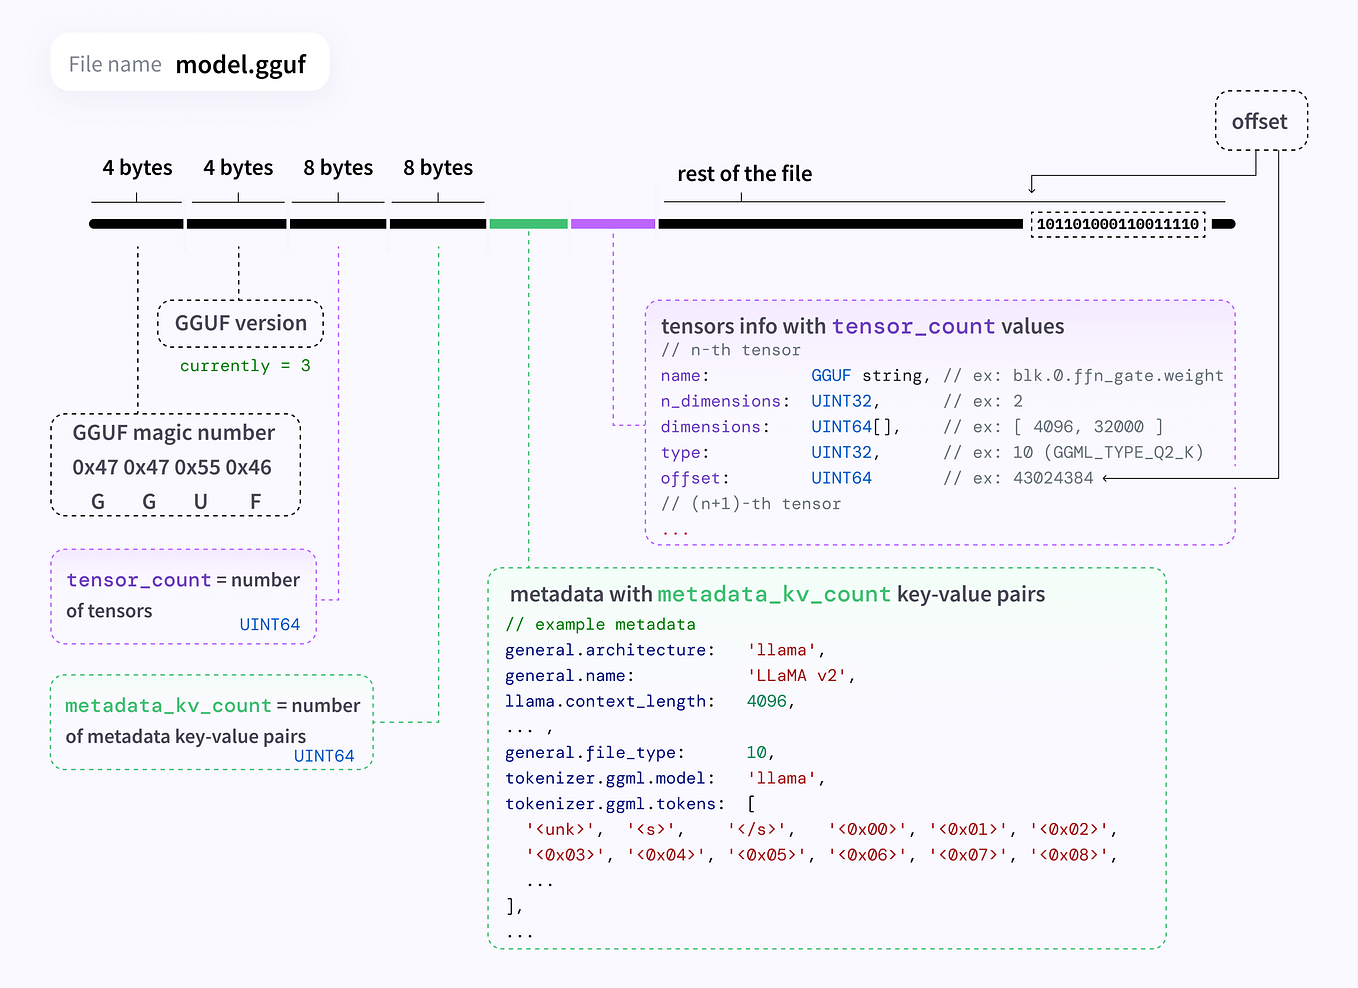
llama.cppuses. Its main innovation is bundling the model weights, tokenizer, and all necessary metadata into a single, portable file. This is a significant improvement over formats likesafetensors, where you have to manage separate files for the model and its tokenizer. GGUF is specifically designed to support the quantization techniques that make CPU inference practical.
2. The End-to-End Workflow: From Hugging Face to Local API
Now, let's walk through the complete process of taking a standard model from Hugging Face and preparing it for local CPU inference with llama.cpp. This workflow involves compiling llama.cpp itself, converting the model, and quantizing it.
The following video provides an excellent, comprehensive walkthrough of this entire process. We will follow its structure, and you can refer to it for a live demonstration of these steps.
How to Run Local LLMs with Llama.cpp: Complete Guide
The video 'How to Run Local LLMs with Llama.cpp: Complete Guide' by the channel pookie demonstrates every step we're about to take. We'll use it as our primary guide for the practical implementation.
This video is quite comprehensive. For now, just watch the introduction (00:00 - 05:24) to get a feel for what llama.cpp is and how it compares to other tools like Ollama or VLLM. We will refer to specific parts of this video as we go through each step below.
Step 1: Build llama.cpp from Source
Since llama.cpp is a C++ project, the first step is to compile it. This process creates the executable tools we'll need for conversion, quantization, and inference.
How to Run Local LLMs with Llama.cpp: Complete Guide
Let's build llama.cpp. The video guide walks through this process clearly.
Please watch the following sections: Cloning and Building (05:24 - 13:46): Follow the steps to clone the llama.cpp repository from GitHub. Pay attention to the build process. While the video uses make, you can also use cmake, which is a more modern standard. The prerequisites mentioned (C++ compiler, CMake) are essential. Python Environment Setup (13:46 - 19:32): The video explains why a Python environment is needed for the utility scripts. Follow along as it sets up a virtual environment and installs the required packages from requirements.txt.
Here's a summary of the build process using cmake, which is a robust alternative to the make commands shown in the video:
- Prerequisites: Ensure you have
git,python, a C++ compiler (likeg++on Linux orclangon macOS), andcmakeinstalled. - Clone the repository:
git clone https://github.com/ggerganov/llama.cpp cd llama.cpp - Set up Python environment (for conversion scripts):
python3 -m venv .venv source .venv/bin/activate pip install -r requirements.txt - Configure and build with CMake:
# Create a build directory
cmake -B build

# Compile the project
cmake --build build --config Release
After the build completes, you will find all the necessary executables (like main, quantize, and server) inside the build/bin/ directory.
Step 2: Convert the Model to GGUF
Now that our tools are ready, we need a model to convert. We'll grab a model from Hugging Face in its original format (e.g., safetensors) and use a Python script from the llama.cpp repository to convert it into the base GGUF format.
How to Run Local LLMs with Llama.cpp: Complete Guide
The next step is converting a standard Hugging Face model to GGUF. Let's see how this is done in the video guide.
Watch the section on Model Conversion (41:05 - 45:25). The video demonstrates downloading a model from Hugging Face and then using the convert_hf_to_gguf.py script to perform the conversion. Notice that the resulting GGUF file is still very large.
The process is as follows:
- Download a model from Hugging Face. You can clone it using Git. Many models use
git-lfsfor large files, so ensure you have it installed (git lfs install).# Example using Llama-3.1-8B-Instruct git clone https://huggingface.co/meta-llama/Meta-Llama-3.1-8B-Instruct - Run the conversion script. Make sure your Python virtual environment is activated.
python convert.py path/to/your/huggingface/model/

# Or, specifying an output file as in the video
python convert_hf_to_gguf.py path/to/your/model --outfile model.gguf
This creates a GGUF file (e.g., ggml-model-f16.gguf). This file is in full or half precision (FP32/FP16) and is still too large for efficient CPU inference. This brings us to the next critical step.
Step 3: Quantize the GGUF Model
This is where we dramatically shrink the model. We'll use the quantize tool we compiled in Step 1 to convert the FP16 GGUF file into a lower-precision integer format (like 4-bit).
How to Run Local LLMs with Llama.cpp: Complete Guide
With our large GGUF file ready, it's time to quantize it. This step is where the magic happens for efficiency.
Watch the section on Quantization (45:25 - 48:35). The video uses the llama-quantize executable. Observe the command structure and the significant reduction in file size after quantization.
The command is straightforward. You specify the input file, the output file, and the desired quantization method. Q4_K_M is a popular choice that offers a good balance between size and quality.
# Navigate to the directory with the compiled tools if you aren't there
cd build/bin/

# Run the quantization
./quantize /path/to/your/large_model.gguf /path/to/your/quantized_model_Q4_K_M.gguf Q4_K_M
An 8B parameter model, which might be ~16 GB in FP16, will shrink to under 5 GB in this 4-bit quantized format, making it perfectly suited for running on a system with 8 or 16 GB of RAM.
Step 4: Run Inference
We have our optimized model! Let's run it. llama.cpp provides two main ways to do this:
A. Interactive Command-Line Interface (llama-cli)
This is perfect for quick tests and direct interaction.
How to Run Local LLMs with Llama.cpp: Complete Guide
Let's finally run our model! The simplest way is via the command-line interface.
Watch the section on Running Inference with the CLI (19:32 - 30:04). Focus on the basic command structure, especially the -m flag to specify the model and how to start an interactive session.
A typical command looks like this:
./main -m /path/to/your/quantized_model_Q4_K_M.gguf -p "Tell me a joke about a programmer." -n 128
-m: Specifies the model file.-p: The initial prompt.-n: The number of tokens to generate.
You can also run it in an interactive mode for a back-and-forth chat.
B. OpenAI-Compatible Web Server (server)
This is the most powerful method for application development. It exposes your local model through an API that mimics OpenAI's, allowing you to use any OpenAI-compatible client—including your own Python scripts.
The llama.cpp server is a fantastic tool. You can start it with a command similar to the CLI tool:
./server -m /path/to/your/quantized_model_Q4_K_M.gguf --ctx_size 2048
--ctx_size: Sets the context window size.
Once the server is running (by default on http://localhost:8080), you can interact with it using a Python script. Given your background, you'll see how easy this makes it to integrate a local LLM into any application.
import openai

# Point the client to your local server
client = openai.OpenAI(
    base_url="http://localhost:8080/v1",
    api_key = "sk-no-key-required" # The key can be anything
)

completion = client.chat.completions.create(
  model="local-model", # The model name can be anything
  messages=[
    {"role": "system", "content": "You are a helpful assistant."},
    {"role": "user", "content": "Write a Python function to calculate the factorial of a number."}
  ]
)

print(completion.choices[0].message.content)
Test your understanding!
You have successfully converted and quantized a model to Llama-3-8B-Q4_K_M.gguf. You want to ask it a question from the command line, but the default response is too short. Which command-line argument for the ./main executable would you use to increase the length of the generated response?
Show answer
You would use the -n or --n-predict flag to set the number of tokens to generate. For example, to generate up to 512 tokens, you would use:
./main -m Llama-3-8B-Q4_K_M.gguf -p "Your question here" -n 512
3. Deeper Dive: GGUF Quantization Methods
We used Q4_K_M for quantization, but what does that even mean? The GGUF format supports a sophisticated and evolving set of quantization schemes. Understanding them gives you finer control over the trade-off between model quality and performance.
Reverse-engineering GGUF | Post-Training Quantization
To truly master GGUF, it's worth understanding the theory behind its different quantization 'generations'. The video 'Reverse-engineering GGUF' by Julia Turc provides a fantastic, code-driven explanation of these methods.
This video is quite technical, which aligns with your goal of understanding AI theory in depth. Watch the following segments: Legacy Quants (05:40 - 10:38): Understand the basics of block quantization and the difference between symmetric (type 0) and asymmetric (type 1) methods. K-quants (10:38 - 13:49): This is the key innovation. Grasp the concept of 'double quantization' (quantizing the quantization constants themselves) and the use of 'superblocks'. Most modern methods like Q4_K_M are K-quants. Size Modifiers (S, M, L) (23:00 - 24:51): Understand what the S, M, and L suffixes mean. They indicate mixed-precision, where more important layers (like attention) are kept at a slightly higher precision to preserve quality.
In short, the naming convention Q<bits>_<type>_<size> tells you:
- Q
<bits>: The target number of bits (e.g.,Q4for 4-bit,Q5for 5-bit). <type>: The quantization method.Kstands for K-quants, the improved method that uses superblocks.<size>: (Optional)S,M, orLfor Small, Medium, or Large. This refers to a mixed-precision strategy where some layers are quantized with more bits than others to maintain model quality.
For example, Q4_K_M means it's a 4-bit model using the K-quant method with the "Medium" mixed-precision configuration. This level of detail allows you to choose the exact compression strategy that best fits your needs for performance versus accuracy.
Conclusion
Congratulations! You've just completed the full journey from a standard, resource-heavy model on a public repository to a highly efficient, quantized model running on your own machine. This is a fundamental skill for anyone serious about building and deploying AI applications.
Key Takeaways:
llama.cppis a powerful C++ library that makes high-performance LLM inference on CPUs a reality.- The GGUF format is key to this ecosystem, providing a single, portable file that bundles the model, tokenizer, and metadata.
- The workflow involves building
llama.cppfrom source, converting a Hugging Face model to GGUF, and quantizing it to a low-bit format. - You can deploy the final GGUF model via a simple command-line tool for direct interaction or as a powerful OpenAI-compatible web server for easy application integration.
- GGUF supports advanced quantization schemes (like K-quants) that give you fine-grained control over the size-quality trade-off.
Preview of the Next Lesson:
While llama.cpp gives you ultimate control, several user-friendly tools have been built on top of it to simplify the process of downloading and managing models. In our next lesson, we will "Set up local inference servers using tools like Ollama and text-generation-webui". You will see how these tools automate many of the steps we performed manually today, providing a more streamlined experience for day-to-day use.