
Hello again. You now have the toolchain and a named Android Virtual Device ready. This lesson turns that environment into a working development loop: generate a Kotlin/Compose app, make one intentional source change, and deploy it to the emulator.
This is deliberately a small app. The objective is not visual design yet; it is to establish evidence that Android Studio, Gradle, the SDK, the emulator, and your Kotlin source all work together. Plan for about 35–45 minutes.
Create a Compose project
Start Android Studio. From the welcome screen choose New Project; if a project is already open, use File > New > New Project.
In the Phone and Tablet category, choose Empty Activity. In current Android Studio releases, this is the Compose-oriented starter template. Templates explicitly labeled Views create the older XML-layout style of app, which is not the path used for this course.
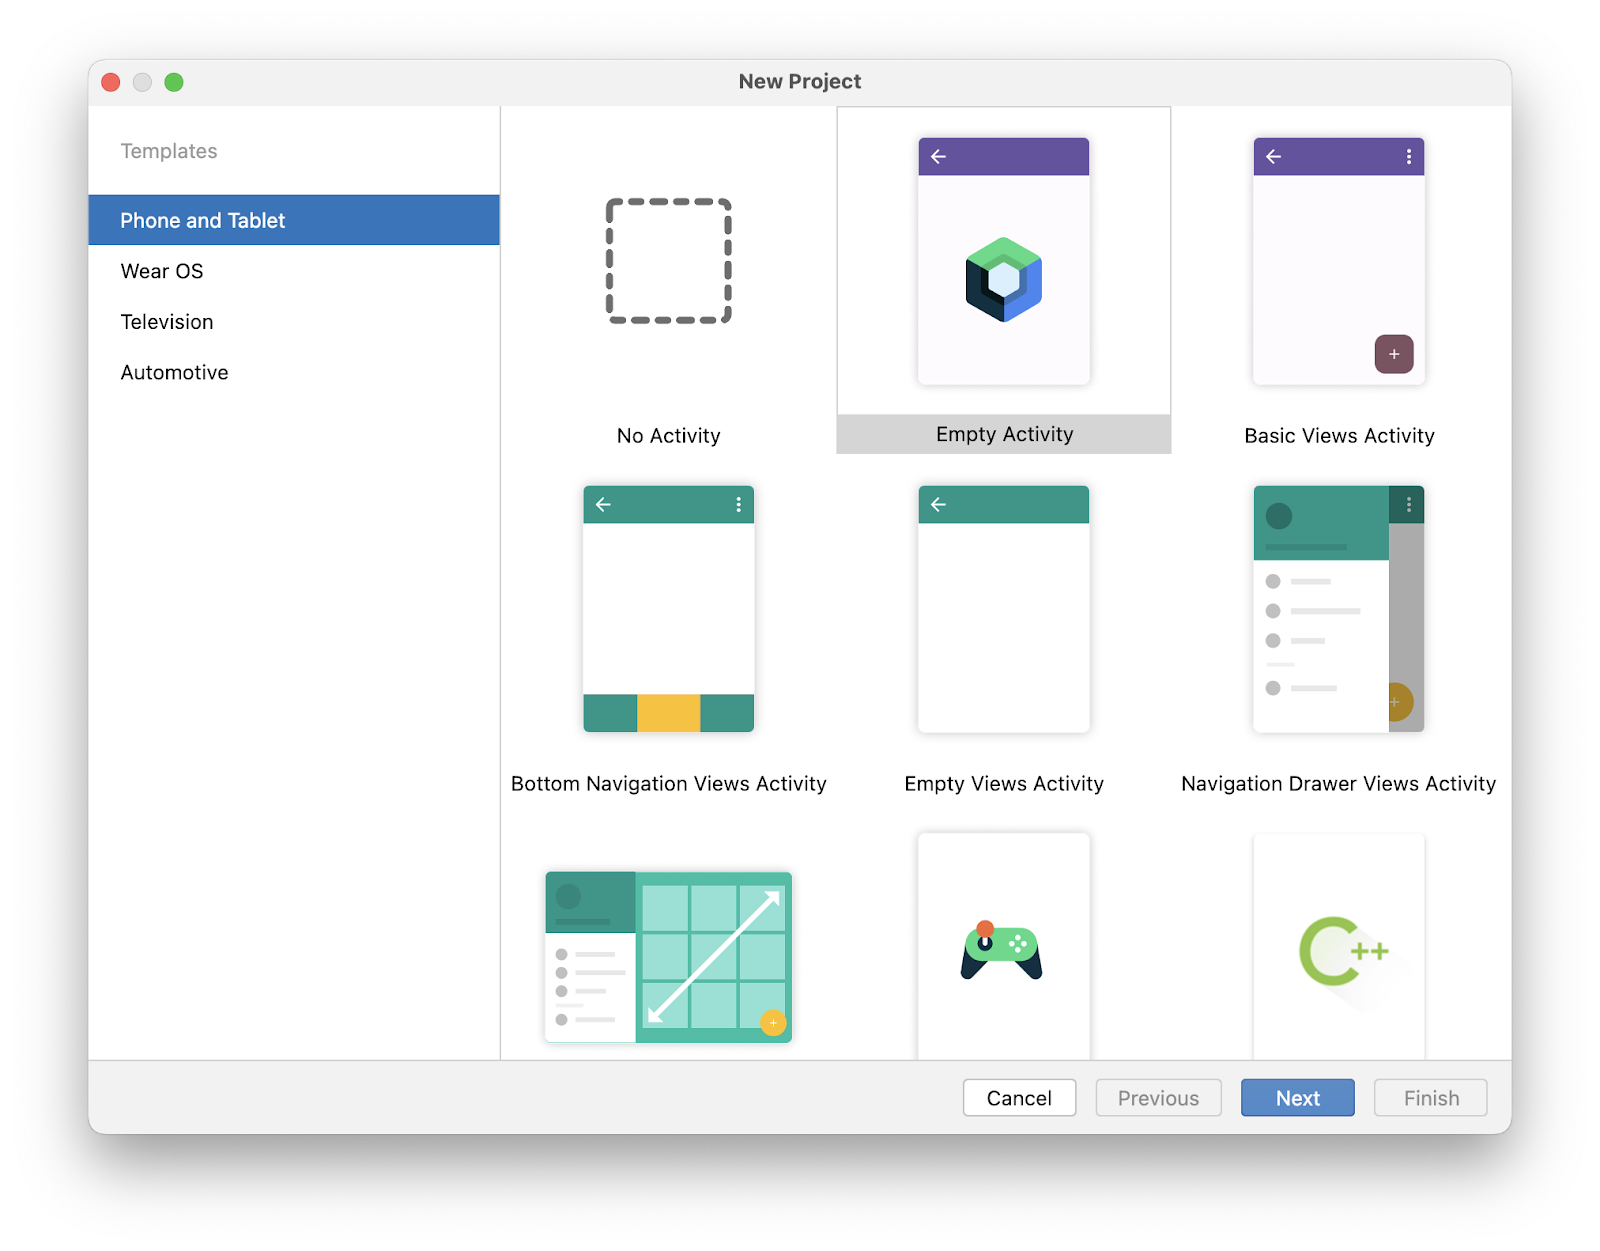
Use a name that connects the project to the game you will build, such as TapToDodge. For the initial local project, a namespace such as com.example.taptododge is fine. For any project that will become a real Play release, choose a stable reverse-domain identifier controlled by your organization; this identity later matters for Play Console and Play Games Services configuration.
Set the Minimum SDK to API 24: Android 7.0, if the template does not already recommend it. This setting answers a compatibility question: what is the oldest Android version allowed to install this app? It is independent of the newer Android platform used to compile the code and independent of the Android version running in your emulator.
Depending on your Android Studio version, a Kotlin selector may be visible or Kotlin may already be fixed for the Compose template. In either case, the generated app should contain a MainActivity.kt file and Compose dependencies.
Create your first Android app | Android Developers
Read the official Android Developers codelab, “Create your first Android app,” as a visual companion for the project-creation flow and the generated Compose entry point.
In Section 2, “Create a project using the template,” read from creating the template project. Its example project name is different from yours; retain the workflow but use TapToDodge and API 24. Then skip to Section 4, “Update the text.” Read the compilation explanation and the surrounding discussion of MainActivity, onCreate(), setContent(), and @Composable. Do not spend time on the later color and padding customization yet.
Select Finish. Android Studio now creates the project, downloads or resolves dependencies as necessary, and performs a Gradle sync. The bottom status area may report progress such as indexing, downloading, or syncing. Wait until it completes before diagnosing editor warnings or attempting the first run.
A successful initial sync is meaningful: it confirms that the project’s Gradle configuration can locate the Android SDK and resolve the libraries required by the template.
Make the smallest useful source change
Open MainActivity.kt. The exact starter code changes modestly across Android Studio releases, but its structure is consistent:
MainActivityis an Android activity: the initial screen-level component.- Android calls its
onCreate()method when it creates the activity. setContent { ... }establishes the Compose UI content for that activity.- A function marked
@Composabledescribes part of that UI.
You will likely see a generated Greeting composable and a call that supplies "Android" as its name. Change only that argument first. For example, change:
Greeting(name = "Android")
to:
Greeting(name = "Tap to Dodge")
Some template versions omit the named argument, in which case the equivalent is:
Greeting("Tap to Dodge")
The generated text will then render something similar to:
Hello Tap to Dodge!
This trivial modification is useful because it distinguishes a genuinely fresh deployment from a preinstalled or stale template app. You have changed Kotlin source, requested a build, installed the result, and observed the changed behavior on Android.
The generated code may also contain a theme function, a Surface or Scaffold, edge-to-edge setup, and a @Preview function. Leave those in place. They are productive scaffolding, not noise to delete.
A Compose preview in the editor is helpful, but it is not the completion criterion. Preview renders design-time UI inside Android Studio; the emulator run validates the actual Android application lifecycle and installation path.
Run the app on your emulator
Confirm that your AVD from the previous lesson is visible in Android Studio’s device selector. It can already be running, or Android Studio can normally start it as part of deployment.
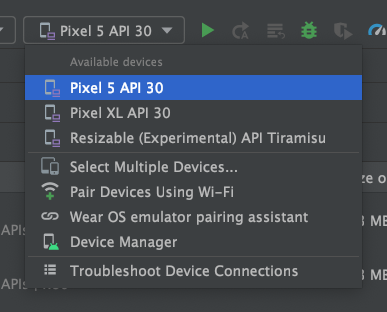
At the top of Android Studio:
- Ensure the run configuration is the app configuration created with the project.
- Open the target-device dropdown and select your Pixel-style AVD.
- Click the green Run triangle, or use the Run command from the toolbar.
- Wait for the first build and, if needed, the emulator boot. First launch can take several minutes.
- On the emulator, verify that the app opens automatically and displays your changed greeting.
The Run action is more than “execute Kotlin.” In this development configuration, Android Studio coordinates several operations:
- Gradle compiles the Kotlin and Compose code and packages a debug installable artifact.
- Android Studio uses Android device tooling, including
adb, to deploy that debug build to the selected emulator. - Android starts the app’s launcher activity, which creates
MainActivity. MainActivity.onCreate()invokessetContent, and Compose renders the greeting.
This is a local debug deployment, not Google Play delivery. No App Bundle is uploaded and no Play-generated APK set is involved at this stage.
If the app is already installed and you make another text change, press Run again. Android Studio rebuilds and redeploys as required. Try one extra change—for example, replace the greeting with Dodge test build ready—and confirm the emulator reflects it. That gives you a repeatable edit–build–deploy–observe loop.
Read first-run signals rather than guessing
For a first app, the most useful signals are in Android Studio’s tool windows rather than in the code editor alone:
| Signal | What it tells you |
|---|---|
| Gradle Sync completed | The project configuration and dependencies were resolved well enough for the IDE to understand the project. |
| Build succeeded | Kotlin and Android resources compiled and the package step completed. |
| Run output reports installation and launch | The debug artifact reached the selected device and Android was asked to start it. |
| Your edited text appears in the emulator | You are observing the version you just built, not merely a previous installation. |
A build can succeed while a deployment fails: for example, if the emulator is not available. Conversely, an emulator can boot perfectly while the project cannot build because Gradle cannot resolve dependencies. Keep the layers separate when diagnosing a problem.
Here are focused first checks for common failures:
| Symptom | Likely layer | First action |
|---|---|---|
| Run is unavailable or Gradle is still busy | Project sync | Wait for sync to finish; open the visible sync error rather than changing source files. |
| No target device appears | Emulator connection | Start the AVD from Tools > Device Manager, then reopen the target dropdown. |
| The emulator is running but marked offline | Device tooling | Close and restart the AVD. If it persists, use Device Manager’s cold boot option. |
| Installation says the app requires a newer SDK | Compatibility settings | Ensure the emulator’s API level is at least the project’s minSdk; your stable AVD should normally exceed API 24. |
| The app still shows old text | Deployment observation | Confirm the selected run configuration is app, run again, and inspect the Run output for installation messages. |
| Red code appears after editing | Kotlin source | Undo back to the generated template, then make only the greeting-argument change again. |
Do not react to every transient warning during initial indexing. A red build failure or a failed Run result deserves attention; an editor still indexing immediately after project creation often only needs time.
Completion check
Before moving on, confirm all of the following:
- A project named TapToDodge opens in Android Studio.
- It uses the Empty Activity Compose template and contains Kotlin source in
MainActivity.kt. - Gradle sync finishes successfully.
- You changed a visible string in the generated composable UI.
- Your selected emulator starts and the app installs automatically.
- The emulator displays the edited text.
You have now created and run a minimal Kotlin Android application through the same local toolchain you will use for the game: source code is compiled by Gradle, deployed as a debug build, and executed by Android on an AVD.
Next, you will orient yourself in the generated project: Gradle configuration, the manifest, Kotlin source, resources, and the build outputs each have distinct responsibilities.
Can't find a good explanation? Sign up and we'll make it for you
Sign up