Welcome back. In our last two lessons, you mastered the "pull" method of data interaction, first by writing a script to execute transactions and then by creating another to query the contract's state on demand. This approach is perfect for getting a snapshot of data at a specific moment.
However, for many applications in finance and analytics, you need to react to changes as they happen. Continuously polling a contract for updates is inefficient and slow. In this lesson, we'll explore the much more powerful "push" model by learning how to listen for and process on-chain events in real-time. This is analogous to subscribing to a real-time data feed or a webhook in a traditional data architecture, a concept that should be familiar from your work with business intelligence systems.
Our goal is to write a Node.js script that subscribes to the Transfer events emitted by your SecurityToken contract, allowing you to see and process every token movement the moment it is confirmed on the blockchain.
1. Understanding Smart Contract Events
Before we write the code, it's essential to understand what events are and why they are the standard for on-chain notifications. In short, events are a specialized, low-cost logging facility built into the Ethereum Virtual Machine (EVM).
When a smart contract needs to signal that an important action has occurred—like a token transfer—it can emit an event. This event is recorded in the transaction logs, a separate and much cheaper storage area than the contract's own state variables. This makes events the ideal mechanism for communicating with the outside world (like your script, a block explorer, or a frontend application) without incurring high gas costs.
The following article provides an excellent introduction to the mechanics of events in Solidity.
How Smart Contract Events Work: A Simple Guide with Examples
This guide explains the fundamental role of events in smart contract development, from their purpose to their implementation.
First, read the introduction and core concepts to understand why events are used and how they differ from state variables. Then, review the section on declaring and emitting events. Pay close attention to the SimpleToken example and its Transfer event, as this is the exact pattern used by the OpenZeppelin ERC-20 contract that your SecurityToken inherits from.
2. The Power of indexed Parameters
As you saw in the reading, event parameters can be marked with the indexed keyword. This is a critical feature for anyone working with on-chain data.
Think of indexed parameters as creating an index on a column in a SQL database. When a parameter is indexed, its value is stored in a special data structure called "topics" within the transaction log. This allows applications to efficiently filter for events based on the values of these indexed parameters—for example, "find all Transfer events where the to address is 0x...". Without indexing, you would have to fetch all Transfer events and filter them client-side, which is vastly less efficient. The ERC-20 Transfer(address indexed from, address indexed to, uint256 value) event wisely indexes the sender and receiver addresses, as these are the most common filter criteria.
This article section explains the performance implications in more detail.
How Smart Contract Events Work: A Simple Guide with Examples
This section dives into the practical importance of using indexed parameters for efficient data retrieval.
Please read the section Why Indexed Parameters Matter. The comparison between efficient and inefficient querying will be very familiar from your experience optimizing queries in data warehousing environments.
3. Listening for Live Events with ethers.js
Now, let's get practical. To listen for events in real-time, our script needs to maintain a persistent connection to an Ethereum node. For this, we can't use the JsonRpcProvider from our previous scripts, which is designed for individual requests. Instead, we must use a WebSocketProvider. WebSockets allow for a continuous, two-way communication channel, perfect for receiving "pushed" updates from the node.
Once connected, we can use the contract.on() method to subscribe to a specific event. This method registers a callback function that will be executed every time the contract emits the specified event.
The following video provides a concise walkthrough of setting up a listener script from scratch.
How to Listen To Smart Contract Events using ethers.js & node.js
This video from EatTheBlocks demonstrates how to build a Node.js script to listen for live ERC-20 Transfer events.
Please watch the main segment from building the script. As you watch, focus on these key steps: Setting up the WebSocketProvider: Notice the use of a WebSocket URL (wss://...). You will need to get one of these from your provider (e.g., Alchemy or Infura). Instantiating the contract: The process is the same as before, but the provider is now a WebSocketProvider. Using contract.on("Transfer", ...): This is the core of the listener. Decoding the value: Pay attention to how ethers.utils.formatUnits() is used with the correct number of decimals to convert the raw token amount into a human-readable format.
4. Building Your Listener Script
Let's apply these concepts to create a listen.js script in your security-token-scripts project. This script will connect to your deployed SecurityToken contract and log every transfer as it happens.
First, ensure you have a WebSocket URL from your node provider for the Sepolia testnet. Add it to your .env file:SEPOLIA_WSS_URL="wss://eth-sepolia.g.alchemy.com/v2/YOUR_API_KEY"
Now, create the listen.js file:
// 1. Imports and setup
require('dotenv').config();
const { ethers } = require('ethers');
const contractABI = require('./abis/SecurityToken.json').abi;

// 2. Configuration
const wssUrl = process.env.SEPOLIA_WSS_URL;
const contractAddress = '0x...'; // PASTE YOUR DEPLOYED SecurityToken ADDRESS

async function main() {
  console.log('Connecting to WebSocket...');
  const provider = new ethers.WebSocketProvider(wssUrl);
  const securityTokenContract = new ethers.Contract(contractAddress, contractABI, provider);

  console.log(`Listening for Transfer events from SecurityToken at ${contractAddress}...`);
  console.log('---');

  // 3. Set up the listener
  securityTokenContract.on('Transfer', (from, to, value, event) => {
    console.log('--- New Transfer Detected ---');
    console.log(`From: ${from}`);
    console.log(`To: ${to}`);

    // The `value` is a BigInt. We need to format it using the token's decimals.
    // Assuming your SecurityToken has 18 decimals, like the default OpenZeppelin ERC20.
    const formattedValue = ethers.formatUnits(value, 18);
    console.log(`Value: ${formattedValue} SEC`);

    // The `event` object contains more metadata
    console.log(`Transaction Hash: ${event.log.transactionHash}`);
    console.log('---------------------------');
  });

  // The script will run indefinitely, listening for events.
  // You'll need to stop it manually with Ctrl+C.
}

main().catch((error) => {
  console.error('An error occurred:', error);
  process.exit(1);
});
To run the script:
- Make sure your
.envfile is updated with yourSEPOLIA_WSS_URL. - Replace the placeholder
contractAddresswith the address of your deployedSecurityToken. - Run the script from your terminal:
node listen.js. - Leave the script running. Now, go to MetaMask and perform a transfer of your
SECtoken to another account. Within moments, you should see the formatted event details appear in your terminal.
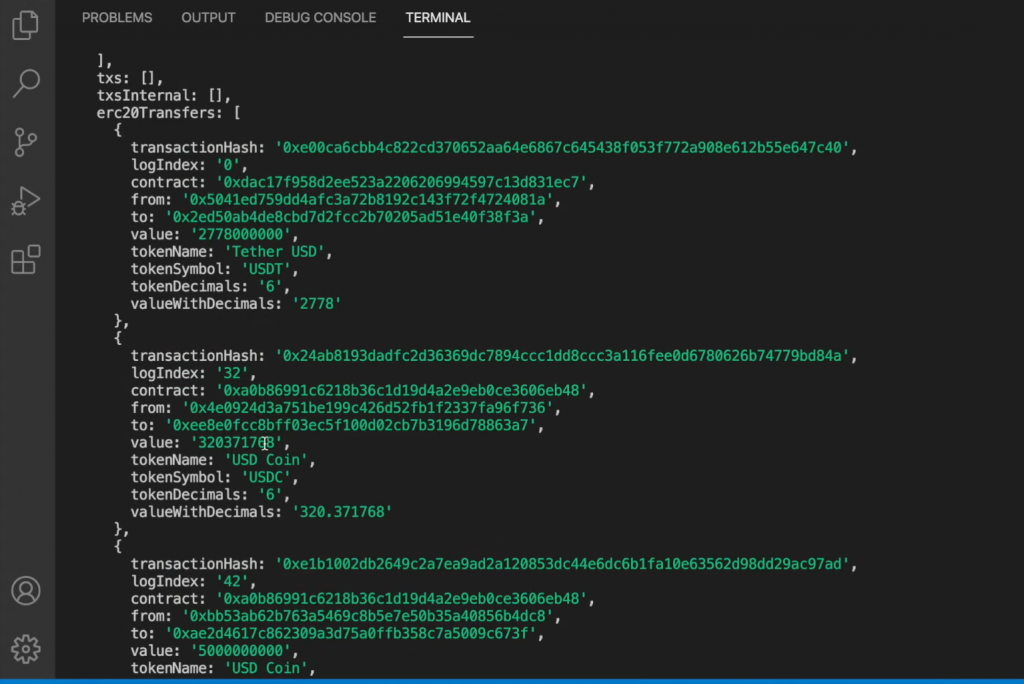
The output will be similar in structure to the data shown in the image below, which displays several ERC-20 transfer events in JSON format. Your script provides a real-time stream of this valuable data.
Conclusion
In this lesson, you transitioned from actively "pulling" data from the blockchain to passively and efficiently "pushing" data to your application using events. You now have the skills to build real-time monitoring and notification systems for any on-chain activity.
Key Takeaways:
- Events are for communication: They are a cheap and efficient way for smart contracts to log activity for off-chain applications.
indexedparameters are for filtering: They act like database indexes, enabling fast, node-side filtering of events.WebSocketProvideris for real-time: It provides the persistent connection necessary for listening to live events.contract.on()is the subscriber: It allows you to register a callback function that processes events as they are emitted.
You've now built scripts to write to, read from, and listen to your smart contract. The final piece of the automation puzzle is streamlining the deployment process itself. In our next lesson, you will learn how to write a dedicated deployment script using Hardhat, allowing you to manage deployments across different networks with ease.