Hello again. In the last few lessons, you've become adept at interacting with an already deployed smart contract. You've written scripts to execute transactions, query state, and even listen for real-time events. This is the "runtime" aspect of DApp development. Now, we'll shift our focus to the crucial preceding step: the deployment process itself.
So far, you've likely used a basic script or manual command to get your contract on-chain. While fine for simple experiments, this approach isn't robust, repeatable, or secure enough for professional development. In this lesson, we will address that by implementing a dedicated deployment script with environment-specific configurations using Hardhat. This is analogous to how in data warehousing and BI, you would have configuration files to manage database connections and parameters for different environments like development, testing, and production. Our goal is to create an automated, professional process that can deploy your SecurityToken to any network with a single command.
1. Beyond Basic Deployment Scripts
The default scripts/deploy.js file provided by Hardhat is a good starting point, but it has limitations for real-world projects:
- Statefulness: It doesn't remember what has already been deployed. If you have multiple contracts and run the script again, it will try to redeploy everything, wasting gas and leading to confusion.
- Modularity: For projects with many interdependent contracts, a single script becomes monolithic and difficult to manage.
- Configuration: Hardcoding addresses or parameters makes it difficult to switch between networks like a local testnet, Sepolia, and eventually, the mainnet.
To overcome these challenges, we'll use a powerful community plugin called hardhat-deploy.
2. Introducing hardhat-deploy
The hardhat-deploy plugin extends Hardhat's capabilities with a more structured and powerful deployment system. It allows you to write modular deployment scripts, manage deployments across different networks, and even handle complex dependencies automatically.
The following article gives an excellent overview of why this professional approach is necessary and introduces the plugin's core concepts.
Learn to Deploy Smart Contracts more Professionally with ...
This article from dev.to explains the motivation for using a dedicated deployment plugin and walks through the setup of hardhat-deploy.
Please read the following sections: Start from the beginning and read until the end of the section that explains the solution, The Solution. This introduces the pain points of basic deployment scripts. Next, follow the setup instructions, starting from setting up the environment. You have already done most of this, but it's a good review. Then, read the section on installing and configuring the plugin. This is the most important part. Finally, review the section on the project structure, which explains the deploy folder and script naming convention.
After reading, you should understand the value of hardhat-deploy and have it installed and configured in your hardhat.config.js file. Your project should now have an empty deploy directory.
3. Environment Configuration with .env
A key part of professional deployment is managing different configurations for different networks without exposing sensitive data, like private keys or API keys, in your code. Just as you would store database credentials for an ETL job in a secure configuration file, we'll use a .env file for our blockchain environments.
You've used this before, but it's time to formalize its role in deployment. We will define network-specific RPC URLs and the private key of the account that will pay for the deployment.
The following video provides a clear, step-by-step guide on setting this up. We'll use the principles shown here to configure your hardhat.config.js for the Sepolia testnet.
How to deploy a Polygon (MATIC) Smart Contract with Hardhat + Ethers.js
This video from Alchemy, though focused on Polygon, perfectly demonstrates the universal process of using a .env file and configuring hardhat.config.js for a specific network.
First, watch the segment on installing dotenv and setting up the .env file. You will create a .env file in your project's root directory to store your SEPOLIA_RPC_URL (your Alchemy or Infura HTTP URL) and your PRIVATE_KEY (from MetaMask). Next, watch how to update the Hardhat configuration file. You will apply this pattern to add a sepolia network configuration to your hardhat.config.js, which reads the variables from your .env file.
After completing these steps, your hardhat.config.js should be updated. Here is a consolidated example of what your configuration should look like. Note the addition of the require('dotenv').config() line, the networks object for sepolia, and the namedAccounts object, which is a feature of hardhat-deploy.
require("@nomicfoundation/hardhat-toolbox");
require("hardhat-deploy");
require("dotenv").config(); // Make sure this is at the top

const SEPOLIA_RPC_URL = process.env.SEPOLIA_RPC_URL || "";
const PRIVATE_KEY = process.env.PRIVATE_KEY || "0xkey";

module.exports = {
  solidity: "0.8.20",
  defaultNetwork: "hardhat",
  networks: {
    hardhat: {
      chainId: 31337,
    },
    sepolia: {
      url: SEPOLIA_RPC_URL,
      accounts: [PRIVATE_KEY],
      chainId: 11155111,
      blockConfirmations: 6, // Wait 6 blocks for Etherscan to catch up
    },
  },
  namedAccounts: {
    deployer: {
      default: 0, // here this will by default take the first account as deployer
    },
  },
  // ... other configurations like etherscan api key
};
4. Writing the Deployment Script
Now, let's create the actual deployment script for your SecurityToken. Inside the deploy folder, create a new file named 01-deploy-security-token.js. The 01- prefix ensures that hardhat-deploy runs this script first if you add more later.
The script exports an asynchronous function that hardhat-deploy will execute. This function receives the Hardhat Runtime Environment (hre), from which we can access helpful properties and functions like getNamedAccounts and deployments.
Let's dissect the components of a deployment script by reviewing the explanation in the article you read earlier.
Learn to Deploy Smart Contracts more Professionally with ...
This section breaks down the code inside a hardhat-deploy script.
Please read the explanation section starting from "Let me explain what's going on". This covers what hre, deployments, getNamedAccounts, and the parameters of the deploy function (from, log, args, waitConfirmations) all mean.
Now, apply this knowledge to write your 01-deploy-security-token.js file. Your SecurityToken's constructor likely takes arguments such as a name, a symbol, and the address of the initial administrator. We will pass these in the args array. The deployer account from namedAccounts is the perfect candidate for the administrator role.
Here is the complete script. Add this to your 01-deploy-security-token.js file:
// deploy/01-deploy-security-token.js

const { network } = require("hardhat");

// hre is the Hardhat Runtime Environment, which is passed automatically
module.exports = async ({ getNamedAccounts, deployments }) => {
  const { deploy, log } = deployments;
  const { deployer } = await getNamedAccounts(); // From hardhat.config.js

  log("----------------------------------------------------");
  log("Deploying SecurityToken...");

  // The constructor for your SecurityToken requires name, symbol, and admin.
  // We will pass them as an array to the 'args' property.
  const args = ["My Security Token", "MST", deployer];

  const securityToken = await deploy("SecurityToken", {
    from: deployer,
    args: args,
    log: true, // Print deployment info
    waitConfirmations: network.config.blockConfirmations || 1,
  });

  log(`SecurityToken deployed at: ${securityToken.address}`);
  log("----------------------------------------------------");

  // You can add a verification step here for testnets
};

// Add a tag to the script for selective deployment
module.exports.tags = ["all", "SecurityToken"];
5. Running the Deployment
With the configuration and script in place, deploying is now a simple, repeatable command. To deploy to the Sepolia testnet, run the following in your terminal:
npx hardhat deploy --network sepolia
Hardhat will:
- Compile your contracts if they've changed.
- Read the
sepoliaconfiguration fromhardhat.config.js. - Use your
SEPOLIA_RPC_URLandPRIVATE_KEYfrom the.envfile. - Execute the script(s) in the
deploy/folder. - Wait for the specified number of block confirmations.
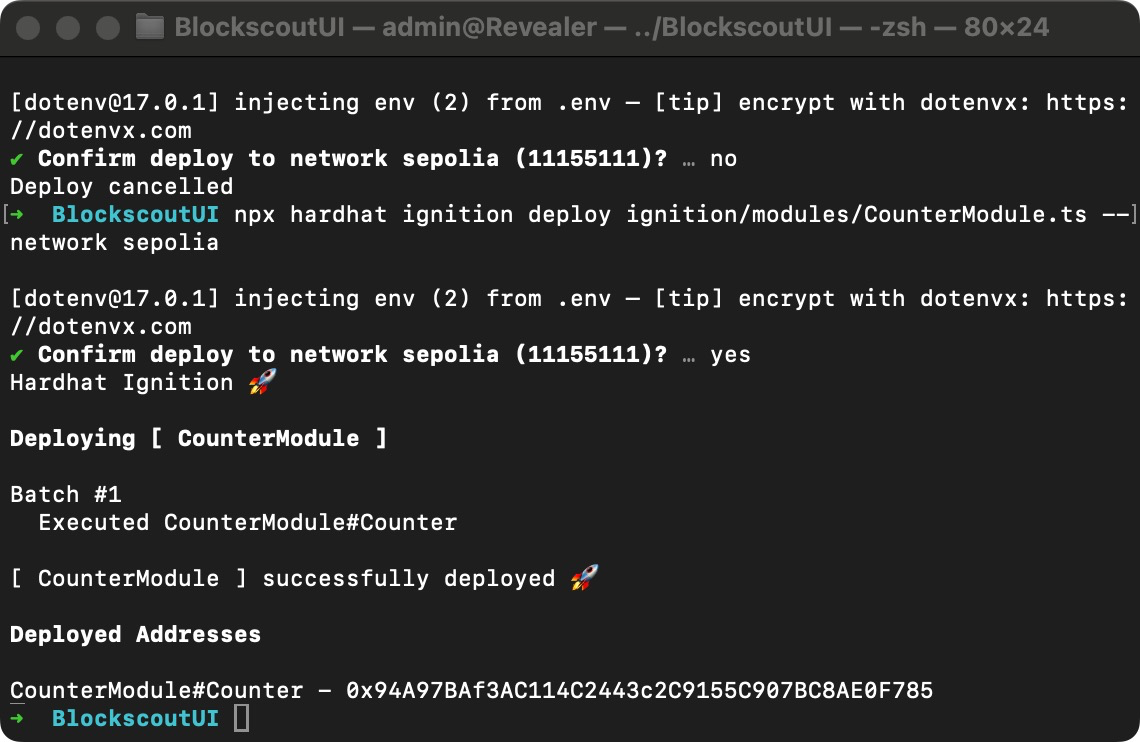
The terminal output will show the transaction hash and the final address of your newly deployed SecurityToken contract. The image below shows a similar deployment process using a tool called Hardhat Ignition. The core elements are the same: a command-line instruction that specifies the network and results in a deployed contract address.
If you only wanted to run scripts with a specific tag, you could use the --tags flag. For example: npx hardhat deploy --network sepolia --tags SecurityToken. This is incredibly useful in large projects with many contracts.
Conclusion
Congratulations! You have now moved beyond simple deployment scripts and implemented a professional, automated, and environment-aware deployment process. This setup is scalable and secure, forming the foundation for managing your smart contracts throughout their lifecycle.
Key Takeaways:
- Automation is Key: Deployment scripts make the process of deploying contracts reliable, repeatable, and less prone to human error.
hardhat-deployfor Structure: This plugin provides a robust framework for managing modular deployment scripts, tracking their state, and using tags for granular control.- Configuration over Hardcoding: Using
hardhat.config.jsin combination with a.envfile allows you to securely and seamlessly switch between different blockchain networks. - The Deployment Command: The
npx hardhat deploy --network <network-name>command is your new entry point for deploying contracts to any configured environment.
You now have a solid workflow for writing, testing, and deploying your smart contracts. However, a deployed contract with unverified source code can appear untrustworthy to users. In our next lesson, we will tackle this by learning how to automatically verify and publish your contract's source code on a block explorer like Etherscan, a crucial step for transparency and user confidence.