Welcome back! In our previous lessons, you learned how to both read from and, more recently, write to your smart contracts using ethers.js. You built a script to execute state-changing transactions like mint and transfer, which is analogous to performing "load" or "update" operations in a traditional data pipeline.
In this lesson, we will shift our focus back to reading data, but with a more deliberate and structured approach. You will learn to build a dedicated query script to extract specific, valuable information from your deployed contract. This is the "Extract" phase of interacting with on-chain data—a fundamental skill for monitoring, analytics, or feeding data into other systems.
We will cover how to programmatically query standard token data, like total supply and balances, as well as more complex, application-specific information like the administrative roles you configured in your SecurityToken.
1. The Two Paths of Contract Interaction: Read vs. Write
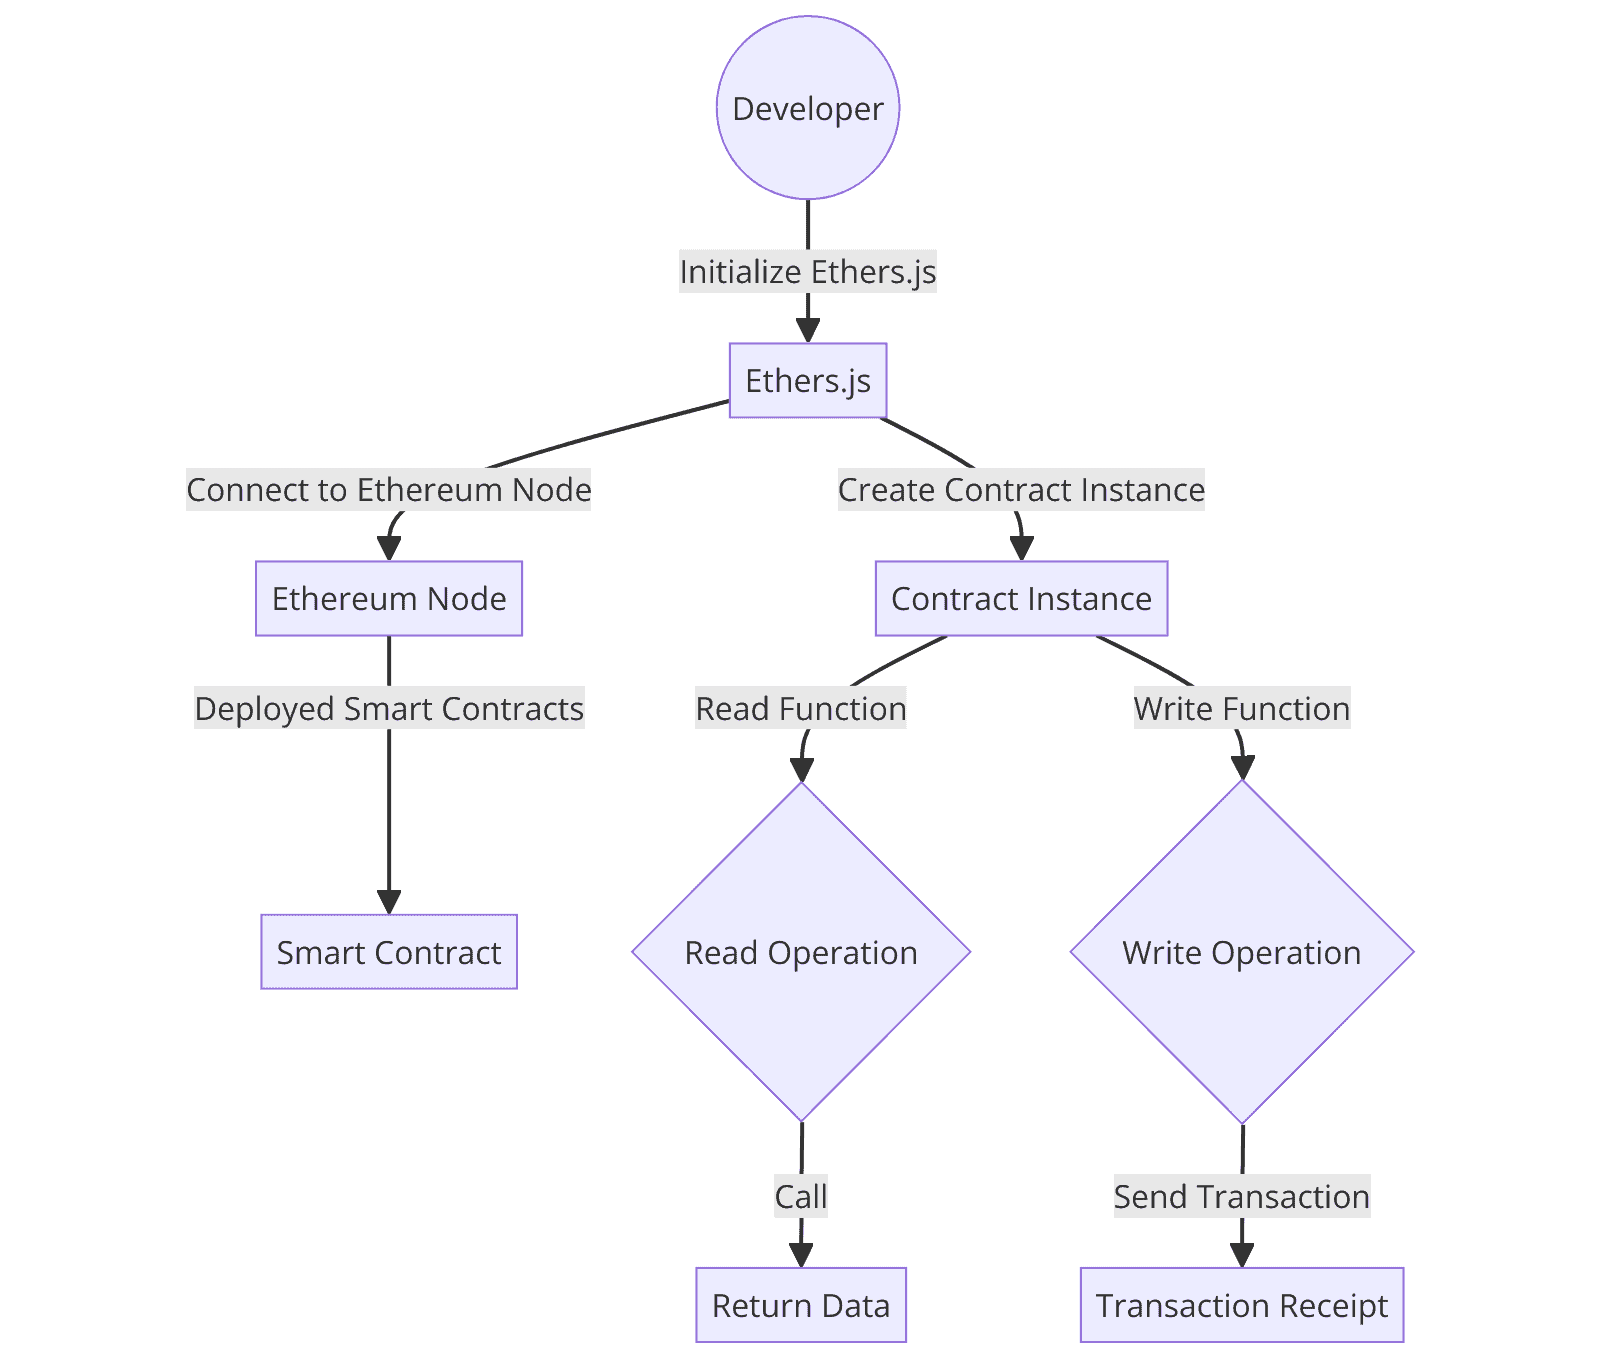
Every interaction with a smart contract falls into one of two categories: reading state or changing state. The previous lesson focused on changing state (writing), which requires a Signer to authorize the transaction and pay for gas. This lesson focuses on reading state, which is a free operation that only requires a Provider to connect to a blockchain node.
The following flowchart provides a great visual summary of this distinction. This lesson is all about the "Read Operation" path on the left.
2. Querying Standard Token Information
Since your SecurityToken is built upon the ERC-20 standard, it automatically inherits a set of public functions for querying its core state. These functions are like a standard API for any fungible token on Ethereum. The most common ones include:
name(): Returns the token's name (e.g., "Security Token").symbol(): Returns the token's symbol (e.g., "SEC").totalSupply(): Returns the total amount of tokens in existence.balanceOf(address): Returns the token balance of a specific account.
You've already used balanceOf to verify the results of your transactions. Now, we'll formalize this by creating a script dedicated to querying and reporting this information.
The following video provides an excellent walkthrough of reading this kind of data from a live ERC-20 contract using ethers.js.
Master Ethers.js for Blockchain Step-by-Step (Full Course 2025)
This video from Dapp University demonstrates how to interact with an existing smart contract (USDC) to read its on-chain data. The principles are directly applicable to your own SecurityToken.
Please watch the section covering reading from a smart contract. As you watch, focus on: The concept of the ABI (Application Binary Interface) and how ethers.js allows you to define only the functions you need. The three key components for creating a contract instance for reading: the contract address, the ABI, and a provider. How to call functions like name(), symbol(), totalSupply(), and balanceOf(). The importance of using ethers.formatUnits() with the correct number of decimals to display token amounts in a human-readable format.
3. Querying Administrative Roles
Beyond standard ERC-20 data, your SecurityToken contains custom logic, specifically the role-based access control managed by OpenZeppelin's AccessControl contract. For compliance and administrative purposes, it's crucial to be able to query which accounts hold specific roles, such as the MINTER_ROLE or the DEFAULT_ADMIN_ROLE.
The AccessControl contract makes this possible through a set of enumeration functions. You can first get the number of accounts that have a role, and then iterate through to get each member's address.
The official OpenZeppelin documentation explains this process clearly.
This resource is the definitive guide to OpenZeppelin's AccessControl contract. We'll look at the specific section on how to query which accounts have been granted roles.
In the document, find the section titled "Role-Based Access Control" and navigate to the subsection "Querying Privileged Accounts". Pay close attention to the getRoleMemberCount and getRoleMember functions, and the example JavaScript loop that retrieves all members of a given role.
To use these functions, you first need the unique bytes32 identifier for the role you want to query. In your Solidity code, you defined this as a public constant, for example:bytes32 public constant MINTER_ROLE = keccak256("MINTER_ROLE");
Because it's a public variable, you can call it directly from your script like any other read-only function (contract.MINTER_ROLE()) to get the required hash. The default admin role is also available via contract.DEFAULT_ADMIN_ROLE().
4. Building Your Query Script
Now, let's combine these concepts into a single query.js script. This script will connect to your deployed SecurityToken and report on both its standard ERC-20 state and its administrative roles.
Create a new file named query.js in your security-token-scripts project.
// 1. Imports and setup
require('dotenv').config();
const { ethers } = require('ethers');
const contractABI = require('./abis/SecurityToken.json').abi;

// 2. Configuration
const rpcUrl = process.env.SEPOLIA_RPC_URL;
const contractAddress = '0x...'; // PASTE YOUR DEPLOYED SecurityToken ADDRESS

// An address to check the balance of. Use an address you've minted tokens to.
const addressToCheck = '0x...';

async function main() {
  try {
    // 3. Setup provider and contract instance (read-only)
    const provider = new ethers.JsonRpcProvider(rpcUrl);
    const securityTokenContract = new ethers.Contract(contractAddress, contractABI, provider);

    console.log(`Querying SecurityToken at: ${contractAddress}`);
    console.log('---');

    // --- Part 1: Querying Standard ERC-20 Data ---
    console.log('Fetching standard token data...');

    const name = await securityTokenContract.name();
    const symbol = await securityTokenContract.symbol();
    const totalSupply = await securityTokenContract.totalSupply();
    const decimals = await securityTokenContract.decimals(); // Assumes your token has a decimals() function

    console.log(`Token Name: ${name}`);
    console.log(`Token Symbol: ${symbol}`);
    console.log(`Total Supply: ${ethers.formatUnits(totalSupply, decimals)}`);

    const balance = await securityTokenContract.balanceOf(addressToCheck);
    console.log(`Balance of ${addressToCheck}: ${ethers.formatUnits(balance, decimals)} ${symbol}`);
    console.log('---');

    // --- Part 2: Querying Administrative Roles (AccessControl) ---
    console.log('Fetching administrative roles...');

    // Get the role identifier hashes
    const adminRole = await securityTokenContract.DEFAULT_ADMIN_ROLE();
    const minterRole = await securityTokenContract.MINTER_ROLE();
    // Add other roles you have, e.g., FREEZER_ROLE, FORCED_TRANSFER_ROLE

    console.log(`DEFAULT_ADMIN_ROLE hash: ${adminRole}`);
    console.log(`MINTER_ROLE hash: ${minterRole}`);

    // Create a helper function to get all members of a role
    const getRoleMembers = async (role) => {
      const memberCount = await securityTokenContract.getRoleMemberCount(role);
      const members = [];
      for (let i = 0; i < memberCount; i++) {
        members.push(await securityTokenContract.getRoleMember(role, i));
      }
      return members;
    };

    const admins = await getRoleMembers(adminRole);
    const minters = await getRoleMembers(minterRole);

    console.log('\nAdmins:', admins);
    console.log('Minters:', minters);
    console.log('---');

  } catch (error) {
    console.error('An error occurred:', error);
    process.exit(1);
  }
}

main();
To run the script:
- Make sure your
.envfile is configured with yourSEPOLIA_RPC_URL. - Replace the placeholder
contractAddresswith your deployedSecurityTokencontract's address. - Replace the placeholder
addressToCheckwith an address you know has a token balance. - Run the script from your terminal:
node query.js.
The output will be a clean report of your token's on-chain state, providing a snapshot of its supply, a specific user's balance, and the addresses responsible for its administration.
Conclusion
In this lesson, you built a powerful, reusable script for querying crucial data from your smart contract. This moves you beyond simple one-off checks and toward systematic data extraction, a process that is central to your background in business intelligence and data engineering.
Key Takeaways:
- Reading on-chain data is a distinct operation from writing data, requiring only a
Providerand not aSigner. - ERC-20 tokens expose a standard interface (
name,symbol,totalSupply,balanceOf) that can be used for basic token queries. - Application-specific data, such as administrative roles from OpenZeppelin's
AccessControl, can be queried using functions likegetRoleMemberCountandgetRoleMember. - A dedicated query script is a fundamental tool for monitoring, analytics, and building the backend for any decentralized application.
In the last two lessons, you've mastered the "pull" method of getting data by actively querying the contract. However, this can be inefficient if you need to react to changes in real-time. In our next lesson, we will explore the "push" method: listening for and decoding on-chain events. This will allow your script to react instantly to activities like token transfers as they happen.