
Hello! Welcome back to our journey through Kubernetes.
In our last lesson, we mastered the art of externalizing configuration with ConfigMaps and Secrets. Your application is no longer tied to a specific environment through hardcoded values, which is a massive step towards production readiness. However, deploying a configured container is only half the battle. We also need a way for Kubernetes to understand if that container is actually working. Is it alive? Is it ready to accept user requests?
This lesson directly answers those questions. Our goal is to implement liveness and readiness probes for automated container health management. These probes are the foundation of Kubernetes' self-healing capabilities. By correctly implementing them, you ensure your system can automatically detect, isolate, and recover from failures, which is a non-negotiable requirement for any production-grade microservice and a key topic in system design interviews.
The Problem: When "Running" Isn't Enough
A container might be in a "Running" state, but the application inside could be deadlocked, stuck in an infinite loop, or unable to connect to a critical dependency like a database. If Kubernetes doesn't know about this internal state, it will keep sending traffic to a broken instance, leading to errors and a poor user experience.
This is the problem health probes solve. They give the Kubelet—the agent running on each node—a way to ask your application: "How are you doing?"
Liveness vs. Readiness: A Critical Distinction
Kubernetes provides two main types of probes to ask different questions, and understanding their distinct purposes is crucial. Misconfiguring them can lead to cascading failures instead of self-healing.
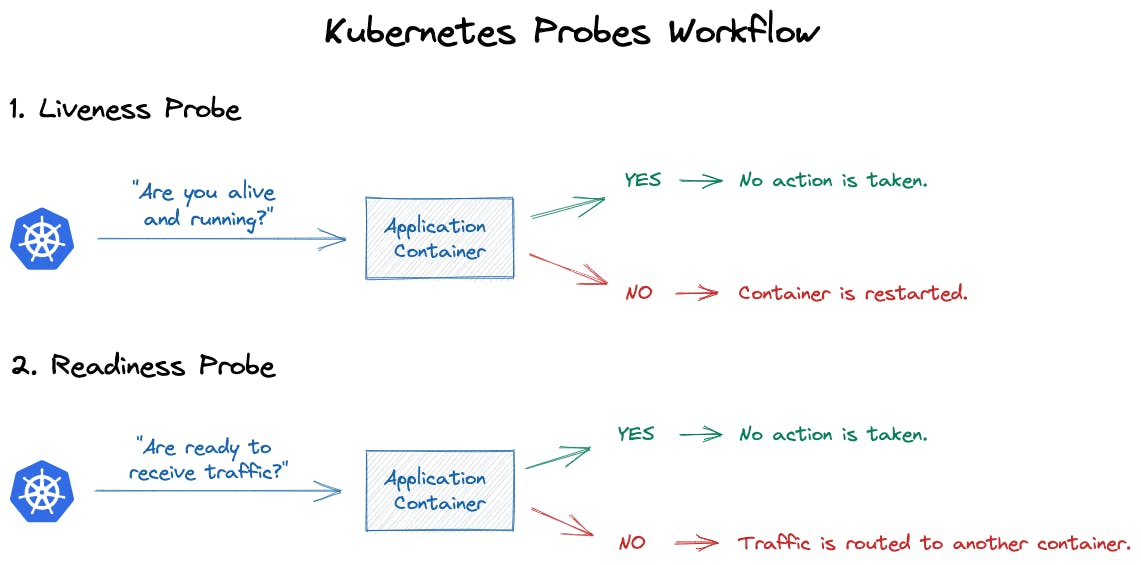
-
Liveness Probe: "Are you alive?"
- Purpose: To detect if your application has entered an unrecoverable state (e.g., a deadlock, memory corruption).
- Action on Failure: If the liveness probe fails, Kubernetes assumes the application is broken beyond repair and restarts the container.
- Golden Rule: A liveness probe should NOT depend on external factors like database connectivity or downstream services. If your database is down, restarting your app won't fix it. In fact, if all app instances restart, you've just created a cascading failure. The liveness probe should only check the internal health of the application itself.
-
Readiness Probe: "Are you ready to serve traffic?"
- Purpose: To signal whether your application is ready to accept new requests.
- Action on Failure: If the readiness probe fails, Kubernetes stops sending traffic to the Pod but leaves it running. It assumes the condition is temporary and will continue to check the probe. Once it passes again, the Pod will be put back into the pool of available endpoints.
- Golden Rule: A readiness probe SHOULD depend on its critical dependencies. If your app can't connect to the database it needs to function, it isn't "ready."
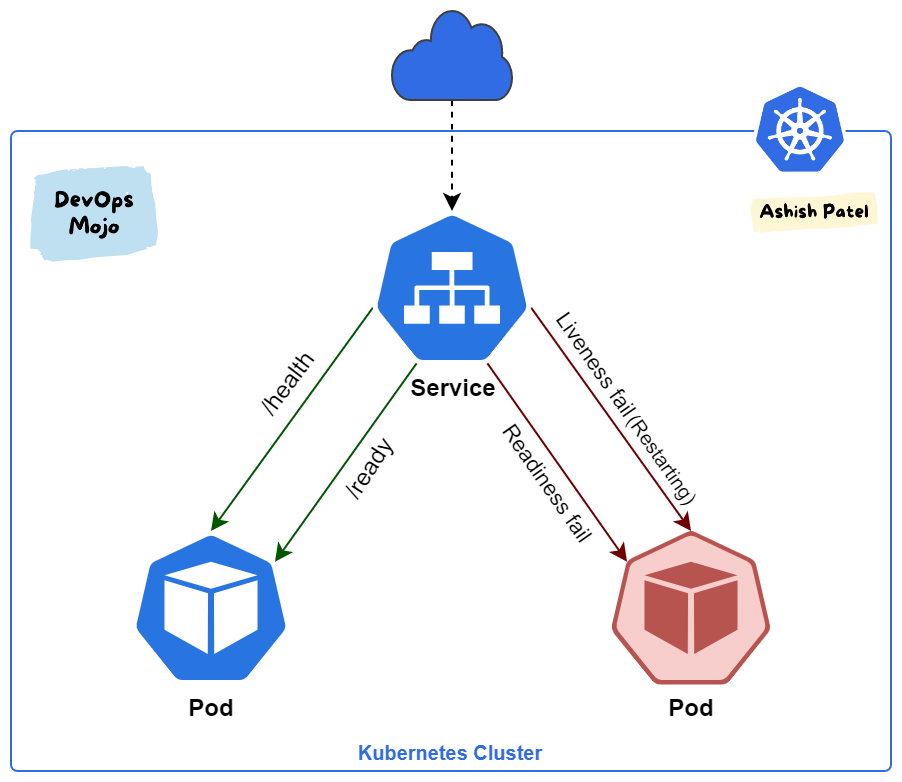
The following discussion on Stack Overflow is an excellent real-world example of why this distinction matters. It's highly recommended reading to solidify your understanding of the trade-offs involved.
Spring Boot app + Kubernetes liveness/readiness checks
This Stack Overflow thread, particularly the question and the detailed answer by Brian Clozel (from the Spring team), perfectly captures the architectural dilemma of configuring health checks and is a great resource for interview preparation.
Please read: The original question by 'chinabuffet', which frames the core problem of using a generic health endpoint and its risks regarding database dependencies. Brian Clozel's answer, which explains the design philosophy behind dedicated liveness and readiness probes in Spring Boot and why you should avoid using the generic /actuator/health endpoint for this purpose. Focus on his explanation of what liveness vs. readiness should check.
What about slow-starting applications? The Startup Probe
Some applications, especially complex Java services, can take a while to start up. If your liveness probe starts checking too early, Kubernetes might kill your app before it's even had a chance to become healthy.
To solve this, Kubernetes 1.16+ introduced the Startup Probe.
- Purpose: To check if an application has finished its initialization.
- Action: It runs before the liveness and readiness probes. If the startup probe fails, the container is restarted. If it succeeds, the Kubelet hands off to the liveness and readiness probes.
- This allows you to configure a generous timeout for startup while keeping your liveness checks frequent and responsive.
Implementation with Spring Boot Actuator
Now for the practical part. Your background in Spring Boot will make this straightforward. Since Spring Boot 2.3, integrating with Kubernetes probes is a first-class feature handled by the Actuator module.
Liveness and Readiness Probes in Spring Boot
The article 'Liveness and Readiness Probes in Spring Boot' from Baeldung is a comprehensive guide on how to enable and use the dedicated health endpoints.
Read the sections 'Kubernetes Probes' and 'Liveness and Readiness in Actuator'. Pay close attention to: The specific endpoints exposed: /actuator/health/liveness and /actuator/health/readiness. The configuration properties required to enable them in application.properties. The example Kubernetes YAML snippet showing how to configure an httpGet probe.
As the article explains, the key steps are:
-
Add Dependencies: Ensure you have
spring-boot-starter-webandspring-boot-starter-actuatorin yourpom.xml. -
Enable Probes in
application.properties:# Expose health endpoints management.endpoints.web.exposure.include=health # Enable the dedicated probe endpoints management.endpoint.health.probes.enabled=true # For Spring Boot 2.3.2+ you might need these as well management.health.livenessstate.enabled=true management.health.readinessstate.enabled=true -
Configure in Kubernetes Deployment YAML: You then configure your Pod spec to use these endpoints.
apiVersion: apps/v1 kind: Deployment metadata: name: my-app-deployment spec: replicas: 3 template: spec: containers: - name: my-app image: my-app:1.0.0 ports: - containerPort: 8080 # Liveness Probe: Checks internal health. Longer initial delay. livenessProbe: httpGet: path: /actuator/health/liveness port: 8080 initialDelaySeconds: 60 # Give the app a minute to start fully periodSeconds: 15 # Check every 15 seconds failureThreshold: 3 # Restart after 3 consecutive failures # Readiness Probe: Checks if ready for traffic. Can start sooner. readinessProbe: httpGet: path: /actuator/health/readiness port: 8080 initialDelaySeconds: 20 # Check readiness after 20 seconds periodSeconds: 10 # Check every 10 seconds # Optional Startup Probe: For very slow starters startupProbe: httpGet: path: /actuator/health/liveness port: 8080 failureThreshold: 30 # Give it 30 * 10s = 5 minutes to start periodSeconds: 10initialDelaySeconds: How long to wait after the container starts before performing the first probe.periodSeconds: How often to perform the probe.failureThreshold: How many times the probe can fail consecutively before Kubernetes takes action.
Test your understanding!
A microservice processes financial transactions. It depends on a fraud-detection service. If the fraud-detection service is down, the microservice cannot safely process transactions, but the application itself is running without errors.
How would you configure the liveness and readiness probes? Which probe (if any) should check the status of the fraud-detection service? Justify your decision based on the principles we've discussed.
Show answer
-
Liveness Probe: This probe should not check the
fraud-detectionservice. It should point to/actuator/health/livenessand only verify that the application's internal state is correct. Restarting the transaction service won't bring the fraud service back online; it would just cause an outage. -
Readiness Probe: This probe should check the status of the
fraud-detectionservice. The transaction service is not "ready" to do its job if it cannot perform fraud checks. By default,/actuator/health/readinessincludes the health indicators of other components (like databases). You would ensure there's a customHealthIndicatorfor thefraud-detectionservice. When that check fails, the readiness probe will fail, and Kubernetes will correctly stop sending new transactions to this Pod until the dependency is restored.
Advanced Control: Programmatically Managing Availability
For even finer-grained control, Spring allows you to programmatically change the application's liveness and readiness states. This is useful for scenarios like:
- Gracefully taking a service offline for maintenance.
- Temporarily stopping traffic if a resource-intensive batch job is running.
- Flagging an application as "broken" if it detects an unrecoverable internal data corruption.
This is achieved by injecting ApplicationAvailability and publishing AvailabilityChangeEvents.
Liveness and Readiness Probes in Spring Boot
Let's return to the Baeldung article to see how to implement this advanced pattern.
Read the sections 'Readiness and Liveness State Transitions' and 'Managing the Application Availability'. Focus on: The different states: ACCEPTING_TRAFFIC, REFUSING_TRAFFIC for readiness, and CORRECT, BROKEN for liveness. The code example showing how to inject ApplicationAvailability and publish an AvailabilityChangeEvent to change the state at runtime.
Here's a practical example. Imagine a service that needs to disable itself if a critical cache becomes unavailable.
import org.springframework.boot.availability.AvailabilityChangeEvent;
import org.springframework.boot.availability.ReadinessState;
import org.springframework.context.ApplicationEventPublisher;
import org.springframework.stereotype.Component;

@Component
public class CacheHealthManager {

    private final ApplicationEventPublisher eventPublisher;

    public CacheHealthManager(ApplicationEventPublisher eventPublisher) {
        this.eventPublisher = eventPublisher;
    }

    // This method could be called by a listener that monitors the cache connection
    public void setCacheUnavailable() {
        System.out.println("Cache is unavailable. Refusing new traffic.");
        AvailabilityChangeEvent.publish(eventPublisher, this, ReadinessState.REFUSING_TRAFFIC);
    }

    public void setCacheAvailable() {
        System.out.println("Cache is back online. Accepting traffic.");
        AvailabilityChangeEvent.publish(eventPublisher, this, ReadinessState.ACCEPTING_TRAFFIC);
    }
}
When setCacheUnavailable() is called, the /actuator/health/readiness endpoint will start returning a 503 status, and Kubernetes will remove the Pod from the service's load balancer.
Conclusion
You have now learned one of the most critical aspects of running reliable applications on Kubernetes. By correctly implementing liveness, readiness, and startup probes, you enable the platform to automatically manage the health of your microservices, leading to more resilient and self-healing systems.
Key Takeaways:
- Liveness Probes are for restarting broken containers. They should only check internal application state.
- Readiness Probes are for pausing traffic to unready containers. They should check critical external dependencies.
- Startup Probes protect slow-starting applications from being killed prematurely.
- Spring Boot Actuator provides dedicated endpoints (
/actuator/health/liveness,/actuator/health/readiness) for seamless integration. - Understanding the trade-offs in probe configuration is a common topic in mid-senior level interviews.
- You can programmatically control the readiness state using
AvailabilityChangeEventfor advanced use cases.
In our next lesson, we will continue building on our production-ready deployment by learning how to configure resource requests and limits for containers. This will ensure your healthy applications get the CPU and memory they need to perform well without impacting other services in the cluster.
Can't find a good explanation? Sign up and we'll make it for you
Sign up