
Hello! Let's dive into our next lesson on Kubernetes.
In our last session, we configured health probes to let Kubernetes know if our application is alive and ready for traffic. This is the foundation of a self-healing system. However, a healthy application can still perform poorly or become unstable if it's starved of resources. This brings us to the crucial next step in creating production-ready services.
This lesson focuses on how to configure resource requests and limits for containers to ensure Quality of Service (QoS). Mastering this topic is essential for building stable, performant, and cost-effective microservices on Kubernetes. For your interview preparation, explaining the trade-offs in resource management demonstrates a senior-level understanding of running systems in production.
The Two Pillars of Resource Management: Requests and Limits
In Kubernetes, you manage a container's primary computing resources—CPU and memory—using two settings: requests and limits. Understanding their distinct roles is fundamental.
- Requests: This is the amount of a resource that you guarantee for a container. The Kubernetes scheduler uses the
requestsvalue to decide which node to place a Pod on. It will only schedule a Pod on a node that has enough unallocated resources to satisfy the Pod's requests. - Limits: This is the maximum amount of a resource that a container is allowed to use. This setting is enforced by the container runtime on the node.
The consequence of exceeding a limit depends entirely on whether the resource is CPU or memory.
- CPU: CPU is a "compressible" resource. If your application tries to use more CPU than its limit, it will be throttled, meaning its CPU usage is artificially capped. This won't kill the container, but it will slow down your application, leading to increased latency.
- Memory: Memory is a "non-compressible" resource. You can't "slow down" memory usage. If a container tries to allocate more memory than its limit, the container will be terminated with an "Out of Memory" (OOM) kill.
Setting these values incorrectly can lead to significant problems:
- Over-provisioning (setting requests too high) wastes cluster resources and money.
- Under-provisioning (setting requests too low) can lead to CPU throttling and OOM kills, causing instability and poor performance.
Ensuring Stability with Quality of Service (QoS)
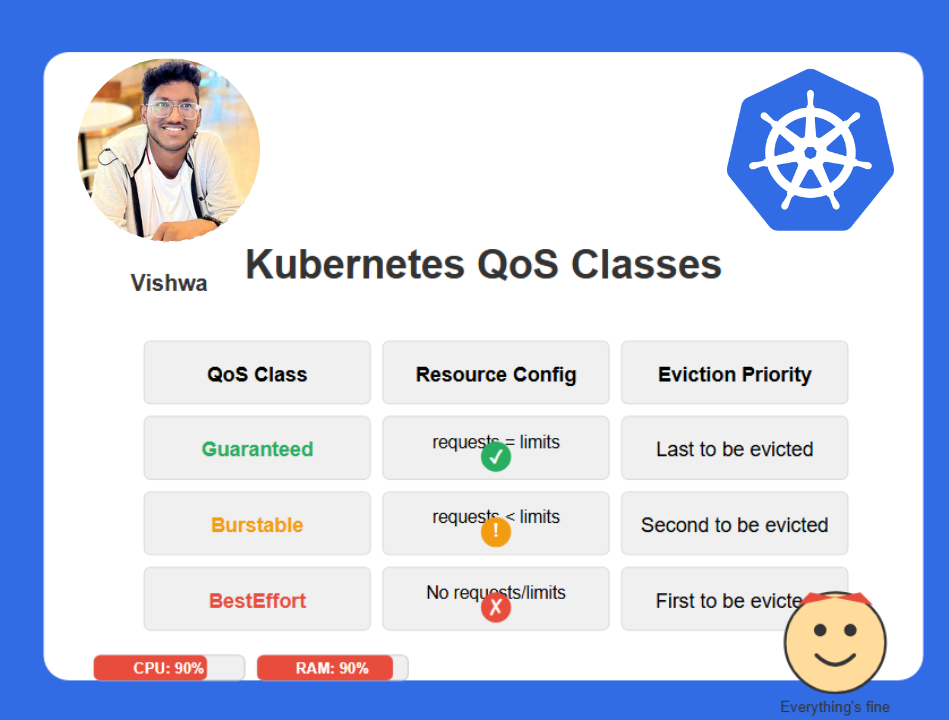
Based on the requests and limits you set, Kubernetes assigns one of three Quality of Service (QoS) classes to your Pods. This class determines how Kubernetes prioritizes your Pods and which ones it evicts first when a node runs out of resources (like memory).
-
Guaranteed (Highest Priority):
- How to get it: Every container in the Pod must have both a memory and a CPU request and limit, and the values for requests must be equal to the values for limits.
- Behavior: These Pods are the last to be killed if the node is under resource pressure. This is the class you want for your most critical, stateful workloads like databases or message brokers.
-
Burstable (Medium Priority):
- How to get it: At least one container in the Pod has a CPU or memory request, but it doesn't meet the criteria for the
Guaranteedclass (e.g., requests are less than limits, or only one resource is specified). - Behavior: These Pods can "burst" and use more resources than requested (up to their limits) if those resources are available on the node. They are evicted before
GuaranteedPods but afterBestEffortPods. Most of your stateless microservices will fall into this category.
- How to get it: At least one container in the Pod has a CPU or memory request, but it doesn't meet the criteria for the
-
BestEffort (Lowest Priority):
- How to get it: No containers in the Pod have any memory or CPU requests or limits set.
- Behavior: These Pods are the first to be killed when a node is low on resources. You should avoid this class for any production workload.
Understanding and deliberately choosing a QoS class is a key part of designing resilient systems on Kubernetes.
Best Practices for Spring Boot Microservices
Now, let's translate these general concepts into specific, actionable advice for the Java and Spring Boot applications you're building. The JVM's behavior within a container adds important nuances that you must consider.
The following article is a fantastic resource that details the specific challenges and best practices for running Java on Kubernetes.
Production Considerations for Spring on Kubernetes
The article 'Production Considerations for Spring on Kubernetes' by Oded Shopen is a must-read for any Java developer working with Kubernetes. It brilliantly explains the nuances of configuring CPU and memory for JVM-based applications.
Please read the sections 'CPU Requests and Limits' and 'Memory Requests and Limits'. Focus on: The arguments for not setting CPU limits in production. The recommendation to set memory requests and limits to the same value for Java workloads. The critical discussion on how the JVM determines active processors and why you should explicitly set -XX:ActiveProcessorCount. The advice on configuring JVM memory (-XX:MaxRAMPercentage) to respect the container's memory limit.
Let's summarize and expand on the key strategies from that article.
Strategy 1: The CPU Limit Debate
For many workloads, especially latency-sensitive APIs, a common best practice is to set a CPU request but not a CPU limit.
- Why? Setting a CPU
requestensures your application gets a guaranteed slice of CPU time for scheduling. By not setting alimit, you allow your application to "burst" and use any idle CPU cycles on the node. This is perfect for handling sudden traffic spikes without experiencing latency from CPU throttling. You've already paid for the node's CPU—why not use it if it's free? - The Exception: You might set a CPU limit for CPU-intensive background jobs where latency isn't a concern, or in shared development/staging environments to prevent one runaway application from impacting others.
Strategy 2: The Memory Golden Rule for Java
For Java applications, the recommended practice is to set the memory request equal to the memory limit.
- Why? This puts your Pod into the
GuaranteedQoS class for memory. The JVM allocates a large heap on startup and manages its own memory. It performs best with a stable, predictable amount of memory. If your Pod is in theBurstableclass for memory and the node comes under pressure, Kubernetes could evict your Pod even if it's operating within its own heap limits. Settingrequest == limitprevents this and makes your service far more stable.
Strategy 3: Tune the JVM for the Container
This is arguably the most critical and often overlooked step for Java developers. The JVM needs to be made aware that it's running inside a resource-constrained container, not on a big server.
-
Set the Active Processor Count: The JVM uses
Runtime.getRuntime().availableProcessors()to configure thread pools (like the default Fork/Join pool) and select a garbage collector. Inside a container, this call can sometimes reflect the node's total cores, not your container's CPU share. This can lead the JVM to create too many threads, causing unnecessary context switching and poor performance.- Solution: Explicitly tell the JVM how many cores it should use. You do this via a JVM flag:
-XX:ActiveProcessorCount=N.Nshould typically match your CPU request.
- Solution: Explicitly tell the JVM how many cores it should use. You do this via a JVM flag:
-
Set the Heap Size: By default, the JVM may only use a fraction of the container's memory limit for its heap, leaving a lot of memory wasted.
- Solution: Tell the JVM to use a percentage of the container's memory for its heap. The modern way to do this is with
-XX:MaxRAMPercentage=80.0(using 80% is a safe start, leaving 20% for other JVM spaces like metaspace, thread stacks, and native memory).
- Solution: Tell the JVM to use a percentage of the container's memory for its heap. The modern way to do this is with
You can pass these settings to your Spring Boot application through the JAVA_TOOL_OPTIONS environment variable in your Kubernetes manifest.
Putting It All Together: A Production-Ready Configuration
Let's see how these principles look in a Kubernetes Deployment YAML for a typical Spring Boot microservice. First, though, remember the cardinal rule: profile your application first! Don't guess these values. Use tools like kubectl top, Prometheus, or a load testing environment to understand your service's typical and peak resource usage.
This guide provides an excellent overview of profiling techniques.
How to Right-Size Kubernetes Resource Requests and ...
To apply these patterns, you first need data. This article provides a great practical guide on how to gather the necessary metrics to 'right-size' your resource settings.
Skim through the sections 'Step 1: Profile Your Application' and 'Step 3: Set Appropriate Values'. You don't need to implement the scripts, but focus on the concepts: Using kubectl top for a quick look. The idea of using P95 (95th percentile) usage from Prometheus for requests. The different patterns for different workload types (Web API vs. Background Worker).
Assuming we've profiled our order-service and found it needs about 1 core and 2 GiB of memory to perform well, here is a production-ready configuration:
apiVersion: apps/v1
kind: Deployment
metadata:
  name: order-service-deployment
spec:
  replicas: 3
  template:
    spec:
      containers:
      - name: order-service
        image: my-registry/order-service:1.2.3
        ports:
        - containerPort: 8080
        env:
        - name: JAVA_TOOL_OPTIONS
          value: "-XX:ActiveProcessorCount=1 -XX:MaxRAMPercentage=80.0 -XX:+UseG1GC"
        resources:
          requests:
            cpu: "1000m"      # 1 core (1000 millicores)
            memory: "2Gi"     # 2 Gibibytes
          limits:
            # No CPU limit is set to allow bursting for traffic spikes.
            memory: "2Gi"     # Limit equals request for Guaranteed QoS on memory.
This configuration achieves:
- Guaranteed Memory: The service is protected from memory-pressure evictions.
- Burstable CPU: The service can handle unexpected load without being throttled, improving latency.
- JVM Awareness: The JVM's thread pools and heap are correctly sized for the container's environment, ensuring efficient operation.
Test your understanding!
A teammate has deployed a new notification-service. Users are complaining that notifications are sometimes severely delayed. During high load, some pods also seem to restart randomly. Here is their resource configuration:
resources:
  requests:
    cpu: "100m"
    memory: "256Mi"
  limits:
    cpu: "200m"
    memory: "512Mi"
Based on what you've learned, what are the two most likely causes of these problems, and how would you advise your teammate to fix them?
Show answer
- Delayed Notifications (High Latency): The most likely cause is CPU throttling. The CPU limit is set very low at
200m(0.2 cores). When load increases, the application's CPU usage likely hits this cap, and Kubernetes throttles it, slowing down processing and causing delays. - Random Restarts: The most likely cause is OOM kills. The memory request (
256Mi) is much lower than the limit (512Mi), placing the Pod in theBurstableQoS class. When the node experiences memory pressure, this Pod is a prime candidate for eviction. Furthermore, the JVM inside may not be configured to respect the512Milimit, causing it to exceed the cap and be OOMKilled.
Advice for fixing:
- Profile the application to find its actual CPU and memory needs under load.
- Remove the CPU limit to prevent throttling and allow the service to handle bursts. Increase the CPU
requestto a more realistic value based on profiling (e.g.,500m). - Set memory request equal to the memory limit to achieve
GuaranteedQoS for memory. Base this value on profiling (e.g.,1Gi). - Set
JAVA_TOOL_OPTIONSto configure-XX:ActiveProcessorCountto match the new CPU request and-XX:MaxRAMPercentage=80.0to ensure the heap respects the new memory limit.
Conclusion
You've now added another critical skill for running production-grade services on Kubernetes. Correctly configuring resource requests and limits moves you beyond just "getting it running" to "getting it running reliably and efficiently."
Key Takeaways:
requestsare for scheduling guarantees;limitsare for runtime enforcement.- Exceeding the CPU limit causes throttling; exceeding the memory limit causes an OOM kill.
- Your resource settings determine your Pod's QoS class (
Guaranteed,Burstable,BestEffort), which dictates its eviction priority. - For Java/Spring Boot:
- Set memory request == memory limit.
- Consider setting a CPU request but no limit.
- Always tune the JVM with
-XX:ActiveProcessorCountand-XX:MaxRAMPercentage.
- Always profile your applications. Do not guess resource values.
We have now meticulously configured our application's probes and resources within its deployment manifest. This file is becoming quite detailed! In our next lesson, we will learn how to use Helm, the package manager for Kubernetes, to template this complexity, manage different configurations, and streamline our application deployments.
Can't find a good explanation? Sign up and we'll make it for you
Sign up