
Hello! Welcome to our next lesson.
In our last session, we spent time meticulously crafting a Kubernetes Deployment manifest, focusing on the critical details of resource requests and limits to ensure our Spring Boot application runs reliably. You probably noticed that even for a single service, the YAML file can become quite complex. Now, imagine managing these files for a dozen microservices across development, staging, and production environments. This manual approach quickly becomes unscalable and error-prone.
This lesson introduces the solution to that complexity. We'll explore Helm, the package manager for Kubernetes. Our goal is to explain the purpose of Helm and describe the structure of a Helm chart. For your interview preparation, demonstrating that you can manage complex application deployments efficiently with a tool like Helm is a hallmark of a senior engineer who thinks about production readiness and operational efficiency.
Let's get started.
The Problem: YAML Overload and Configuration Drift
As we've seen, deploying a single microservice often requires multiple Kubernetes resources: a Deployment, a Service, an Ingress, maybe a ConfigMap or a Secret. Managing these as individual YAML files presents several challenges:
- Repetition: You repeat metadata like labels and application names across all files. Changing a label means editing multiple files, which is tedious and risky.
- Environment-Specific Configuration: Your
devenvironment might need one replica and 256Mi of memory, while yourprodenvironment needs ten replicas and 4Gi of memory. Do you maintain separate folders of YAML for each environment? This leads to "configuration drift," where environments become inconsistent. - Lifecycle Management: How do you reliably upgrade an application to a new version? How do you roll back to a previous, stable version if something goes wrong? Doing this manually with
kubectlis complex and lacks auditability.
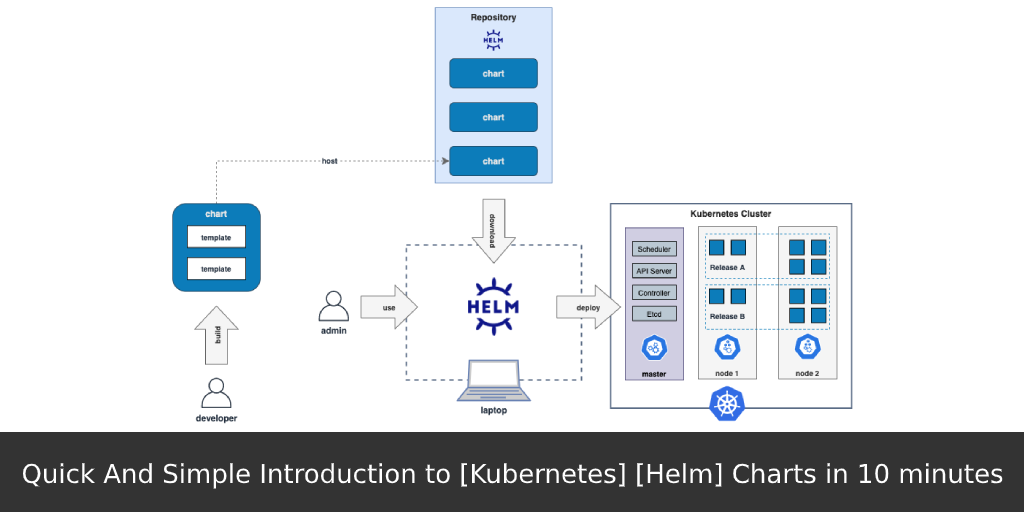
Helm: The Package Manager for Kubernetes
Helm solves these problems by introducing a packaging format called charts. Think of Helm as being for Kubernetes what Maven or Gradle is for Java projects. It helps you define, install, and upgrade even the most complex Kubernetes applications.
To understand Helm's purpose and its core benefits, let's dive into our first resource.
Helm Chart Tutorial: A Step-by-Step Guide with Examples
The article 'Helm Chart Tutorial' from DataCamp provides a concise and clear explanation of what Helm is and the key problems it solves. As you read, think about the challenges of manually managing the YAML files we've discussed.
Please read the section 'What Is Helm and Why Use It?'. Pay close attention to the three main benefits discussed: Parameterization: How Helm avoids hardcoding values. Reusability: How a single chart can be used for multiple environments. Versioning: How Helm tracks releases and supports rollbacks.
As the article explained, Helm's power comes from three core concepts:
- Templating: Helm charts use the Go templating language. This allows you to use variables, loops, and conditional logic inside your Kubernetes manifests. Instead of hardcoding
replicas: 3, you can writereplicas: {{ .Values.replicaCount }}. You can then provide the value forreplicaCountat deployment time. - Packaging (Charts): A Helm chart is a bundle of all the templated manifest files, along with metadata and default configuration, for a specific application. This creates a single, versioned artifact for your application's deployment.
- Release Management: When you install a chart, Helm creates a release. A release is a specific instance of a chart running in your cluster. Helm keeps a history of all your releases, making it simple to run commands like
helm upgradeorhelm rollback.
The Anatomy of a Helm Chart
Now that we understand why Helm is useful, let's dissect its structure. A Helm chart is simply a directory of files organized in a specific way. The easiest way to see this is by using the helm create command, which scaffolds a new chart for you.
If you were to run helm create my-microservice, you would get a directory structure that looks something like this:
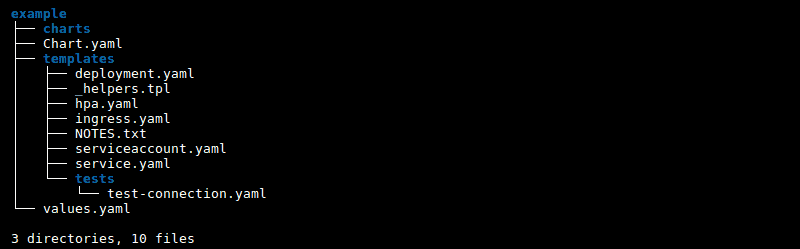
Let's break down the most important files and directories.
An in-depth guide to building a Helm chart from the ground ...
This next article, 'An in-depth guide to building a Helm chart from the ground up', offers a great breakdown of the chart structure. It complements the previous reading by providing a clear, itemized list of each component's role.
Read the section 'Helm Chart tree structure'. It will give you a clear definition for each of the main components: Chart.yaml, values.yaml, and the templates/ directory.
To summarize and expand on what you've just read:
-
Chart.yaml: This is the metadata file for your chart. It's like thepom.xmlin a Maven project. It contains the chart'sname,version,description, and importantly, theappVersion(the version of the actual application you are deploying).apiVersion: v2 name: my-microservice description: A Helm chart for my Spring Boot microservice type: application version: 0.1.0 # The version of the chart itself appVersion: "1.0.0" # The version of the application image -
values.yaml: This file is central to Helm's power. It contains the default values for all the variables used in your templates. This is where you define the default configuration for your application, such as the image repository, tag, replica count, and service ports.replicaCount: 1 image: repository: my-registry/my-microservice pullPolicy: IfNotPresent tag: "1.0.0" # Default tag, can be overridden service: type: ClusterIP port: 8080 -
templates/: This directory holds the templated Kubernetes manifest files. Instead of static YAML, these files contain placeholders that Helm will populate with values fromvalues.yaml(or values you provide on the command line).For example, your
templates/deployment.yamlmight look like this:apiVersion: apps/v1 kind: Deployment metadata: name: {{ .Release.Name }}-{{ .Chart.Name }} spec: replicas: {{ .Values.replicaCount }} # Uses the value from values.yaml template: spec: containers: - name: {{ .Chart.Name }} image: "{{ .Values.image.repository }}:{{ .Values.image.tag }}" # Combines values ports: - containerPort: {{ .Values.service.port }}Notice the
{{ .Values... }}syntax. This is how Helm accesses the configuration defined invalues.yaml. You also see other built-in objects like{{ .Release.Name }}(the unique name for this specific deployment) and{{ .Chart.Name }}(the name fromChart.yaml). -
templates/_helpers.tpl: This is a special file where you can define reusable template snippets, or "helper templates." This helps keep your main template files clean and follows the Don't Repeat Yourself (DRY) principle. -
charts/: This directory is used for chart dependencies, also known as sub-charts. For example, if your application requires a Redis database, you could include the official Redis chart as a dependency here instead of defining it yourself.
Test your understanding!
You are packaging a Spring Boot user-service. Below is a hardcoded snippet from its deployment.yaml. Your task is to make it a Helm template.
# ... spec ...
replicas: 2
# ... template ...
      containers:
        - name: user-service
          image: "my-company/user-service:2.5.1"
          resources:
            requests:
              cpu: "500m"
              memory: "1Gi"
How would you modify this snippet to use Helm templates, and what would the corresponding values.yaml file look like?
Show answer
The goal is to replace all hardcoded, environment-specific values with template placeholders.
Modified templates/deployment.yaml snippet:
# ... spec ...
replicas: {{ .Values.replicaCount }}
# ... template ...
      containers:
        - name: {{ .Chart.Name }}
          image: "{{ .Values.image.repository }}:{{ .Values.image.tag }}"
          resources:
            requests:
              cpu: {{ .Values.resources.requests.cpu }}
              memory: {{ .Values.resources.requests.memory }}
Corresponding values.yaml:
# Default values for user-service.
replicaCount: 2

image:
  repository: my-company/user-service
  tag: "2.5.1"

# Resource requests and limits for the container.
resources:
  requests:
    cpu: "500m"
    memory: "1Gi"
This structure makes it easy to override these values for different environments without touching the template logic. For instance, in production, you could supply a different values file with replicaCount: 10.
Conclusion
In this lesson, we've transitioned from managing raw, static Kubernetes manifests to understanding a powerful, structured approach using Helm. This is a fundamental skill for operating microservices at scale.
Key Takeaways:
- Helm is a package manager for Kubernetes that solves the problems of YAML complexity, configuration drift between environments, and application lifecycle management.
- Its core benefits are templating (parameterization), packaging (charts), and release management (upgrades and rollbacks).
- A Helm chart has a standard directory structure:
Chart.yamlfor metadata.values.yamlfor default configuration values.templates/for the Kubernetes manifest templates that consume those values.
We've covered the "what" and "why" of Helm and its structure. In our next lesson, we will put this theory into practice. You will create a basic Helm chart to package and deploy a Spring Boot microservice on Kubernetes, taking the manifests we've built in previous lessons and turning them into a reusable, production-ready package.
Can't find a good explanation? Sign up and we'll make it for you
Sign up