
Hello! Let's dive into our next lesson on Kubernetes.
In our previous session, we laid the theoretical foundation, exploring the architecture of a Kubernetes cluster. You learned about the control plane acting as the brain, the worker nodes as the muscle, and the Pod as the fundamental unit that runs your containers. We ended by discussing Kubernetes's declarative nature: you define the desired state, and the control plane's controllers work to make it a reality.
Today, we'll put that theory into practice. We're moving from the "what" to the "how." Our goal is to implement a Kubernetes Deployment to manage application replicas and perform rolling updates for zero-downtime deployments. This is a core competency for any developer working with microservices on Kubernetes and a very common topic in technical interviews.
From Pods to Deployments
While a Pod is the smallest deployable unit, you rarely create individual Pods directly in a production environment. What happens if the node it's running on fails? Or if you need to scale up to handle more traffic?
This is where the Deployment object comes in. A Deployment is a higher-level resource that provides declarative updates to Pods. In simple terms, you tell the Deployment: "I want 3 replicas of my application, using this container image, to be running at all times."
The Deployment controller (part of the Controller Manager you learned about) then takes over. It creates a helper object called a ReplicaSet, which in turn is responsible for creating and maintaining the desired number of Pods. If a Pod dies, the ReplicaSet ensures a new one is created.
The real power of Deployments shines when you need to update your application. Instead of manually stopping old Pods and starting new ones, you simply update the Deployment's Pod template (e.g., with a new container image version), and the Deployment controller manages the update process for you, aiming to do so with no downtime.
The Rolling Update Strategy
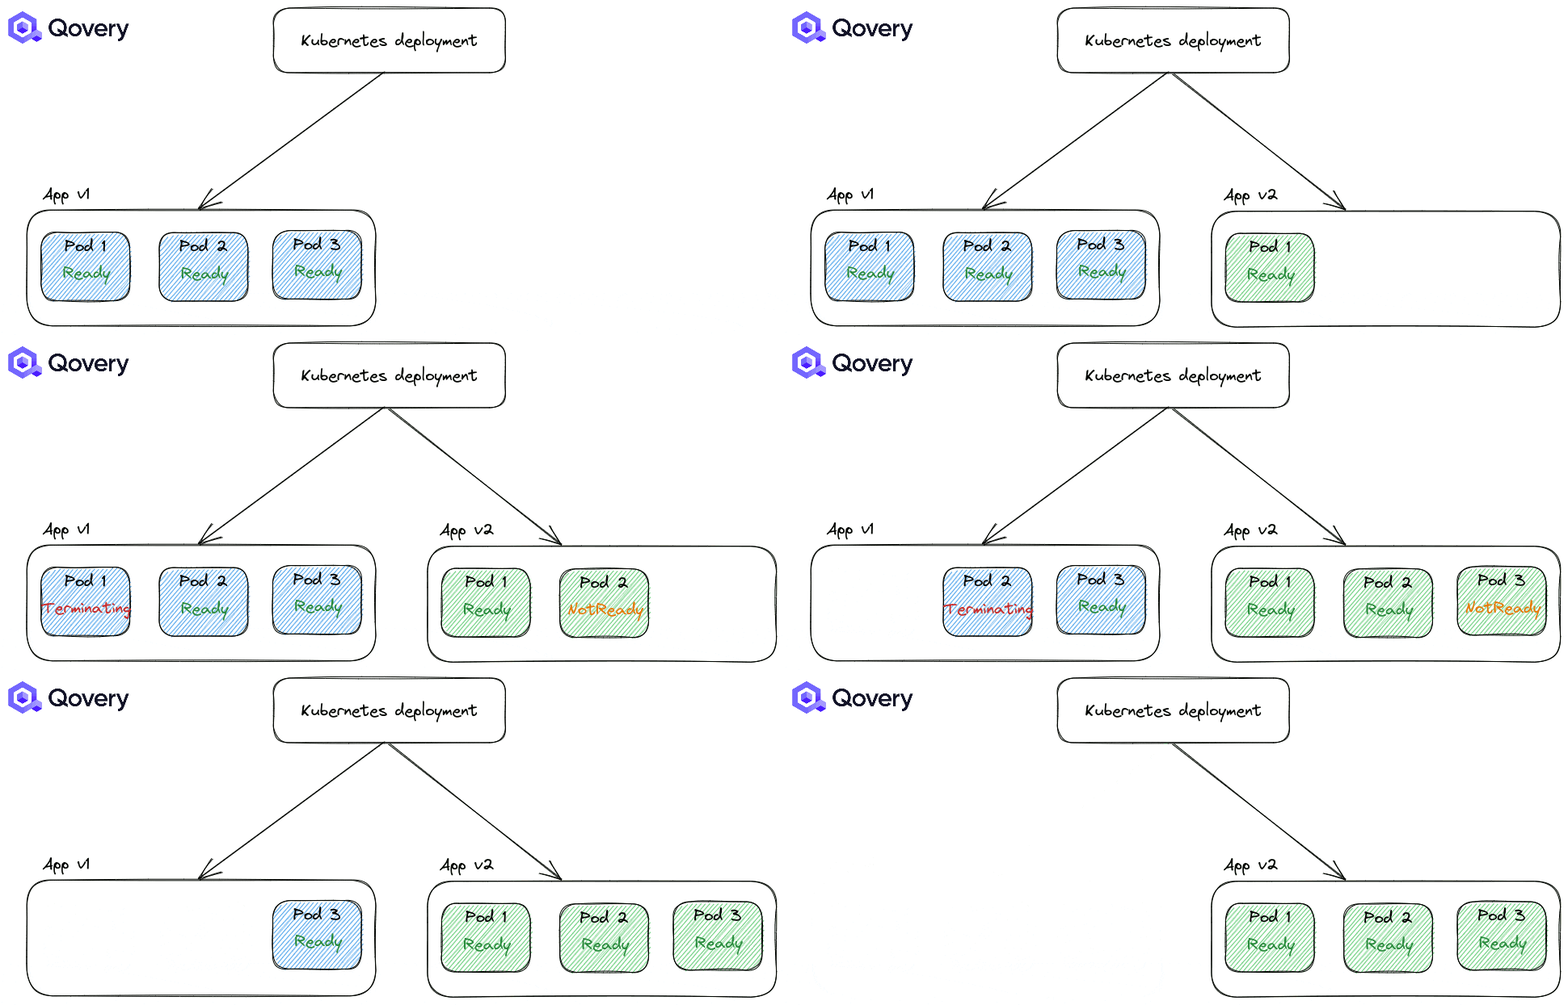
The default and most common strategy used by Deployments is the rolling update. This strategy allows your application to remain available throughout the update process by incrementally replacing old Pods with new ones.
This GIF provides a great high-level visualization of the process:
To understand the mechanics and benefits of this strategy, let's turn to a guide from Semaphore.
Kubernetes Deployments: A Guide to the Rolling Update ...
This article provides an excellent overview of the rolling update strategy and its key benefits.
Please read the introduction and the section 'What is the Rolling Update Deployment Strategy'. Focus on its primary goal and the key benefits it provides, such as incremental updates and continuous availability.
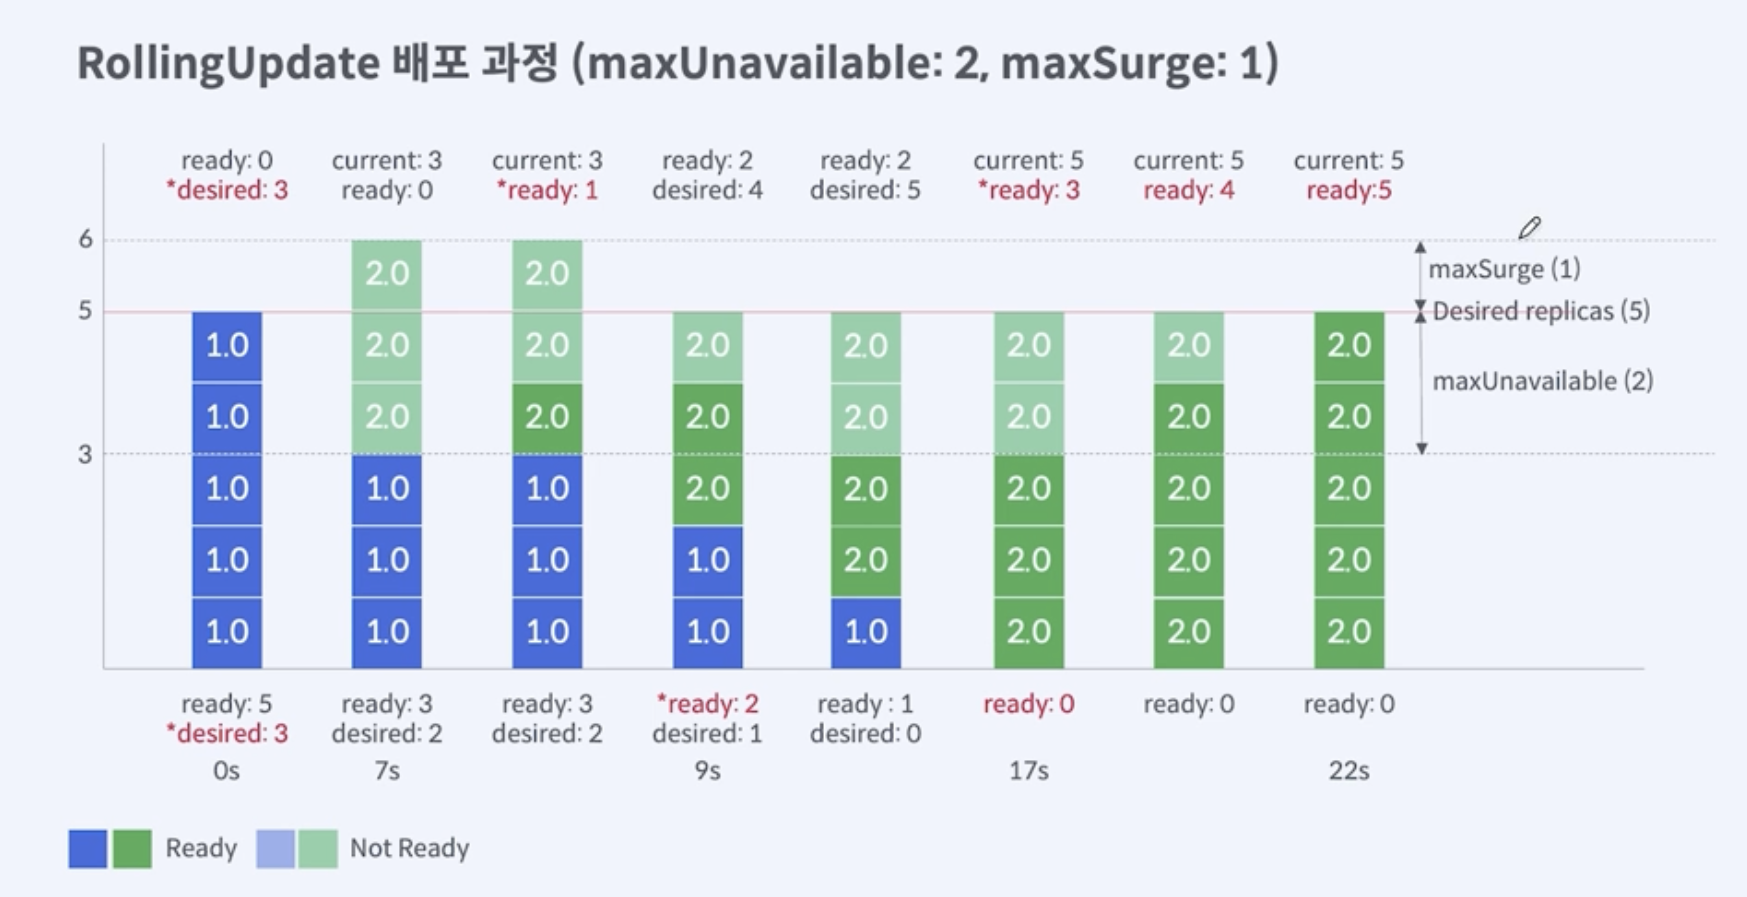
As you read, the rolling update ensures continuous availability by making sure a certain number of Pods are always running and ready to serve traffic. This process is highly configurable using two key parameters in your Deployment manifest:
maxUnavailable: The maximum number of Pods that can be unavailable during the update. This can be an absolute number (e.g.,1) or a percentage of the desired replicas (e.g.,25%).maxSurge: The maximum number of Pods that can be created above the desired number of replicas. This can also be an absolute number or a percentage.
These two settings allow you to balance deployment speed against risk and resource consumption. For example, with replicas: 4, maxUnavailable: 1, and maxSurge: 1, Kubernetes can take down one old Pod and bring up one new Pod. At any given time during the update, you will have between 3 (4 - 1) and 5 (4 + 1) Pods in total.
This chart visualizes how these parameters work together with 5 desired replicas:
Test your understanding!
You have a critical service with replicas: 10. You want to perform updates as safely as possible, ensuring that at least 90% of your capacity is always available, and you want to avoid adding too much extra load on the cluster. How might you configure maxUnavailable and maxSurge? Justify your choices.
Show answer
A good configuration would be:
maxUnavailable: 1(or10%): This ensures that at most one Pod is taken down at a time, keeping 9 out of 10 replicas (90% capacity) running to serve traffic.maxSurge: 1: This allows Kubernetes to create one new Pod before taking down an old one. This "1-up, 1-down" approach is very safe. SettingmaxSurgeto0would also work, but would be slightly slower as Kubernetes would have to wait for a Pod to be terminated before creating a new one.
This configuration prioritizes availability over the speed of the rollout, which is appropriate for a critical service.
Implementing a Production-Ready Deployment
Now, let's create a Deployment. A basic Deployment is simple, but for production use and to achieve true zero-downtime, we need to add a few more things.
Kubernetes Deployments: A Guide to the Rolling Update ...
The Semaphore article provides a well-annotated YAML manifest for an Nginx deployment. This is a perfect template for understanding how to build a robust Deployment.
Read the sections 'Preparing for a Rolling Update' and 'Configuring a Rolling Update'. Pay close attention to the YAML file. Understand the purpose of revisionHistoryLimit, minReadySeconds, and especially the readinessProbe and livenessProbe sections.
Let's break down the provided nginx-server.yaml and highlight the production-readiness aspects:
apiVersion: apps/v1
kind: Deployment
metadata:
  name: nginx-deployment
spec:
  replicas: 3
  revisionHistoryLimit: 5 # Good practice: limits stored old ReplicaSets
  selector:
    matchLabels:
      app: nginx
  strategy:
    type: RollingUpdate
    rollingUpdate:
      maxSurge: 1
      maxUnavailable: 33%
  minReadySeconds: 5 # Safety buffer: wait 5s after a pod is ready before it's 'available'
  template:
    metadata:
      labels:
        app: nginx
    spec:
      containers:
      - name: nginx
        image: nginx:1.25.3 # Key: Use a specific version tag, not 'latest'
        ports:
        - containerPort: 80
        # This probe is critical for zero-downtime updates
        readinessProbe:
          httpGet:
            path: /
            port: 80
          initialDelaySeconds: 10
          periodSeconds: 30
        # This probe keeps unhealthy pods from staying in service
        livenessProbe:
          httpGet:
            path: /
            port: 80
          initialDelaySeconds: 15
          periodSeconds: 45
The most critical elements for a zero-downtime deployment here are the probes:
livenessProbe: Asks "Is my application still alive?". If this probe fails, Kubernetes will kill the container and restart it. This helps recover from deadlocks or frozen states.readinessProbe: Asks "Is my application ready to serve traffic?". A new Pod will not receive any traffic until its readiness probe passes. During a rolling update, Kubernetes waits for the new Pod's readiness probe to succeed before it considers terminating an old Pod. This is the key mechanism that prevents requests from being sent to a new application instance that is still starting up.
For your Spring Boot applications, you would configure these probes to hit the Spring Boot Actuator endpoints you implemented earlier (e.g., /actuator/health/liveness and /actuator/health/readiness).
Managing Rollouts with kubectl
Once you have your Deployment.yaml file, you use kubectl to bring it to life and manage its lifecycle.
Kubernetes Deployments: A Guide to the Rolling Update ...
Let's see how to apply, monitor, and roll back these deployments using the command line.
Read the sections 'Performing a Rolling Update' and 'Rolling Back an Update'. Focus on the kubectl commands shown: kubectl set image, kubectl get pods, kubectl rollout status, kubectl rollout history, and kubectl rollout undo.
Here's a summary of the essential commands you just reviewed:
- Create or update:
kubectl apply -f your-deployment.yaml - Trigger an update imperatively:
kubectl set image deployment/nginx-deployment nginx=nginx:1.25-alpine - Check rollout status:
kubectl rollout status deployment/nginx-deployment - View deployment history:
kubectl rollout history deployment/nginx-deployment - Roll back to the previous version:
kubectl rollout undo deployment/nginx-deployment - Roll back to a specific revision:
kubectl rollout undo deployment/nginx-deployment --to-revision=2
Understanding how rollbacks work is key. When you update a Deployment, Kubernetes doesn't discard the old ReplicaSet; it just scales it down to zero. The revisionHistoryLimit determines how many old ReplicaSets are kept. A rollback is simply a matter of scaling the new ReplicaSet down and the desired old ReplicaSet back up. It's fast and reliable.
The "Near" Zero-Downtime Caveat: An Interview Deep Dive
For a senior-level interview, it's not enough to know how to do a rolling update. You need to understand its limitations. Is a default rolling update truly zero-downtime? The answer is "usually, but not always."
Is Kubernetes rolling update truly zero downtime ?
This article explores the nuances of achieving true zero-downtime and is excellent preparation for a deep architectural discussion.
Read from 'Working of Rolling Update' through to the 'Conclusion'. Focus on the 'ISSUES!!!' section, which describes the race condition between a Pod terminating and the network endpoints being updated. Note the key practices in the conclusion.
The core issue is a potential race condition:
- Kubernetes decides to terminate an old Pod. It removes the Pod from the Service's list of endpoints.
- The
kube-proxyon all nodes and any Ingress controllers need to be updated with this new list of endpoints. This takes a small amount of time to propagate. - Kubernetes sends a
SIGTERMsignal to the Pod, starting its graceful shutdown process. - If a request arrives at a node before its
kube-proxyhas been updated, it might still try to forward the request to the terminating Pod, resulting in a connection error.
How do we solve this?
- Graceful Shutdown: Your Spring Boot application should handle the
SIGTERMsignal correctly, finishing in-flight requests but not accepting new ones. Spring Boot does this by default. preStopLifecycle Hook: This is a powerful tool. You can configure a hook in your Pod spec that executes before theSIGTERMsignal is sent. A common practice is to add a simplesleepcommand (e.g.,sleep 5). This pauses the termination process, giving the cluster's networking components enough time to update before your application even begins to shut down.
Mentioning this race condition and the preStop hook as a mitigation strategy in an interview demonstrates a deep, practical understanding of production systems.
Conclusion
Today, you've learned how to translate the architectural theory of Kubernetes into a practical, core deployment workflow. You now understand how to define, manage, and safely update a stateless application with zero downtime.
Key Takeaways:
- A Deployment is a declarative Kubernetes object used to manage a set of replicated Pods.
- The rolling update strategy ensures service availability by incrementally replacing old Pods with new ones.
- The
maxSurgeandmaxUnavailableparameters control the speed and safety of the rollout. - For true zero-downtime, readiness probes are essential to ensure new Pods are ready for traffic before being added to the service.
- The
kubectl rolloutcommands (status,history,undo) are your tools for managing the update lifecycle. - Real-world zero-downtime requires handling the endpoint update race condition, often by using a
preStophook and ensuring graceful application shutdown.
In our next lesson, we will address a crucial question: now that we have our Deployment running, how do clients actually access it? We will cover exposing applications using different Kubernetes Service types (ClusterIP, NodePort, LoadBalancer), which provides the stable networking layer on top of your dynamically changing Pods.
Can't find a good explanation? Sign up and we'll make it for you
Sign up