
Hello. In the previous lesson, you turned the job-application workspace MVP into user stories, testable acceptance criteria, and an ordered backlog. You now have a sensible answer to “what should I build first?” This lesson establishes the professional project baseline: a reproducible Next.js repository where quality checks and Git workflow support that backlog rather than slow it down.
By the end, you will have a public-ready local repository using Next.js, TypeScript, ESLint, Prettier, and a lightweight pull-request workflow. The next lesson will use this foundation to build and deploy the first responsive application shell.
The baseline you are creating
A repository is more than a folder containing working code. For a portfolio project, it should make three things clear:
- How to run the project
- How code quality is checked
- How changes are made without destabilizing the main branch
For this application, choose a deliberately small toolchain:
| Concern | Choice | Why |
|---|---|---|
| Framework | Next.js App Router | Current React-oriented full-stack framework conventions; useful for frontend roles. |
| Language | TypeScript | Makes application data and component contracts explicit. |
| Styling | Tailwind CSS | Matches tools already present in your frontend experience and supports fast responsive implementation. |
| Linting | ESLint with Next.js and TypeScript rules | Flags common React, Next.js, and TypeScript problems. |
| Formatting | Prettier | Applies one consistent code layout without debates over spacing or line wrapping. |
| Version control | Git and GitHub pull requests | Produces reviewable evidence of incremental development. |
It is important not to confuse the responsibilities of your checks:
- Prettier formats code: indentation, wrapping, quotes, commas, and similar presentation decisions.
- ESLint lints code: it detects suspicious patterns and applies project rules, including React and Next.js rules.
- TypeScript type-checking verifies that the types in the program are internally consistent.
- A production build verifies that Next.js can compile the application for deployment.
One tool cannot substitute for the others. In particular, formatting does not prove that your application is type-safe, and a successful build should not be treated as a replacement for deliberate linting.
Read the official Next.js installation guide to confirm the current scaffold choices, Node.js requirement, and built-in TypeScript support. Use it as the source of truth if the CLI wording differs slightly from this lesson.
In the “Create with the CLI” section, read the create-next-app introduction, then review the listed customization prompts. Next, in “Run the development server” and “Set up TypeScript,” read the TypeScript setup notes. Notice that Next.js generates and maintains a recommended tsconfig.json configuration rather than requiring you to invent one.
Scaffold the application intentionally
First, confirm that your Node.js version meets the current Next.js minimum requirement:
node --version
npm --version
The official documentation currently specifies Node.js or later. If your installed version is older, update Node.js before scaffolding rather than trying to repair dependency problems afterward.
Create the project from the directory where you keep development work:
npx create-next-app@latest job-application-workspace
When prompted, select these options:
| Prompt | Choice | Reason |
|---|---|---|
| TypeScript | Yes | This project will model application data and UI state with types. |
| Linter | ESLint | Use the established Next.js-aware linter. |
| React Compiler | No for now | It is not needed to deliver this MVP; keep the initial setup understandable. |
| Tailwind CSS | Yes | A practical, familiar styling system for the application shell. |
Code inside src/ directory | Yes | Separates source code from repository configuration and documentation. |
| App Router | Yes | This is the recommended routing model for new Next.js applications. |
| Import alias | Yes, retain @/* | Avoids fragile chains of relative imports as the project grows. |
Include AGENTS.md | Your choice | It does not affect the runtime application. Keep it only if you expect to use coding agents and will review their changes carefully. |
Then enter the project and verify that the initial application works:
cd job-application-workspace
npm run dev
Open http://localhost:3000. Make one harmless visible edit to src/app/page.tsx, save it, and verify that the browser updates. This checks the complete local loop: dependencies, development server, file watching, editor, and browser.
At this point, inspect the generated repository rather than deleting unfamiliar files. The most relevant starting files are usually:
| File or directory | Purpose |
|---|---|
src/app/page.tsx | The route component for the home page. |
src/app/layout.tsx | Shared HTML structure and metadata for routes. |
src/app/globals.css | Global styles and Tailwind imports. |
tsconfig.json | TypeScript compiler configuration, including the import alias. |
eslint.config.mjs | ESLint flat configuration. |
.gitignore | Files that must not enter Git history, such as dependencies and build output. |
package.json | Dependencies and project commands. |
The @/* alias lets you write imports such as:
import { ApplicationCard } from "@/components/application-card";
That stays readable when the component is nested several folders away. It is a small convention, but it makes later refactoring less noisy.
Add formatting without weakening linting
A good project baseline makes the easy action the correct one. You should be able to format the repository, then run linting and type checks using memorable commands.
Install Prettier and the compatibility configuration:
npm install --save-dev prettier eslint-config-prettier
Prettier will own formatting. ESLint will own code-quality rules. eslint-config-prettier turns off any ESLint formatting rules that could contradict Prettier.
Read the official Next.js ESLint documentation before changing the generated config. It shows the current flat-config approach, the TypeScript extension, and the recommended way to prevent ESLint and Prettier from fighting each other.
In “Setup ESLint,” read the flat-config setup and compare it with your generated eslint.config.mjs. In “With TypeScript,” read the TypeScript configuration. Finally, in “With Prettier,” read the compatibility rationale. Focus on the distinction between a lint rule and a formatter rule.
Replace the generated eslint.config.mjs with the following configuration, or carefully add the prettier import and entry if your scaffold has a newer equivalent structure:
import { defineConfig, globalIgnores } from "eslint/config";
import nextVitals from "eslint-config-next/core-web-vitals";
import nextTs from "eslint-config-next/typescript";
import prettier from "eslint-config-prettier/flat";

const eslintConfig = defineConfig([
  ...nextVitals,
  ...nextTs,
  prettier,
  globalIgnores([
    ".next/**",
    "out/**",
    "build/**",
    "next-env.d.ts",
  ]),
]);

export default eslintConfig;
This configuration has three meaningful layers:
core-web-vitalsapplies Next.js, React, React Hooks, and stricter performance-related Next.js rules.typescriptadds TypeScript-specific linting rules.prettierdisables conflicting formatting rules, allowing Prettier to be the single formatter.
Next, create .prettierrc.json in the repository root:
{
  "semi": true,
  "singleQuote": true,
  "trailingComma": "all",
  "tabWidth": 2
}
These are conventions, not universal truths. What matters most is that the repository has one explicit, automated formatting style. Do not add lots of subjective ESLint rules such as mandatory quote preferences when Prettier already handles them.
Create .prettierignore as well:
.next
node_modules
coverage
Now update the scripts field in package.json. Preserve the scaffold’s existing scripts and add the quality commands below:
{
  "scripts": {
    "dev": "next dev",
    "build": "next build",
    "start": "next start",
    "lint": "eslint .",
    "lint:fix": "eslint . --fix",
    "typecheck": "tsc --noEmit",
    "format": "prettier . --write",
    "format:check": "prettier . --check"
  }
}
Run the baseline checks now:
npm run format
npm run lint
npm run typecheck
npm run build
A successful npm run build is useful, but remember that modern Next.js no longer automatically runs ESLint during the build. That is why npm run lint remains an explicit project command and later belongs in continuous integration.
For everyday development:
- Use
npm run formatwhen you want Prettier to rewrite files. - Use
npm run format:checkwhen you only want a pass/fail result. - Use
npm run lint:fixonly after understanding what it changes; review the diff afterward. - Run
npm run lint,npm run typecheck, andnpm run buildbefore opening a pull request.
If you use VS Code, enabling Format on Save with the Prettier extension is convenient. It is not, however, a substitute for the repository scripts: a recruiter, collaborator, CI service, or future machine must be able to verify quality without relying on your local editor settings.
Establish a branching workflow that fits a portfolio project
Your project is initially a one-person repository, but use the same basic discipline expected in a team:
mainrepresents the best known stable version.- Each focused backlog item gets its own short-lived branch.
- Every completed change is reviewed in a pull request, even when you are the only reviewer.
- Only a checked, understandable change is merged into
main.
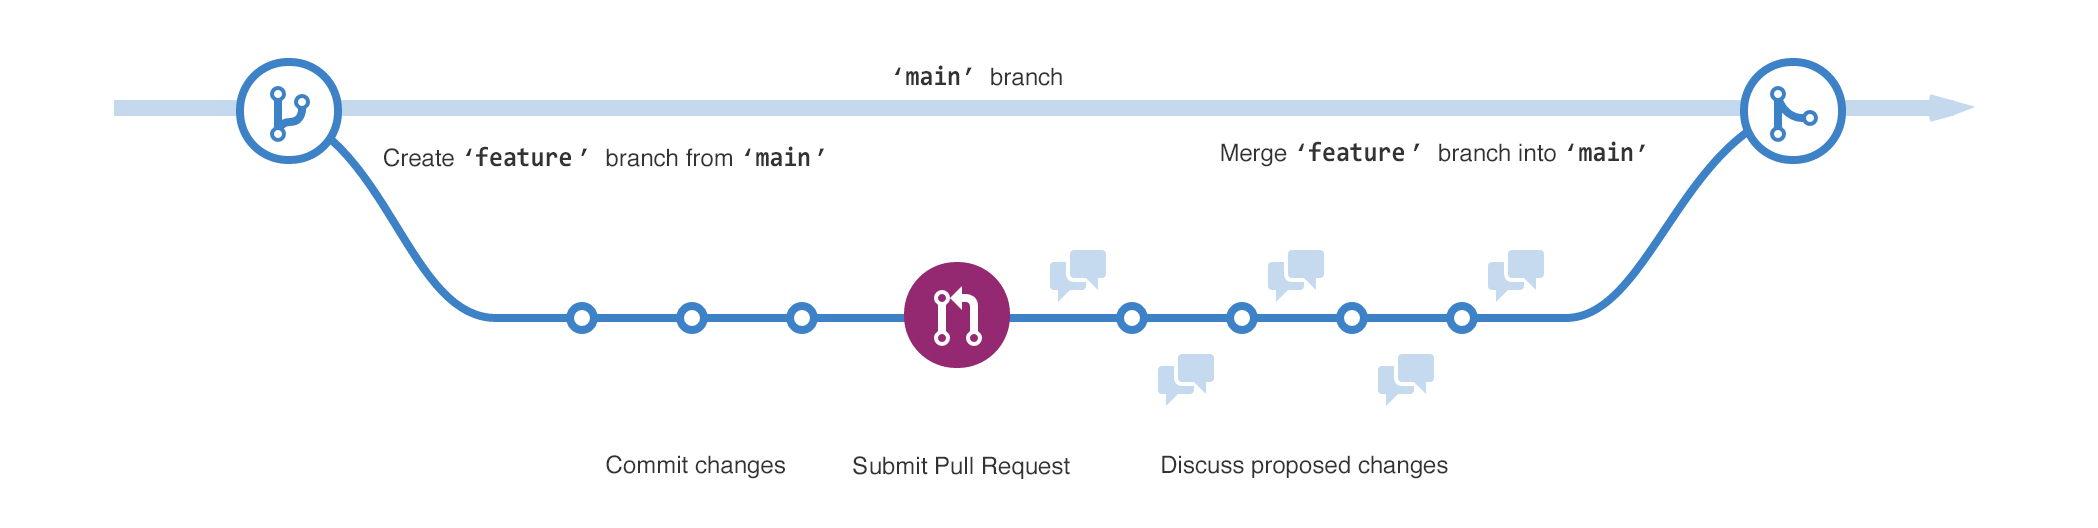
The image shows the underlying idea: work may move independently on a feature branch, while main remains stable. A pull request is not merely a button used to merge code. It creates a review record containing the intent of the change, screenshots or verification notes, discussion, and the status of quality checks.
Create the initial baseline
create-next-app often initializes Git automatically. Check before doing anything else:
git status
git branch --show-current
If Git has not been initialized, run:
git init
git branch -M main
Add your planning material from the previous lesson so the repository documents the reason behind future changes:
docs/
  backlog.md
  mvp-scope.md
The first commit is the one reasonable exception to the “never commit directly to main” rule: it establishes the project baseline.
git add .
git commit -m "chore: initialize job application workspace"
Create an empty GitHub repository named job-application-workspace. Do not ask GitHub to generate a README, license, or .gitignore, because those files already exist locally and would create an unnecessary first-history conflict.
Connect and push your baseline. Substitute your own GitHub username:
git remote add origin https://github.com/YOUR_USERNAME/job-application-workspace.git
git push -u origin main
Before proceeding, confirm that the GitHub repository shows:
- the initial commit;
- your
README.mdif the scaffold generated one; docs/backlog.mdanddocs/mvp-scope.md;- no
node_modules,.next,.env, or.env.localfiles.
Never commit credentials, API tokens, private keys, or local environment files. The application will use environment variables later, but the repository must be safe before deployment is introduced.
Use predictable branch and commit names
Choose branch names that reveal both the kind of work and its intent:
| Change type | Branch example |
|---|---|
| New user-facing capability | feat/pbi-03-create-application |
| Bug repair | fix/invalid-date-feedback |
| Documentation | docs/update-mvp-scope |
| Tooling or maintenance | chore/repository-quality-baseline |
Use concise commit messages in a similar style:
feat(applications): add application form fields
fix(validation): announce required field errors
docs(backlog): clarify persistence scope
chore: configure prettier checks
The prefix makes scanning history faster; the rest describes a completed change in imperative language. Avoid vague messages such as changes, fix stuff, final update, or working.
The workflow for every backlog item
For example, when you begin the first technical backlog item, use this sequence:
-
Start from an up-to-date
mainbranch.git switch main git pull --ff-only origin main -
Create one focused branch.
git switch -c docs/pbi-01-product-decisions -
Make only the changes needed for that backlog item. Keep unrelated cleanup for a separate branch.
-
Inspect what changed.
git status git diff -
Run the repository quality checks.
npm run format:check npm run lint npm run typecheck npm run build -
Stage and commit the verified change.
git add docs/ git commit -m "docs(backlog): define application field decisions" -
Push the branch and open a pull request.
git push -u origin docs/pbi-01-product-decisions -
Review the pull request before merging. Confirm that its description states:
- the backlog item or user story addressed;
- the user-visible or technical outcome;
- how you verified it;
- screenshots when the change affects the interface.
-
Use Squash and merge for this project. It keeps
mainhistory concise: one pull request becomes one purposeful commit. -
Delete the merged remote branch, then update your local
mainbefore starting the next item.
git switch main
git pull --ff-only origin main
git branch -d docs/pbi-01-product-decisions
For now, this workflow uses manual quality checks. Do not add Husky, commit-message enforcement, lint-staged, and multiple third-party plugins merely to make the setup look advanced. Those tools can be valuable once tests and CI exist, but a consistent manual checklist that you actually follow is stronger than complicated automation you do not understand. Later in the course, you will add automated checks before deployment.
Your repository-quality checklist
Before treating this lesson as complete, verify the following in the actual repository:
-
node --versionmeets the current Next.js requirement. - The project starts with
npm run dev. - The project uses TypeScript, App Router, Tailwind CSS, and the
@/*alias. -
npm run formatcompletes successfully. -
npm run format:checkcompletes successfully immediately afterward. -
npm run lintcompletes successfully. -
npm run typecheckcompletes successfully. -
npm run buildcompletes successfully. -
.prettierrc.json,.prettierignore, and the finaleslint.config.mjsare committed. -
docs/mvp-scope.mdanddocs/backlog.mdare in the repository. - The baseline is pushed to GitHub on
main. - You can create a branch, push it, and open a pull request.
- Your GitHub repository contains no secrets or generated dependency folders.
Keep the README.md minimal for now if you wish: project name, one-sentence purpose, local setup commands, and quality commands are enough. You will write the recruiter-friendly final README after the application is built, tested, and deployed.
Key takeaways
You now have a stable engineering foundation for the job-application workspace:
create-next-appgives you a modern Next.js, TypeScript, App Router baseline with less configuration risk.- Prettier handles formatting, while ESLint and TypeScript handle different forms of code correctness.
- Explicit scripts make quality checks reproducible beyond your local editor.
mainshould remain stable; each backlog item belongs on one focused branch.- Pull requests create useful portfolio evidence when they explain intent, verification, and visible results.
- A simple workflow followed consistently is better than prematurely complex Git automation.
Next, you will build and deploy the first responsive application shell. That will turn this well-configured repository into the first public preview of your portfolio project.
Can't find a good explanation? Sign up and we'll make it for you
Sign up