
Welcome back. You have already planned a purposeful set of plein-air studies: thumbnails for composition, a small color study for the overall effect, and selective detail studies. This lesson supplies the written record that makes those studies genuinely useful weeks or months later, when the original light is no longer in front of you.
A landscape does not merely have “sun” or “cloud.” It has a particular direction of light, a particular atmosphere, and a particular sequence of changes. Your aim is to record those relationships clearly enough that, in the studio, you can distinguish what you saw from what you later remembered, photographed, or chose to alter.
By the end of this lesson, you should be able to make a compact field-note page that preserves:
- the direction and character of the light;
- the weather and atmospheric conditions;
- the important color and value relationships;
- transient effects worth preserving; and
- the point at which you decided to “freeze” the observed condition for the painting.
Field notes are evidence, not a diary
A note such as “lovely warm evening” may preserve an emotional impression, but it does not help solve a studio problem. When you later ask, “Why is this roof light warmer than the field?” or “Which way should the cast shadow fall?”, you need statements that can be translated into paint.
Think of a useful observation as a comparison, a location, and, where relevant, a time.
Instead of:
Pretty blue shadows.
Write:
At 5:10 p.m., the house’s north-facing wall is cooler and about one value darker than the sunlit roof; its shadow edge is soft where it meets the blue-gray background trees.
Instead of:
Cloudy, then sunny.
Write:
Broken cloud. Sun appears in 3–5 minute intervals. When sun emerges, the near field shifts from muted olive to yellow-green; distant ridge changes very little. Chose the first sun interval at 4:42 p.m. as the painting condition.
That last phrase, chose the painting condition, is crucial. A field session often contains several incompatible moments. Your notes should not pretend they all occurred at once.
First, locate the light in space
Light direction governs the visible pattern of illuminated planes, attached shadows, and cast shadows. Before making a color note, pause and identify the light in relation to your viewpoint, not merely according to a clock or compass.
Use three complementary descriptions:
| What to record | Example | Why it matters later |
|---|---|---|
| Source direction | “Sun from upper right, slightly behind viewer” | Establishes which planes should receive light |
| Cast-shadow direction | “Fence-post shadows travel down and left across grass” | Provides an observable check on light direction |
| Lit and shadowed planes | “Roof plane and west wall lit; front wall in shadow” | Prevents inconsistent architecture and terrain |
| Light height | “Low enough for long shadows, but not yet sunset-orange” | Indicates the mood and shadow length |
A practical shorthand is to imagine the painting as a clock face. If the light comes from the upper right of your view, write “light from 2 o’clock”; if shadows descend toward the lower left, write “shadows toward 8 o’clock.” Add words such as high, low, raking, frontal, or backlit where helpful.
Do not rely only on the apparent brightness of an object. A pale road can look light because it is locally pale, while a darker roof can appear light because it faces the sun. Record which planes receive direct light, not just which objects seem bright.
The changing position of the sun can reorganize the picture very quickly: a connected dark may break apart, a building face may move from shade into light, or a cast shadow may lengthen across your intended focal area. The Virtual Art Academy guide stresses that you should assess the sun’s movement before beginning and decide whether to work quickly on the passage most likely to change, move your setup, or preserve one chosen condition rather than continually revising with the weather.
Plein Air Painting: 16 Tips For Success - Virtual Art Academy
Read the relevant practical guidance from Virtual Art Academy before your next outdoor session. It connects the movement of the sun to changing shadow shapes and explains how glare, reflected clothing color, and direct sun on the work surface can distort what you think you are seeing.
In Tip 3, “Plan the changes in light,” read from the light-planning guidance. Focus on the decision to preserve an original light condition rather than altering the painting each time the sun moves. Then read Tips 5–7 and 12, from the viewing-condition advice. Notice that the scene, palette, and canvas should be judged under conditions that do not introduce colored reflections or glare.
A useful distinction: observed light versus studio light
At the end of a session, you may decide to make a studio painting that combines the long cast shadows from 5:00 p.m. with the more vivid sky of 5:30 p.m. That can be a sound artistic decision. Just label it accurately:
- Observed: “At 5:00, shadows reached the path.”
- Observed: “At 5:30, clouds opened and sky became more saturated.”
- Studio decision: “Keep 5:00 shadow design; borrow the clearer 5:30 sky.”
This separates evidence from invention. It will become especially important when you later compare studies and photographs that record different moments.
Record weather as a painter, not a meteorologist
You do not need a technical weather report. You need the conditions that change the appearance of value, edge, color, and distance.
A concise weather observation has four parts:
- Sky cover: clear, hazy, thin overcast, solid overcast, broken cloud, storm front.
- Atmospheric clarity: crisp, humid, smoky, misty, dusty, rain-softened.
- Wind and movement: still, gusting, steady breeze; direction if it affects water, grasses, cloud, or trees.
- Change pattern: stable for an hour, clouds passing every few minutes, rain approaching, sun lowering rapidly.
For example:
Weather, 3:50–4:40: High thin cloud with intermittent openings. Air clear after rain. Moderate wind from right moves the birch crowns but water remains mostly calm. Light shifts briefly but the distant hills retain the same cool gray relationship.
This note tells your future self that the tree contours may not be reliable as literal outlines, while the broad atmospheric depth probably is.
Overcast is not simply “flat”
Under a dense overcast, direct cast shadows may nearly disappear. Forms are still visible, but they are modeled by small value shifts, changes of plane, reflected light, and local color differences rather than dramatic sun-shadow patterns. This can produce a quiet, unified design, but it demands restraint: do not invent sharp cast shadows simply because you expect a landscape to have them.
Under broken cloud, the opposite problem arises. A bright patch of sunlight can become visually irresistible but may last only two minutes. Ask whether it is the subject of the painting or merely a passing event. If it is central, record its exact placement, its value relative to adjacent shade, and the time window in which it appeared. If it is incidental, simplify it out of the study before it fragments the design.
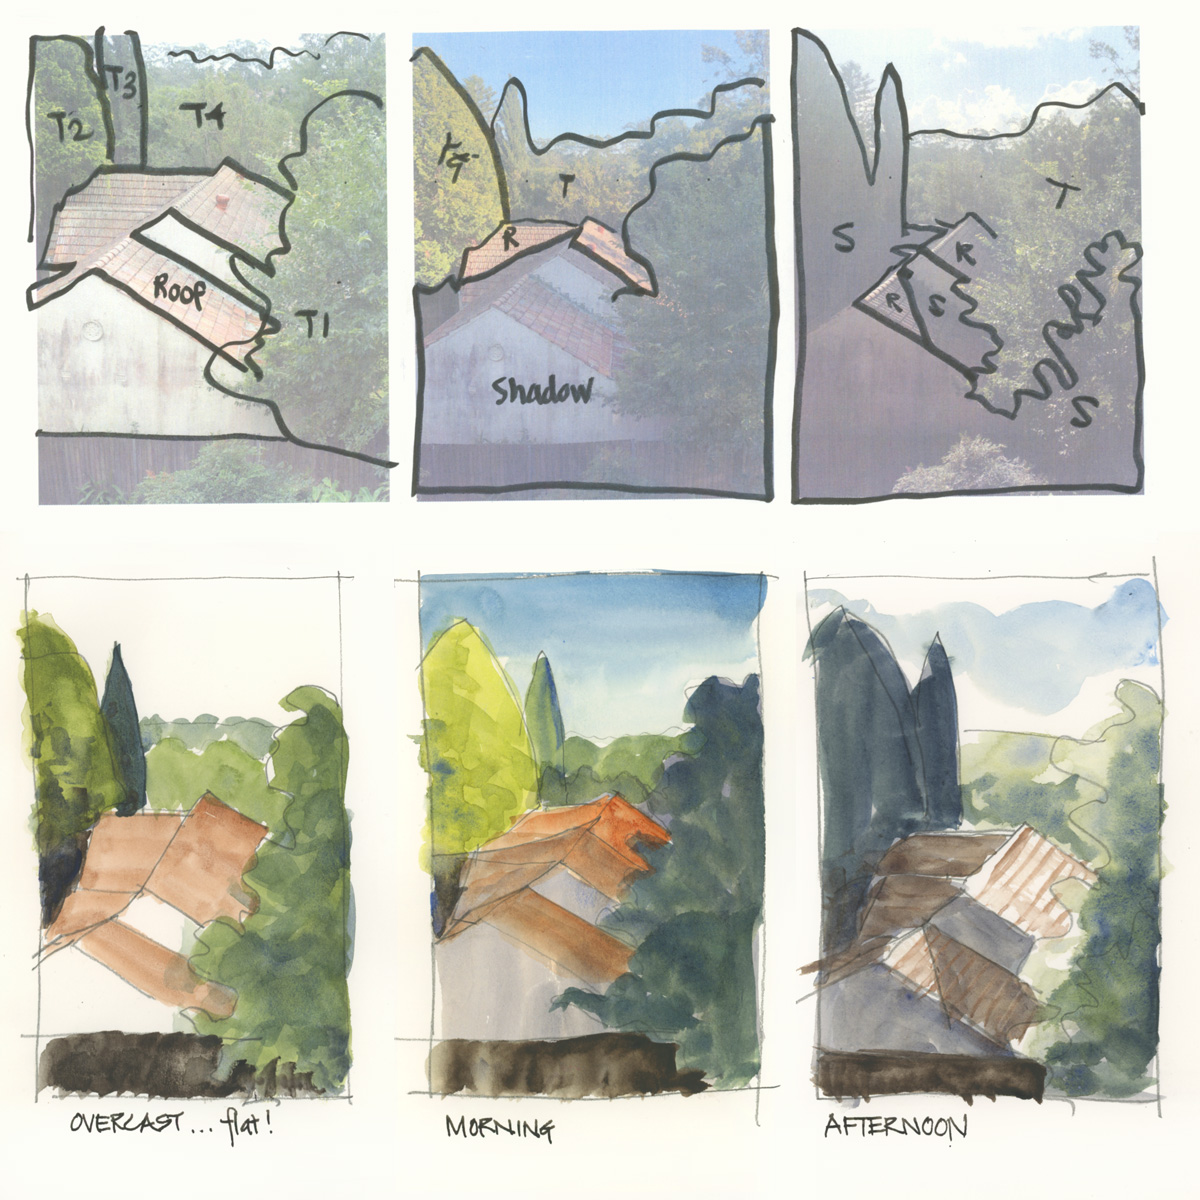
The comparison in Shapes and colour studies suggests a valuable habit: make a small visual notation of the same motif under different conditions. The object has not changed, but the hierarchy of sky, foliage, roof, and shadow has. The overcast version is comparatively unified; the morning and afternoon versions redistribute light and dark and change the warm-cool balance.
Capture color relationships, not isolated “correct” colors
In a studio, the statement “the tree was green” is almost useless. The paint decision depends on what that green was doing relative to nearby colors.
For each major mass, make comparative notes in four dimensions:
| Relationship | Questions to ask | Example note |
|---|---|---|
| Value | Lighter or darker than what? | “Near tree dark is darker than roof shadow but lighter than foreground bank.” |
| Temperature | Warmer or cooler than what? | “Lit field is warmer than sky reflection; distant trees cooler than near trees.” |
| Chroma | More intense or grayer than what? | “Orange roof is strongest chroma; shadows are muted, not black.” |
| Edge | Harder or softer than what? | “Bright roof edge sharp against dark tree; far ridge soft into sky.” |
Use a small set of comparative swatches beside the painting. The swatches need not be beautiful or large; they are reminders of relationships.
A useful page might include six labeled mixtures:
- sky overhead;
- sky near horizon;
- distant land;
- near foliage shadow;
- sunlit ground;
- focal accent.
Then add short relational statements:
Horizon sky is lighter and grayer than upper sky.
Distant ridge nearly matches horizon sky in value, but remains slightly darker.
Near foliage is warmer and more saturated than distant foliage.
Sunlit grass is warm, but not the lightest light; the cloud opening is lighter.
This prevents a common studio mistake: increasing saturation and contrast everywhere because memory has turned an observed landscape into a generalized idea of “bright sunlight.”
Use atmospheric perspective as an observation checklist
Distance usually alters three connected visual qualities:
- Contrast decreases. Distant forms often have smaller value differences internally and weaker separation from the sky.
- Chroma decreases. Distant colors generally become grayer.
- Hue moves toward the atmosphere. In daylight, that often means cooler and bluer; at sunrise or sunset, the distant atmosphere may be warm instead.
These are tendencies, not recipes. A dark distant pine against a pale misty sky can still create a strong silhouette, and sunset can make far hills reddish rather than blue. The field note should describe what actually happened that day.
3 Key Tips for Mastering Atmospheric Perspective
This Virtual Art Academy article provides a concise framework for noticing how air changes distant forms. Use it to improve the color and value language in your notes, especially when a studio painting will need a convincing progression from foreground to distance.
Read the section “The Three Main Effects of Atmospheric Perspective,” beginning with the three effects. Relate each effect to a specific foreground, middle-distance, and far-distance mass in your own motif. Then read “Effects At Sunrise And Sunset,” from the sunrise and sunset exception. The important lesson is observational: warm distance is possible when the horizon atmosphere itself is warm.
A compact distance note could read:
Depth pattern: Foreground bank has darkest darks and most definite edges. Middle trees are cooler and less saturated. Far hill is lighter, grayer, and only slightly darker than the horizon sky. Keep its top edge broken but soft.
That one sentence can guide value, color, and edge handling later without forcing you to copy every twig.
Treat transient effects as events with a lifespan
A transient effect is any visual event likely to disappear or substantially change before you finish studying it. Common examples include:
- cast-shadow length and direction;
- sunlight moving across a field or building;
- a bright cloud opening;
- fog lifting from a valley;
- changing water reflections;
- wind patterns in grass or trees;
- rain shafts, smoke, or dust;
- rapidly shifting sunset color.
The solution is not to chase every change. It is to make an early decision about what belongs to the painting.
The field “lock” protocol
Once you see the condition you want, take two minutes to make a lock record. On the same page as your thumbnail or color study, write:
Chosen light: 4:42 p.m., sun from upper right through broken cloud.
Shadow map: Cottage front in cool shadow; roof lit; tree shadow crosses lower-left field but does not touch cottage.
Key transient event: Narrow band of warm light on middle field; brightest just right of cottage.
What may change: Cloud color, sunlit patch width, moving leaf silhouettes.
Studio commitment: Preserve this shadow pattern and warm field band.
The word commitment is useful. It tells you that the light in the painting is no longer an endlessly updated report from nature. From this point onward, new information must be judged against the chosen design.
Ian Roberts advocates reconnaissance rather than arriving at a location and trying to chase an already-changing effect. His method is to explore, identify when each view is most promising, and return early enough that structural work is already underway when the desired light arrives.
How to Catch the Light en Plein Air
Watch Ian Roberts’s “How to Catch the Light en Plein Air” for a practical approach to timing a painting session. He shows how reconnaissance and an early start reduce the pressure of trying to record every change at the peak moment.
Watch reconnaissance, where Roberts explains noting promising viewpoints and returning roughly 45–60 minutes before the preferred light. Then watch the light shift to see how earlier work can be in place before the desired cast shadows and illumination occur. Apply this by planning to record stable structure first and the fleeting effect at its chosen moment.
Make your notes legible and recoverable
The notes only work if you can understand them later. Give every session a consistent header:
Motif / location:
Date:
Viewpoint:
Time range:
Chosen painting time:
Weather and air:
Light direction:
Dominant value effect:
Color relationships:
Transient effects:
Studio commitments / changes:
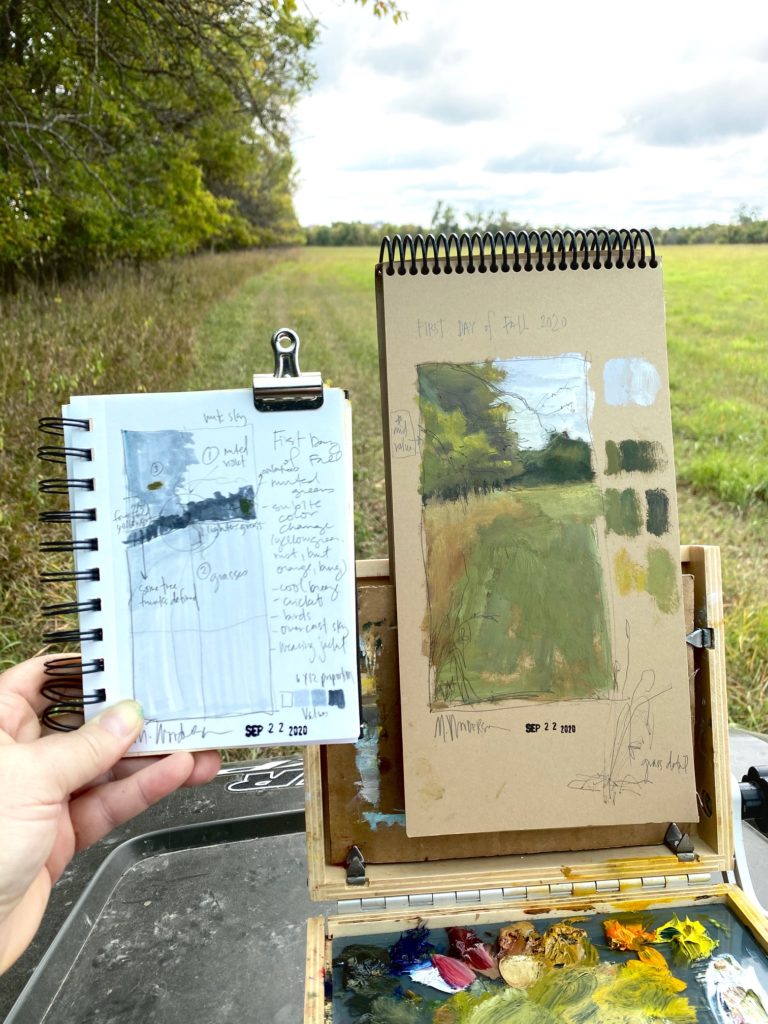
Place the note page directly beside or behind the associated study whenever possible. The plein-air setup in the image below shows a productive model: a finished small study is accompanied by a planning sketch, color swatches, and written observations. A record like this has far more long-term value than a painting with no indication of when, where, or under what conditions it was made.
A 90-second end-of-session audit
Before packing, read through the following questions:
- Can I identify the chosen light direction from the note alone?
- Have I named the time at which the main light effect occurred?
- Do the color notes compare masses rather than merely naming colors?
- Have I noted whether distant forms became lighter, grayer, warmer, or cooler?
- Have I distinguished stable structure from passing effects?
- If I return to this scene, do I know the time and conditions I am trying to recover?
- Have I written down which observed condition the eventual studio painting will preserve?
If you can answer yes to these questions, the notes have done their work.
A complete example note
Imagine a view of a pale house, a dark line of trees, and a field falling toward a distant ridge:
Location / viewpoint: East side of lane, looking northwest across field.
Date and time: October 12, 3:55–5:05 p.m. Chosen condition: 4:38 p.m.
Weather: Broken high cloud after rain; clear air; moderate breeze from viewer’s right.
Light: Low sun from upper left, slightly behind viewer. Long tree shadows travel diagonally toward lower right. House roof and left wall lit; front wall in cool shadow.
Value: Dark tree group is the principal dark. Lit field is middle-light, not as light as the horizon opening. Distant ridge is lighter than near trees and close to sky value.
Color: Upper sky cool blue-gray; horizon warmer and paler. Lit grass muted yellow-green, warmer than roof shadow. House light slightly warm but less saturated than roof. Far ridge blue-violet gray.
Transient effect: At 4:38, sunlight opened across a narrow central strip of field; it faded by 4:48. Preserve it, but keep it narrower than observed so it leads toward the house.
Studio commitment: Keep 4:38 shadow direction and field light. Omit moving leaf detail and later bright cloud gap.
Notice that this is not a prescription for literal copying. It preserves the visual logic of a moment while leaving room for later composition and paint decisions.
Key takeaways
Strong field notes transform a plein-air study from a pleasant memory into usable studio evidence.
- Record light direction through the source position, cast-shadow direction, and lit versus shadowed planes.
- Describe weather in terms of its visual consequences: edge softness, atmospheric clarity, stability, wind, and pattern of change.
- Write color observations as relationships of value, temperature, chroma, and edge, not as isolated color names.
- Use atmospheric perspective as a checklist: distant forms commonly lose contrast and saturation and tend toward the color of the atmosphere.
- Identify transient effects, give them a time window, and explicitly choose the moment your painting will preserve.
- Separate observed facts from studio decisions so later references do not pull the painting into contradictory light conditions.
Next, you will consider how photographs and drawings can supplement this firsthand record without replacing the direct visual information gathered in your plein-air studies.
Can't find a good explanation? Sign up and we'll make it for you
Sign up