
Hello again. In the previous lesson, you built a written record of the conditions behind a plein-air study: the chosen time of day, light direction, value relationships, color comparisons, and transient effects. Those notes establish what you actually observed. This lesson adds two powerful forms of support—photographs and drawings—without allowing either to displace that firsthand evidence.
The central principle is simple: your plein-air study and field observations establish the painting’s visual truth; photographs and drawings answer selected questions that the study cannot fully retain. A camera can preserve a rock’s fracture pattern or the shape of a fleeting wave. A quick drawing can clarify a road’s direction or the interval between two trees. Neither should be permitted to redesign the observed light, color, or hierarchy after the fact.
By the end of this lesson, you will have a practical method for making a small, coherent reference packet at one location: an observed oil study, a few purposeful photographs, and several analytical drawings, each with a distinct job.
Give each kind of reference a job
The common failure is not using photographs; it is using them indiscriminately. A camera records a great deal, but it does not know what your painting is about. Its automatic exposure may bleach the sky, close up a foreground shadow, alter a color balance, or flatten the sense of depth that was clear to your eyes. A photo is therefore evidence with limitations, not a neutral substitute for seeing.
A field study is also selective, but its selection is conscious: it records the dominant light, atmosphere, value grouping, and color character you judged important while standing in the place. It should lead the reference set.
| Reference | Its primary job | What it should not control |
|---|---|---|
| Plein-air oil study | Overall value design, color relationships, atmosphere, and chosen light effect | Every small contour or incidental detail |
| Field notes | Time, conditions, light direction, observed comparisons, and studio commitments | The visual design by themselves |
| Thumbnail drawing | Cropping, placement of major masses, and value structure | Surface detail |
| Structural drawing | Proportions, alignments, perspective cues, and overlaps | The color or mood of the scene |
| Detail sketch | Characteristic movement or construction of a tree, rock, building, wave, or fence | The entire composition |
| Photographs | Specific structural detail, brief events, and information you cannot hold in a small study | Color temperature, exposure values, or the final composition by default |
This creates a useful order of authority:
- Trust direct observation and the field study for the appearance of light, color, atmosphere, and the major value statement.
- Use field notes to interpret what the study means when memory fades.
- Use drawings to understand and redesign structure.
- Consult photos for details or fleeting events only when they agree with the chosen viewpoint, time, and light condition.
If a photograph conflicts with your study—perhaps it makes the shadow colder, the sky paler, or the foreground darker—do not “correct” the study to match the device. First ask whether the photo has simply failed to hold the observed relationship.
Brian Blood “Studio Painting Secrets” **FREE OIL LESSON VIEWING**
In “Studio Painting Secrets,” Brian Blood of Art School Live with Eric Rhoads describes the productive division of labor between photos and plein-air studies: photographs can guide arrangement, while studies preserve the directly observed color and mood.
Watch reference roles. Notice the distinction between using many photographs as visual aids and returning to the field study for the specific light, atmosphere, and color experienced on location.
The phrase “visual aid” is important. A photograph becomes dangerous when it silently becomes the authority for every decision.
Learn to see what a photograph is—and is not—giving you
Before taking more photos, become selective about which images will be useful. The best supplemental photo has clear major shapes, a readable light pattern, and spatial cues that help answer a later drawing question. It need not be beautiful as a photograph. It needs to be usable for painting.
The Landscape Painter's Guide to Selecting Reference Photos
Read Mitch Albala’s guide to understand both the practical value of photographic reference and its tendency to mislead a painter about value, shape, and color.
Begin with the introduction, especially the warning about photos. Then read the section “Shape and Value Differentiation,” comparing the examples of poor and good differentiation. Focus on the discussion of clear shapes: squint at the examples and ask whether the large masses remain distinct. Finish in “Tips for Taking Photos.” Read the subsections “Go for the sun — in morning or late afternoon,” “Avoid over-exposure and under-exposure,” and “Use your own photos.” Focus on how cross-lighting can clarify form, while exposure problems can make a potentially useful image unreliable.
The squint test
When reviewing an image on location or later at home, squint at it until the tiny details disappear. You should still be able to identify:
- the principal light and dark masses;
- the essential overlaps that establish near, middle, and far distance;
- a useful direction of light or a deliberately readable silhouette;
- the main subject’s relationship to its surroundings.
If everything fuses into one gray-green wall of foliage, the image may still be useful for branch direction or botanical character, but it is not a sound guide for the painting’s overall structure.
What the camera changes
You do not need technical expertise to recognize a few recurrent camera distortions:
- Exposure compression: A camera cannot always hold bright sky and deep shadow as your eye can. Highlights may become blank white; dark areas may become featureless black.
- Automatic white balance: A phone may neutralize a warm evening scene or exaggerate blue in shade. It is not a reliable judge of temperature.
- Lens perspective: A wide-angle view can make foreground objects seem too large and push distant objects farther away. A zoomed view can compress distances. Do not combine those spatial effects uncritically.
- Excess detail: Camera sharpness makes every leaf, stone, and twig look equally available for copying. A painting needs hierarchy, not equal treatment.
These shortcomings are not arguments against photography. They tell you how to assign it the right task.
Build a purposeful photo set, not an archive of snapshots
Take photographs after you have established the motif through direct looking, ideally after making at least a thumbnail and beginning or completing a small study. The study tells you what to photograph; the camera does not tell you what to paint.
For a landscape intended to grow into a studio project, use this compact photo set.
1. Take a viewpoint anchor
From approximately the same standing position and eye level as the study, make one broad image that includes the whole motif. This is the photo that helps you remember the scene’s general arrangement.
Keep it tied to your study by recording, in a margin of the sketchbook:
- the camera’s approximate position relative to your easel;
- whether you held the phone vertically or horizontally;
- the boundaries of the planned crop;
- the chosen painting time.
This broad photo is a map, not a design to copy. If you later decide on a different crop or aspect ratio, the thumbnail and artistic intention should govern that change.
2. Photograph specific structural questions
Then take only the images that answer questions a small oil study cannot answer clearly. For example:
- How do the roof angles meet at the chimney?
- Which side of the road does the ditch occupy as it recedes?
- How do fence posts diminish in size and spacing?
- Where does a stream disappear behind a bank?
- What is the distinctive branching gesture of the foreground tree?
- Which rock planes catch the light, and which recede into shade?
Think in labels, even if you do not literally label the image yet: barn roof detail, road alignment, tree silhouette, water edge, foreground rock planes. Each photograph should earn its place by serving a particular decision.
3. Record difficult light without trusting it blindly
When the scene contains extreme brightness—snow and dark evergreens, a glowing sky and shadowed land, sunlit water and dark rocks—make more than one exposure if your device allows it. One image may retain the sky while another preserves information in the shadows.
Scott Burdick’s use of “bracketing” photographs provides a sensible model: multiple exposures can retain detail in very light and very dark passages. But the photos are still a detail reserve, not a replacement for the value organization established in the field study.
Do not merge every visible detail from several exposures into the finished painting. Nature may contain more range than paint can comfortably organize. Preserve the study’s large value relationships first, then use the bracketed images only to retrieve needed structural information.
4. Separate compatible photos from detail-only photos
It is natural to walk around a scene and discover useful close views. Capture them—but mark them mentally as detail-only if the viewpoint or lighting differs from your study.
For instance, you may photograph a tree trunk from ten steps closer because its bark pattern is useful. That close photo can inform the trunk’s character. It cannot reliably tell you the trunk’s size relative to the field, its overlap with the house, or its perspective in the original composition.
A reference is compatible with your painting only if it broadly shares:
- viewpoint and eye level;
- direction and height of light;
- season and weather;
- time window or at least the same chosen light effect;
- spatial relationship of the principal objects.
This discipline prevents the “composite accident”: a painting in which every ingredient is individually convincing but the light, scale, and perspective no longer belong to one coherent world.
Draw to understand, not merely to copy
Drawing is the best antidote to photographic passivity. A photo encourages the eye to accept; a drawing forces the eye to compare, select, and decide.
How to Find the Poetry in Your Reference Photos
In “How to Find the Poetry in Your Reference Photos,” Ian Roberts shows how drawing reduces a busy visual source to a few organized value masses before painting begins.
Watch the premise for Roberts’s argument that a successful painting is found in the underlying structure rather than accumulated detail. Continue with drawing as analysis, then watch the examples. Focus on how quick sketches test crops and reveal three or four dominant value masses in otherwise cluttered scenes.
Three kinds of field drawing will serve you especially well.
The value thumbnail: the design test
Make a small rectangle, usually no larger than a business card, and reduce the scene to three or four values. Indicate only:
- the frame;
- the horizon or major horizontal division;
- large light and dark shapes;
- major directional movement;
- the likely focal area.
This drawing does not record a “little version” of everything. It asks whether the structure still works when the particulars disappear. If the answer is no, a hundred photographs will not solve the composition.
The structural sketch: the measurement tool
Use a slightly larger sketch to clarify the relationships most likely to cause trouble at a larger scale. Keep it plain and analytic. You might note:
- the apparent horizon level;
- where rooflines, road edges, shorelines, or fence lines converge;
- the widths of key intervals;
- overlaps among trees, buildings, banks, or rocks;
- important vertical and horizontal alignments.
For a road entering a field, do not draw every grass tuft beside it. Establish its two edges, its widening toward the foreground, where it bends, and what it overlaps. For a building, mark the roof pitch, wall proportions, and its relationship to the adjacent tree masses.
This drawing is especially valuable because the next stages of the course will ask you to enlarge and redesign. A clear structural note lets you change the composition intentionally rather than guessing at proportions from a phone screen.
The character sketch: the language of a motif
Make a few rapid drawings of the part of the motif whose character matters most: the wind-swept lean of a pine, the layered planes of a boulder, the sweep of a riverbank, or the rhythm of a row of posts.
Work from the motif itself, looking up frequently. Aim to record:
- the dominant action or directional line;
- the main mass before internal detail;
- a few identifying breaks, angles, or asymmetries;
- the relationship between solid form and surrounding negative space.
A useful tree drawing may contain six decisive marks. It is better than a meticulously copied photograph if it preserves why that particular tree mattered to the scene.
A field routine that keeps observation in command
The two images below show the kind of linked record you are aiming for: painted study, small compositional drawings, color notes, and photo support held together around one motif.
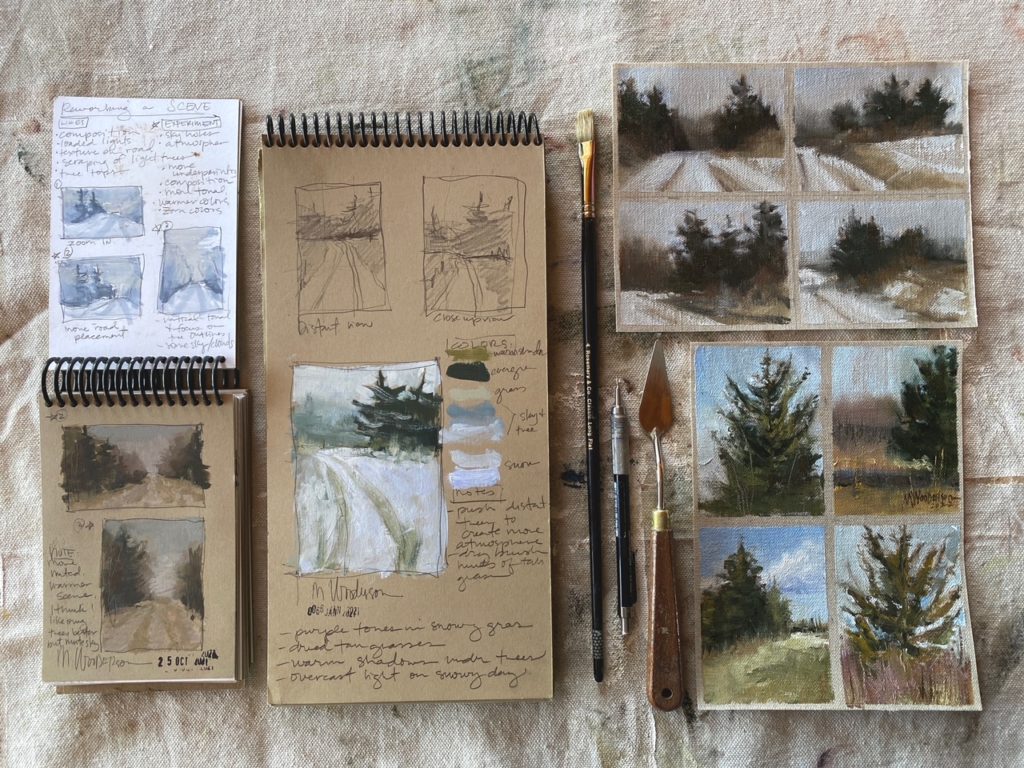
On your next field session, reserve roughly ten minutes after your main study for this sequence:
-
Re-state the chosen condition. In the sketchbook, write the time, light direction, and the specific effect your study is preserving. This reconnects the new material to the observation already recorded.
-
Make one value thumbnail. Use three or four values to confirm the large design and intended crop. If it differs from the study, note why. Perhaps the study includes a beautiful color passage but the thumbnail reveals an awkward empty edge.
-
Make one structural sketch. Select the feature whose proportion or perspective you are most likely to need later: road, building, bridge, shoreline, fence, or arrangement of tree trunks.
-
Make one character sketch. Capture the gesture of a key natural feature, rather than copying texture.
-
Take the viewpoint anchor photo. Stand near the easel and make the broad record of the motif.
-
Take three to six targeted photos. Photograph only the details that answer known questions. If you move far from the original viewpoint, treat those photos as detail references rather than compositional evidence.
-
Make a final compatibility note. Write something as brief as: “All wide photos: 4:20–4:30, same low left light. Tree-bark close-up: detail only; taken from closer position.”
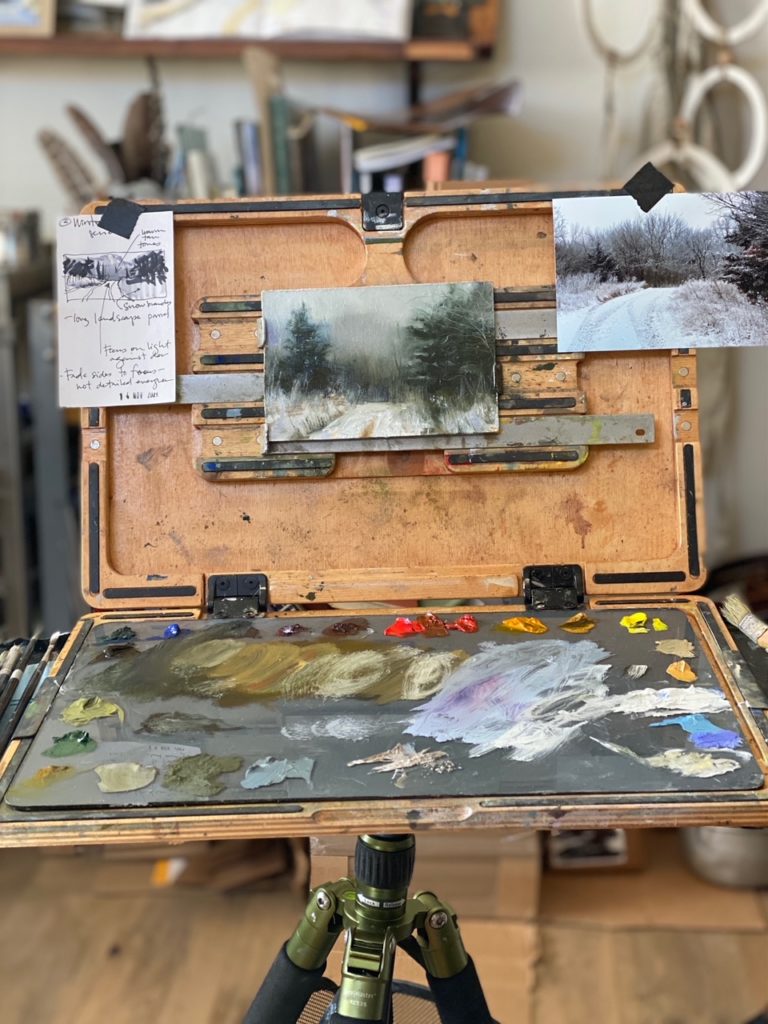
The goal is not to leave with more material. It is to leave with better differentiated material: every item should answer a different question.
When to put the camera away
There is a useful warning sign: if photographing begins to replace looking, stop.
You are drifting into camera dependence when you find yourself:
- taking photos before deciding why the motif interests you;
- repeatedly revising the study to match the screen;
- zooming into detail before the large value pattern is secure;
- photographing dozens of variations without a planned use;
- treating a photo’s colors as more trustworthy than the paint mixed from life;
- gathering scenes from many viewpoints and later trying to make them coexist.
Return to the motif. Squint. Compare the light side to the shadow side. Look at the negative shapes between the trees. Re-state the chosen condition. Then make a mark, a note, a sketch, or a photograph because it serves a defined purpose.
Key takeaways
Photographs and drawings strengthen plein-air work when they remain subordinate to direct observation.
- Let the field study lead decisions about value, color, atmosphere, and the chosen light effect.
- Let photographs preserve structural detail, perishable events, and information beyond the capacity of a small study.
- Let drawings clarify composition, proportion, perspective, overlap, and the distinctive gesture of important forms.
- Take a broad anchor photo from the study’s viewpoint, then add only targeted photos that answer specific future questions.
- Treat photos from a different angle, time, or lighting condition as detail-only references.
- Test every source by asking: What decision does this help me make, and does it support the observed condition I chose?
In the next module, you will begin comparing your plein-air studies systematically to determine which one has the strongest potential as the foundation for a larger studio landscape.
Can't find a good explanation? Sign up and we'll make it for you
Sign up