
Hello! Welcome back to our module on "Working with Databases."
In the last lesson, you successfully learned how to perform Create and Read operations, the 'C' and 'R' in the classic CRUD acronym. You built a workflow to insert new contact data into your database and then read it back. This forms the backbone of many data-driven automations.
Today, we'll complete the set by mastering the 'U' and 'D': Update and Delete operations. By the end of this lesson, you will be able to build n8n workflows that can modify existing records and remove data from your database tables. These skills are essential for tasks like synchronizing data between systems, managing the state of your application data, or performing automated cleanup.
1. Modifying Existing Records with the Update Operation
The Update operation allows you to change the data in one or more existing rows of a table. This is fundamental for keeping your data current. For example, you might update a user's profile, change an order's status from 'processing' to 'shipped', or mark a task as complete.
In n8n, the database nodes provide a dedicated Update operation that simplifies this process. You specify which rows to change and what new data to apply.
The official n8n documentation for the Postgres node provides a clear explanation of the Update operation. The principles are identical for the MySQL node and other SQL nodes.
Please read the section titled 'Update'. Focus on the main parameters: Schema, Table, and especially Mapping Column Mode. Understanding the difference between 'Map Each Column Manually' and 'Map Automatically' is key to building efficient workflows.
As the documentation explains, you have two primary concerns when configuring an update:
- Identifying the rows to update: This is typically done by matching values in one or more key columns (like an
idor a uniqueemail). - Providing the new values: You need to supply the data for the columns you wish to change.
Hands-On Practice: Updating a Contact
Let's modify the contacts table you created in the previous lesson. We'll build a workflow to change the email address for the contact named 'Alice'.
Workflow Steps:
-
Start with a
Setnode: This node will define both the identifier for the row we want to change and the new data.- Add a
Setnode. - Set Mode to
Append. - Add two values:
- Name:
name, Value:Alice(This will identify the row). - Name:
email, Value:alice.smith@example.com(This is the new email).
- Name:
- Add a
-
Add and Configure the Database Node:
- Add your database node (e.g.,
PostgresorMySQL). - Select your credentials.
- Set Operation to
Update. - Select the Table (
contacts). - Under Match On Columns, enter
name. This tells n8n to find the row(s) where thenamecolumn matches thenamefield from our input data (Alice). - Under Update Columns, enter
email. This tells n8n to take theemailfield from our input and use it to update theemailcolumn in the database.
)
This image shows a more advanced but common pattern. AnIFnode checks for a condition (e.g., does the record exist?) and then routes the workflow to either aPostgres Updatenode or aPostgres Insertnode. This is a classic "upsert" (update or insert) logic. - Add your database node (e.g.,
-
Execute the workflow. The node's output should indicate that 1 row was affected. You can verify this by running the
SELECTquery from the previous lesson to see the updated email address.
2. Removing Data with the Delete Operation
The Delete operation is used to remove rows from a table. In n8n, this operation is designed with safeguards in mind, offering different levels of deletion, from removing specific rows to clearing an entire table.
The Postgres documentation details the Delete operation and its different commands. It's crucial to understand these distinctions to avoid accidental data loss.
Read the section titled 'Delete'. Pay close attention to the three different Command options: Delete: Removes rows that match a specific condition. This is the safest and most common option. Truncate: Removes all data from a table but keeps the table structure. Use with caution. Drop: Permanently deletes the entire table, including its structure. This is highly destructive and should be used rarely in automated workflows.
For most automation tasks, you will use the Delete command with one or more conditions to target specific rows.
Hands-On Practice: Deleting a Contact
Now, let's create a workflow to remove the contact we've been working with. We will target the row using the email address.
Workflow Steps:
-
Start with a
Setnode: This node will define the identifier for the row to be deleted.- Add a
Setnode. - Add one value:
- Name:
email, Value:alice.smith@example.com
- Name:
- Add a
-
Add and Configure the Database Node:
- Add your database node.
- Select your credentials.
- Set Operation to
Delete. - Set the Command to
Delete. - Select the Table (
contacts). - Under Select Rows, you will define the condition.
- Click Add Condition.
- Set Column to
email. - Set Operator to
=. - For the Value, use an expression to get the email from the
Setnode:{{ $json.email }}.
-
Execute the workflow. The output should again show 1 affected row. If you query your
contactstable now, the record for Alice will be gone.
Test your understanding!
You have a workflow that processes temporary data. At the end of each daily run, you need to clear a temp_processing_logs table to prepare it for the next day, but you need to keep the table itself for future runs. Which Delete command (Delete, Truncate, or Drop) is most appropriate for this task?
Show answer
The Truncate command is the most appropriate. Truncate quickly removes all rows from a table without deleting the table structure itself, making it perfect for clearing out temporary data between runs. Delete with no condition would also work but is often slower for large tables. Drop would be incorrect as it would delete the table entirely, causing the next run to fail.
3. A Critical Note on Security: Parameterized Queries
When you configure Update and Delete operations, you are defining the WHERE clause of a SQL statement. In our hands-on examples, we used n8n's UI, which handles data safely.
However, if you were to use the Execute Query operation to write a raw UPDATE or DELETE statement, it's vital that you do not construct the query by simply inserting variables into a string, like this:
UPDATE contacts SET email = 'new@email.com' WHERE name = '{{ $json.name }}' ← DANGEROUS
This practice opens you up to SQL Injection, a severe security vulnerability. An attacker could provide a malicious value for name (e.g., 'Alice'; DROP TABLE users;--) that could alter your query and damage your database.
The correct and safe method is to use parameterized queries. You use placeholders in your query string and then provide the values separately. The database driver ensures the values are treated as data, not as executable code.
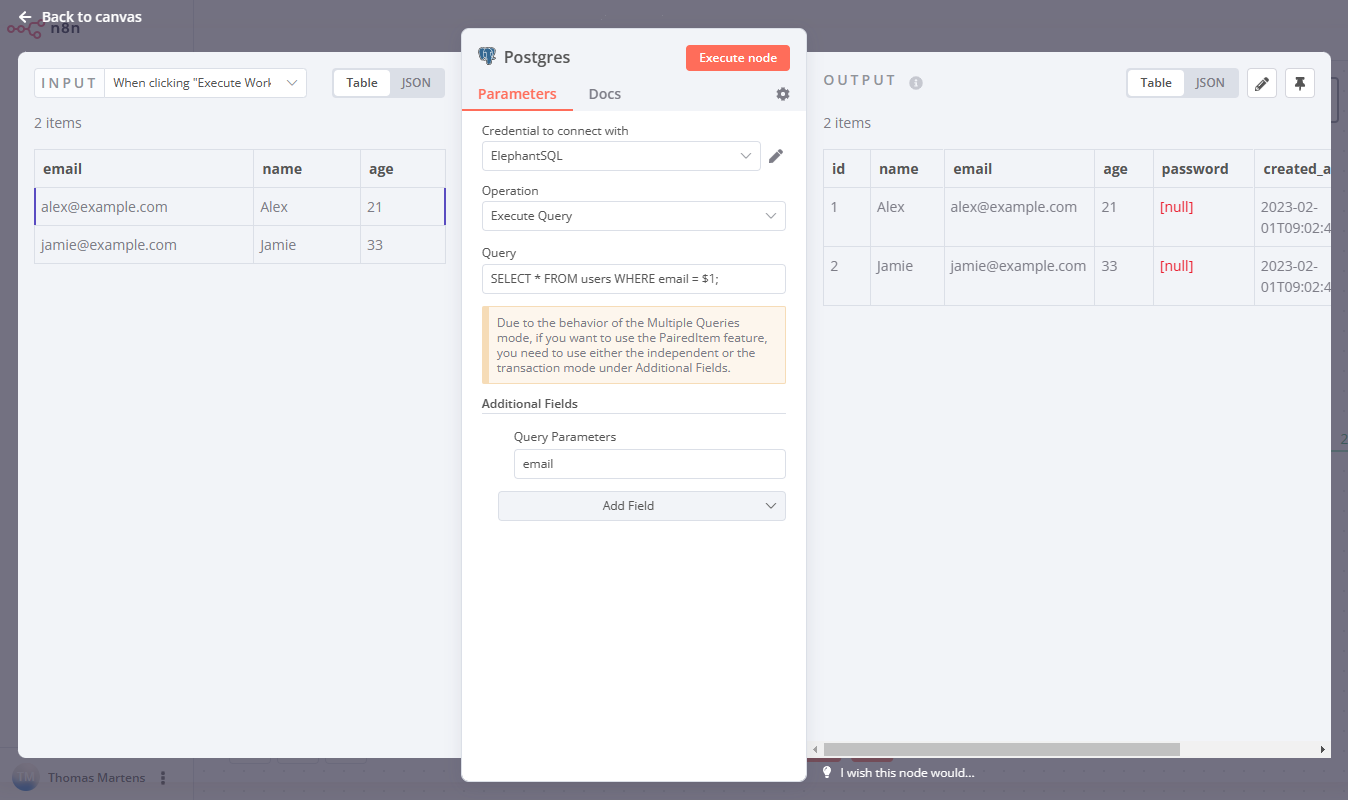
We will cover parameterized queries in great detail in our next lesson, but it is crucial to be aware of the concept now as you work with operations that modify or delete data.
Conclusion
Congratulations! You now have full CRUD (Create, Read, Update, Delete) capabilities in your n8n toolkit for SQL databases. You can manage the entire lifecycle of your data directly within your automation workflows.
Key Takeaways:
- Use the
Updateoperation to modify existing rows by specifying which rows to match and which columns to change. - Use the
Deleteoperation to remove data. Be mindful of the difference betweenDelete(conditional),Truncate(all rows), andDrop(entire table). - Always be conscious of security. When using
Execute QueryforUPDATEorDELETE, you must use parameterized queries to prevent SQL injection.
In our next lesson, we will dive deep into using parameterized queries. You'll learn how to write secure, dynamic SQL statements to handle more complex scenarios safely, a non-negotiable skill for any production-level workflow.