Welcome back. In our last lesson, we built a robust tracking system for the Meta Ads platform using Google Tag Manager, establishing a clean, event-driven data flow. You learned to distinguish between standard and custom events and how to enrich them with parameters—a crucial skill that directly applies to our topic today.
This lesson pivots from feeding data to an external ad platform to building our own, first-party analytics powerhouse: Google Analytics 4 (GA4). We will set up a new GA4 property from scratch and, more importantly, learn how to customize it to answer specific business questions. You'll discover that the event-based architecture you've already worked with is the fundamental principle of GA4. Our primary goal is to implement event-scoped and user-scoped custom dimensions, which will allow you to move beyond generic metrics and capture the unique data points that matter to your businesses.
1. The GA4 Paradigm Shift and Initial Setup
Before we begin, it's important to understand the fundamental architectural shift GA4 represents. Its predecessor, Universal Analytics (UA), was built around the concepts of sessions and pageviews. GA4 simplifies this by adopting a more flexible event-based data model, where every interaction—from a page_view to a purchase—is captured as an event with associated parameters.
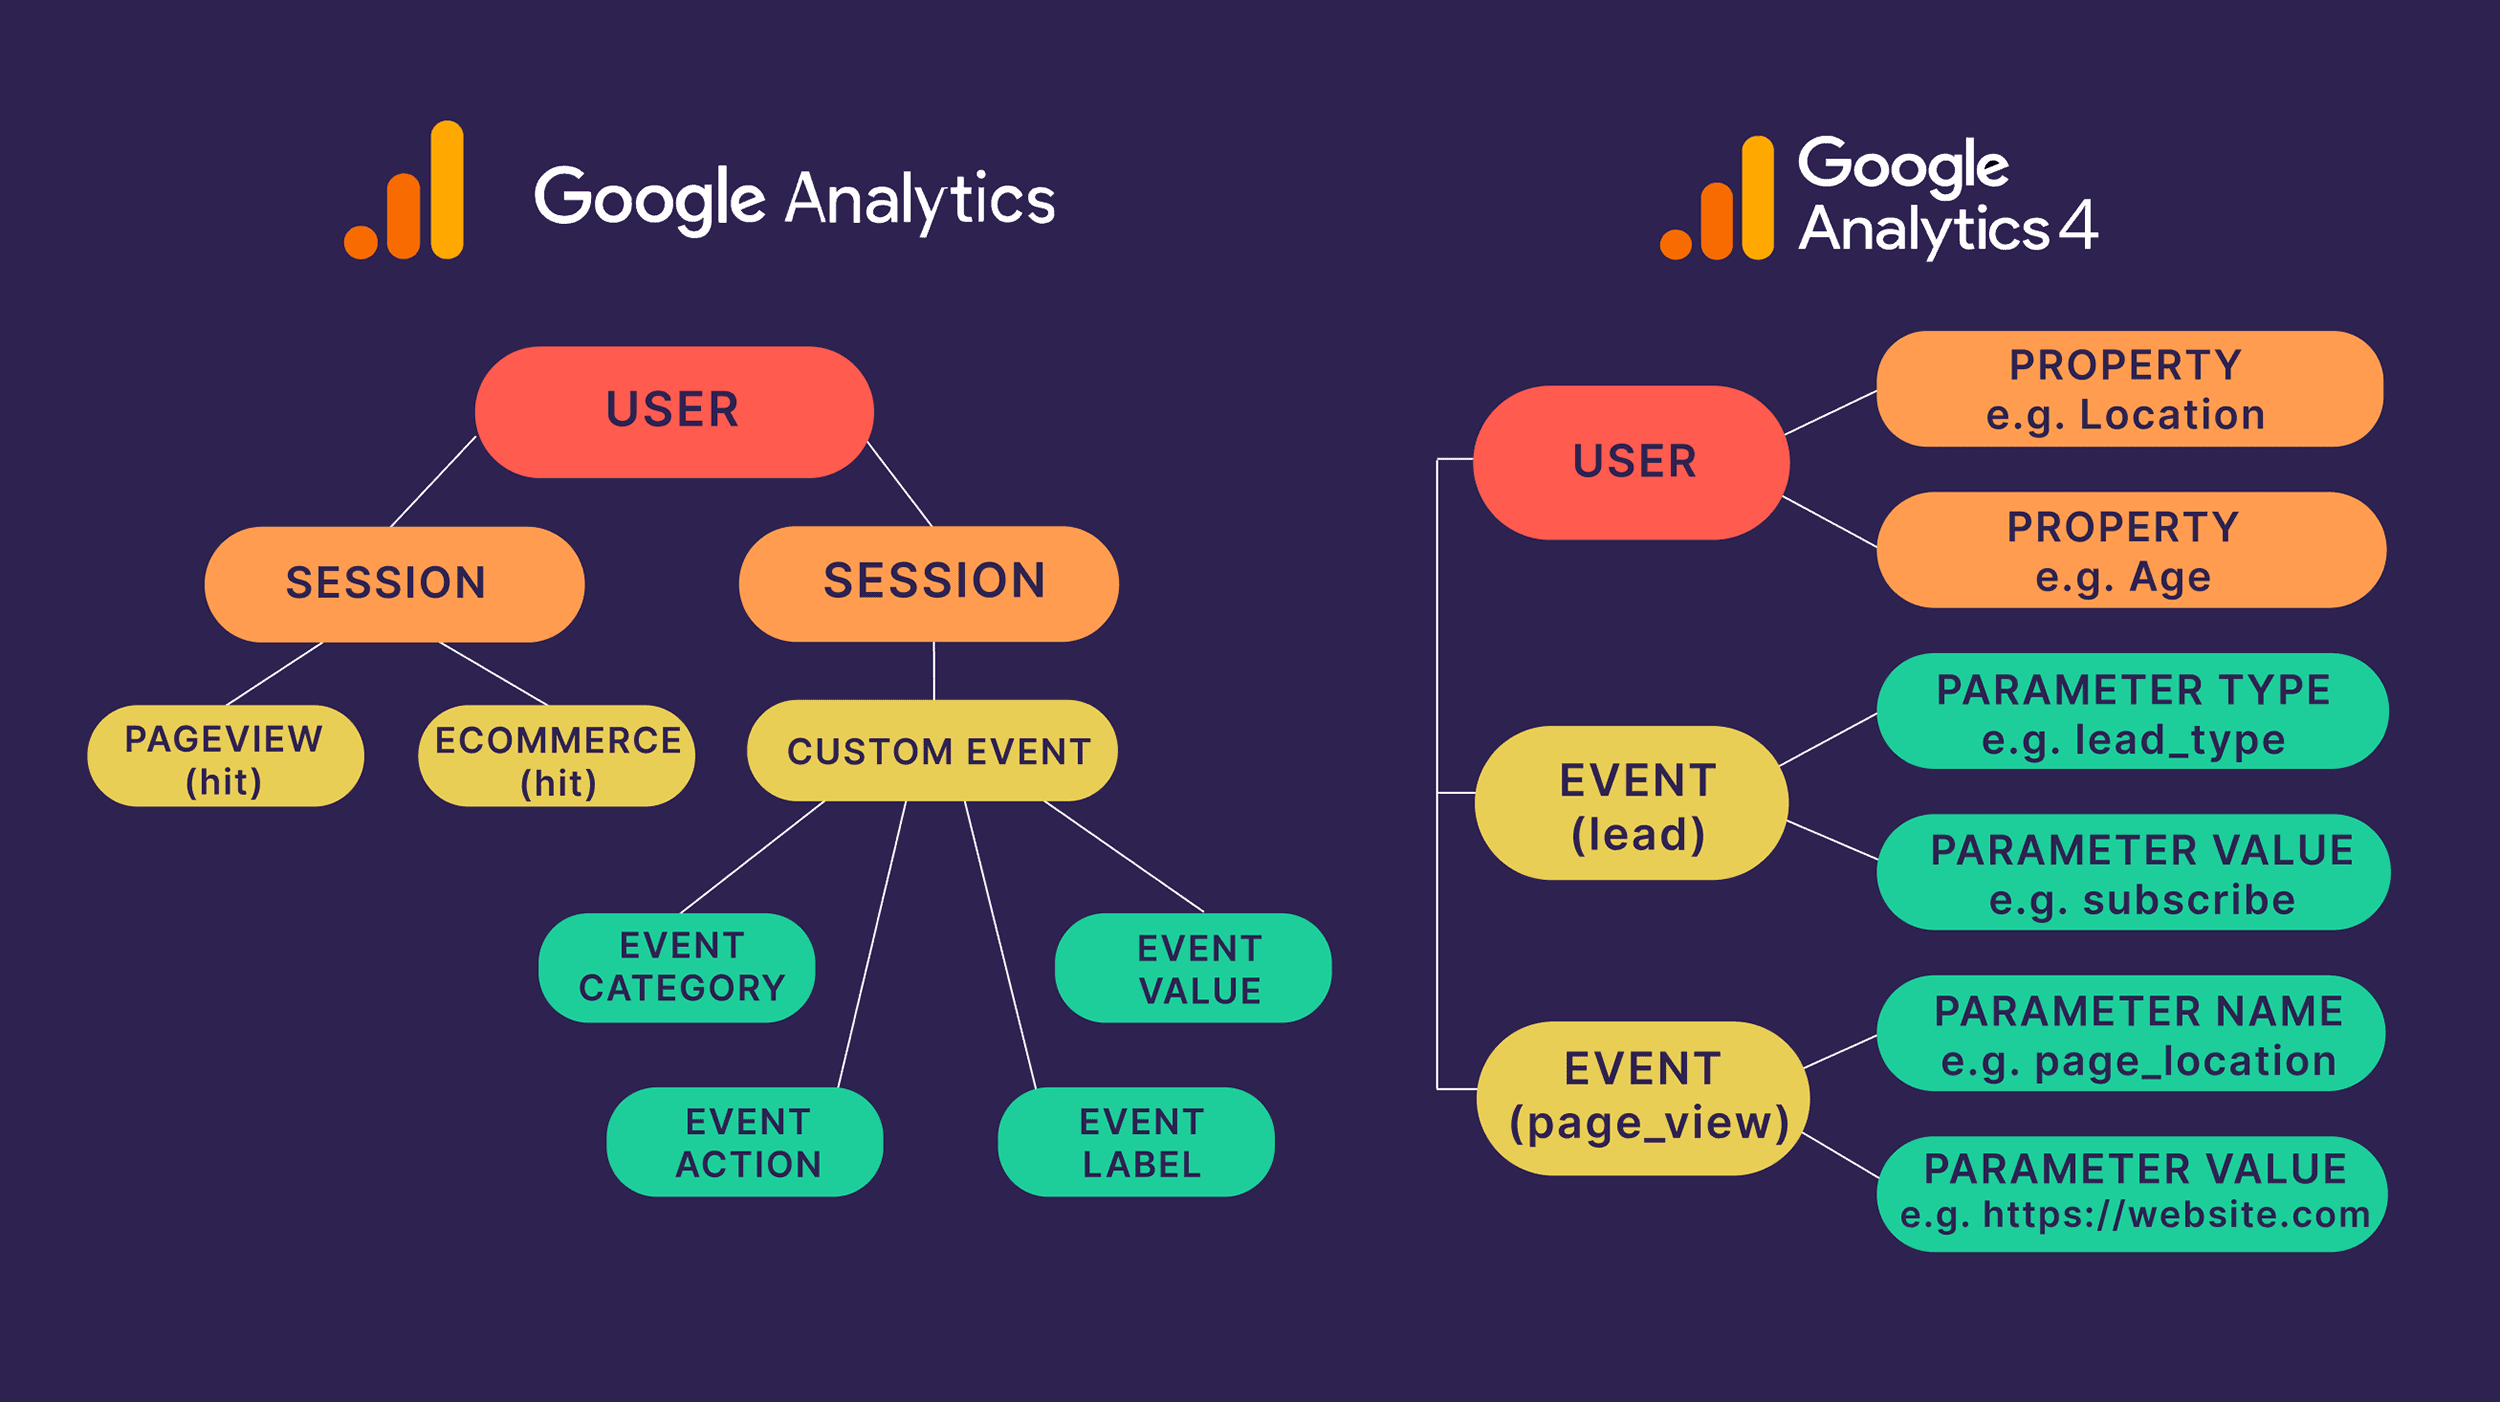
This structure provides a much more granular and user-centric view of behavior, especially across different platforms (like a website and a mobile app). Since your background is in systems, you can think of this as moving from a rigid, hierarchical data structure to a more flexible, object-oriented model where events are the core objects.
Our first step is to create the GA4 property itself and perform some essential initial configurations. The following video provides a clear walkthrough of this process.
How to set up Google Analytics 4 property + 5 things you must do NOW
This video from Analytics Mania covers the creation of a GA4 property and, crucially, several "must-do" settings that are often overlooked.
First, watch the segment on property and data stream creation. Follow these steps to create a new GA4 property and a Web Data Stream for your website. As you'll be using Google Tag Manager, your primary output from this step is the Measurement ID. Next, it's critical to configure the essential settings for data quality and usability. Watch the rest of the video, paying close attention to these five steps: Extend data retention to 14 months. This is vital for long-term analysis in GA4's "Explore" reports. Configure cross-domain tracking if you plan to track multiple websites under one business entity. Define and exclude internal traffic to keep your data clean. List unwanted referrals to prevent payment gateways from distorting your traffic source data. Adjust session timeout settings to better reflect modern browsing behavior.
Once you have your Measurement ID, create a GA4 Configuration tag in GTM (now called the Google Tag) and set it to fire on all pages, just as we did for the Meta base pixel.
2. Custom Dimensions: The Key to Granular Analysis
With GA4 collecting standard data, the next step is to teach it about the specific attributes of your business. In the previous lesson, you sent parameters like value and currency with a purchase event to Meta. GA4 works similarly, but to use these custom parameters for analysis within the GA4 interface (e.g., in reports and filters), you must first register them as custom dimensions.
A dimension is an attribute of your data—it describes it. For example, Page title and City are standard dimensions. A custom dimension is one you define.
The most critical concept to master with custom dimensions is scope, which determines which events the dimension's value will be applied to. GA4 has three scopes, but we will focus on the two most common ones: event and user.

- Event Scope: The dimension applies only to the specific event it was sent with. Use this for attributes of an interaction, like
form_id,button_text, orfile_name. - User Scope: The dimension applies to all subsequent events for that user from the moment it is set. Use this for persistent user attributes, like
subscription_plan,user_role, orcustomer_tier.
The following guide from Analytics Mania provides an excellent, detailed explanation of these concepts.
A Guide to Custom Dimensions in Google Analytics 4 - Analytics Mania
This article provides the theoretical foundation necessary to correctly implement and interpret custom dimensions.
Read the first part of the article, "Let’s start with some theory about dimensions". Pay close attention to the table comparing the different scopes and the explanation of how user-scoped dimensions work.
For an even deeper architectural perspective, Simo Ahava's blog post is an invaluable resource. It clarifies the distinction between event parameters (which become event-scoped dimensions) and user properties (which become user-scoped dimensions).
Implementation Guide For Events In Google Analytics 4
Simo Ahava's guide breaks down the technical structure of a GA4 event hit.
Read the sections titled Custom parameters and User properties. This will solidify your understanding of how these different data types are handled "under the hood" and why their scope is different.
3. Implementation: From GTM to GA4 Reports
Now, let's put theory into practice. The process involves two key stages:
- Sending the Data: Use Google Tag Manager to send custom parameters with your GA4 events.
- Registering the Dimension: In the GA4 interface, tell GA4 to "listen for" these parameters and make them available as dimensions in your reports.
We will follow the comprehensive guide from Analytics Mania to implement both an event-scoped and a user-scoped custom dimension.
3.1. Implementing an Event-Scoped Custom Dimension
Let's start by tracking clicks on your website's main navigation menu and capturing which link was clicked. This is a classic use case for an event-scoped dimension.
A Guide to Custom Dimensions in Google Analytics 4 - Analytics Mania
This guide provides a complete, step-by-step walkthrough for tracking menu link clicks.
Follow the instructions carefully through these sections: How to Configure a Custom Dimension: This walks you through setting up the necessary GTM variables (Click URL, Click Text), the trigger, and the GA4 Event tag itself. Notice how you add menu_item_url and menu_item_name as Event Parameters. Register custom dimensions: This shows you the crucial second step. In the GA4 Admin panel (Admin > Custom Definitions), you will create two new custom dimensions, ensuring the Scope is set to "Event" and the Event parameter name matches exactly what you configured in GTM. Finding the data in reports: This section explains how to use your new custom dimension in an "Explore" report. This step is essential for verifying that your data is being collected and processed correctly.
Remember to use GTM's Preview Mode and GA4's DebugView to verify that your menu_link_click event is firing correctly and that the menu_item_url and menu_item_name parameters are being sent as expected.
3.2. Implementing a User-Scoped Custom Dimension
Next, let's implement a user-scoped dimension. Imagine you want to track a user's subscription status (e.g., 'free' or 'premium'). This is an attribute of the user, not a single event, so it's a perfect fit for a user-scoped dimension.
The best practice for managing user properties in GTM is to use a Google Tag: Event Settings Variable. This follows the DRY (Don't Repeat Yourself) principle; you define the user property once in a variable, then apply that variable to all your GA4 tags. This ensures consistency and makes future updates much easier.
A Guide to Custom Dimensions in Google Analytics 4 - Analytics Mania
This section explains how to configure user-scoped dimensions efficiently.
Read the section on user-scoped custom dimensions. Focus on the "Event settings variable" method. The process is: Create a Google Tag: Event Settings variable in GTM. Add a row in the Google Analytics User Properties section (e.g., Property Name: user_tier, Value: a GTM variable that holds the user's status). Apply this new settings variable to your main Google Tag and all your GA4 event tags. In the GA4 interface (Admin > Custom Definitions), register a new custom dimension (e.g., Dimension name: "User Tier", Scope: User, User property: user_tier).
After implementing, be sure to test. When the user property is set (e.g., on login), you should see it appear in DebugView. From that point on, every subsequent event you trigger in that session should carry that user property with it.
Conclusion
In this lesson, you have established your own powerful, first-party analytics foundation. You've not only created a Google Analytics 4 property but have also gone far beyond the default setup by tailoring it to capture business-specific data. By mastering the concepts of scope and the implementation of custom dimensions, you can now analyze user behavior with a level of granularity that is simply not possible with out-of-the-box configurations.
Key Takeaways:
- GA4 is Event-Based: Every user interaction is an event, making the data model more flexible and user-centric than its predecessor.
- Initial Setup is Crucial: Correctly configuring data retention, internal traffic filters, and session timeouts from the start ensures data quality and long-term analytical capability.
- Scope Defines Application: The scope of a custom dimension (Event or User) determines how its value is associated with events and is the most critical concept to understand for correct implementation.
- Implementation is a Two-Step Process: You must first send a parameter from your tracking code (via GTM) and then register that parameter as a custom dimension in the GA4 interface.
- Use the Event Settings Variable: For user-scoped dimensions (user properties), using an Event Settings Variable in GTM is the most efficient and maintainable approach.
Now that you have configured your analytics platform to receive rich, contextual data, our next lesson will focus on standardizing one of the most important contexts: marketing campaign information. We will design and enforce a systematic UTM parameter schema to ensure you can accurately track the source, medium, and content that drives traffic and conversions on your site.