Welcome back. In our previous lesson, we established why the modern, privacy-focused web makes first-party data collection an absolute necessity. The decline of third-party cookies and the rise of platform-level restrictions like ITP and ATT have fundamentally shifted the landscape, forcing marketers to build direct, transparent relationships with their users and the data they generate.
Today, we transition from the "why" to the "how." We will implement the primary tool for collecting that crucial first-party behavioral data from your website: the Meta Pixel. Your background in information systems and development will be a significant asset here, as we'll go beyond simple "button-clicking" to construct a scalable and robust tracking architecture using Google Tag Manager (GTM). Our goal is to not only track page visits but also to configure standard and custom conversion events, laying the groundwork for sophisticated ad optimization and audience building.
1. The Architectural Approach: GTM as a Central Hub
Before we write a single line of code or configure a tag, it's crucial to understand the architecture. While Meta's documentation might suggest pasting the Pixel's JavaScript code directly into your website's theme files, this approach is brittle and creates technical debt. Any site redesign or change to an HTML element could silently break your tracking.
A more robust, modern architecture treats Google Tag Manager as a central data processor and router.
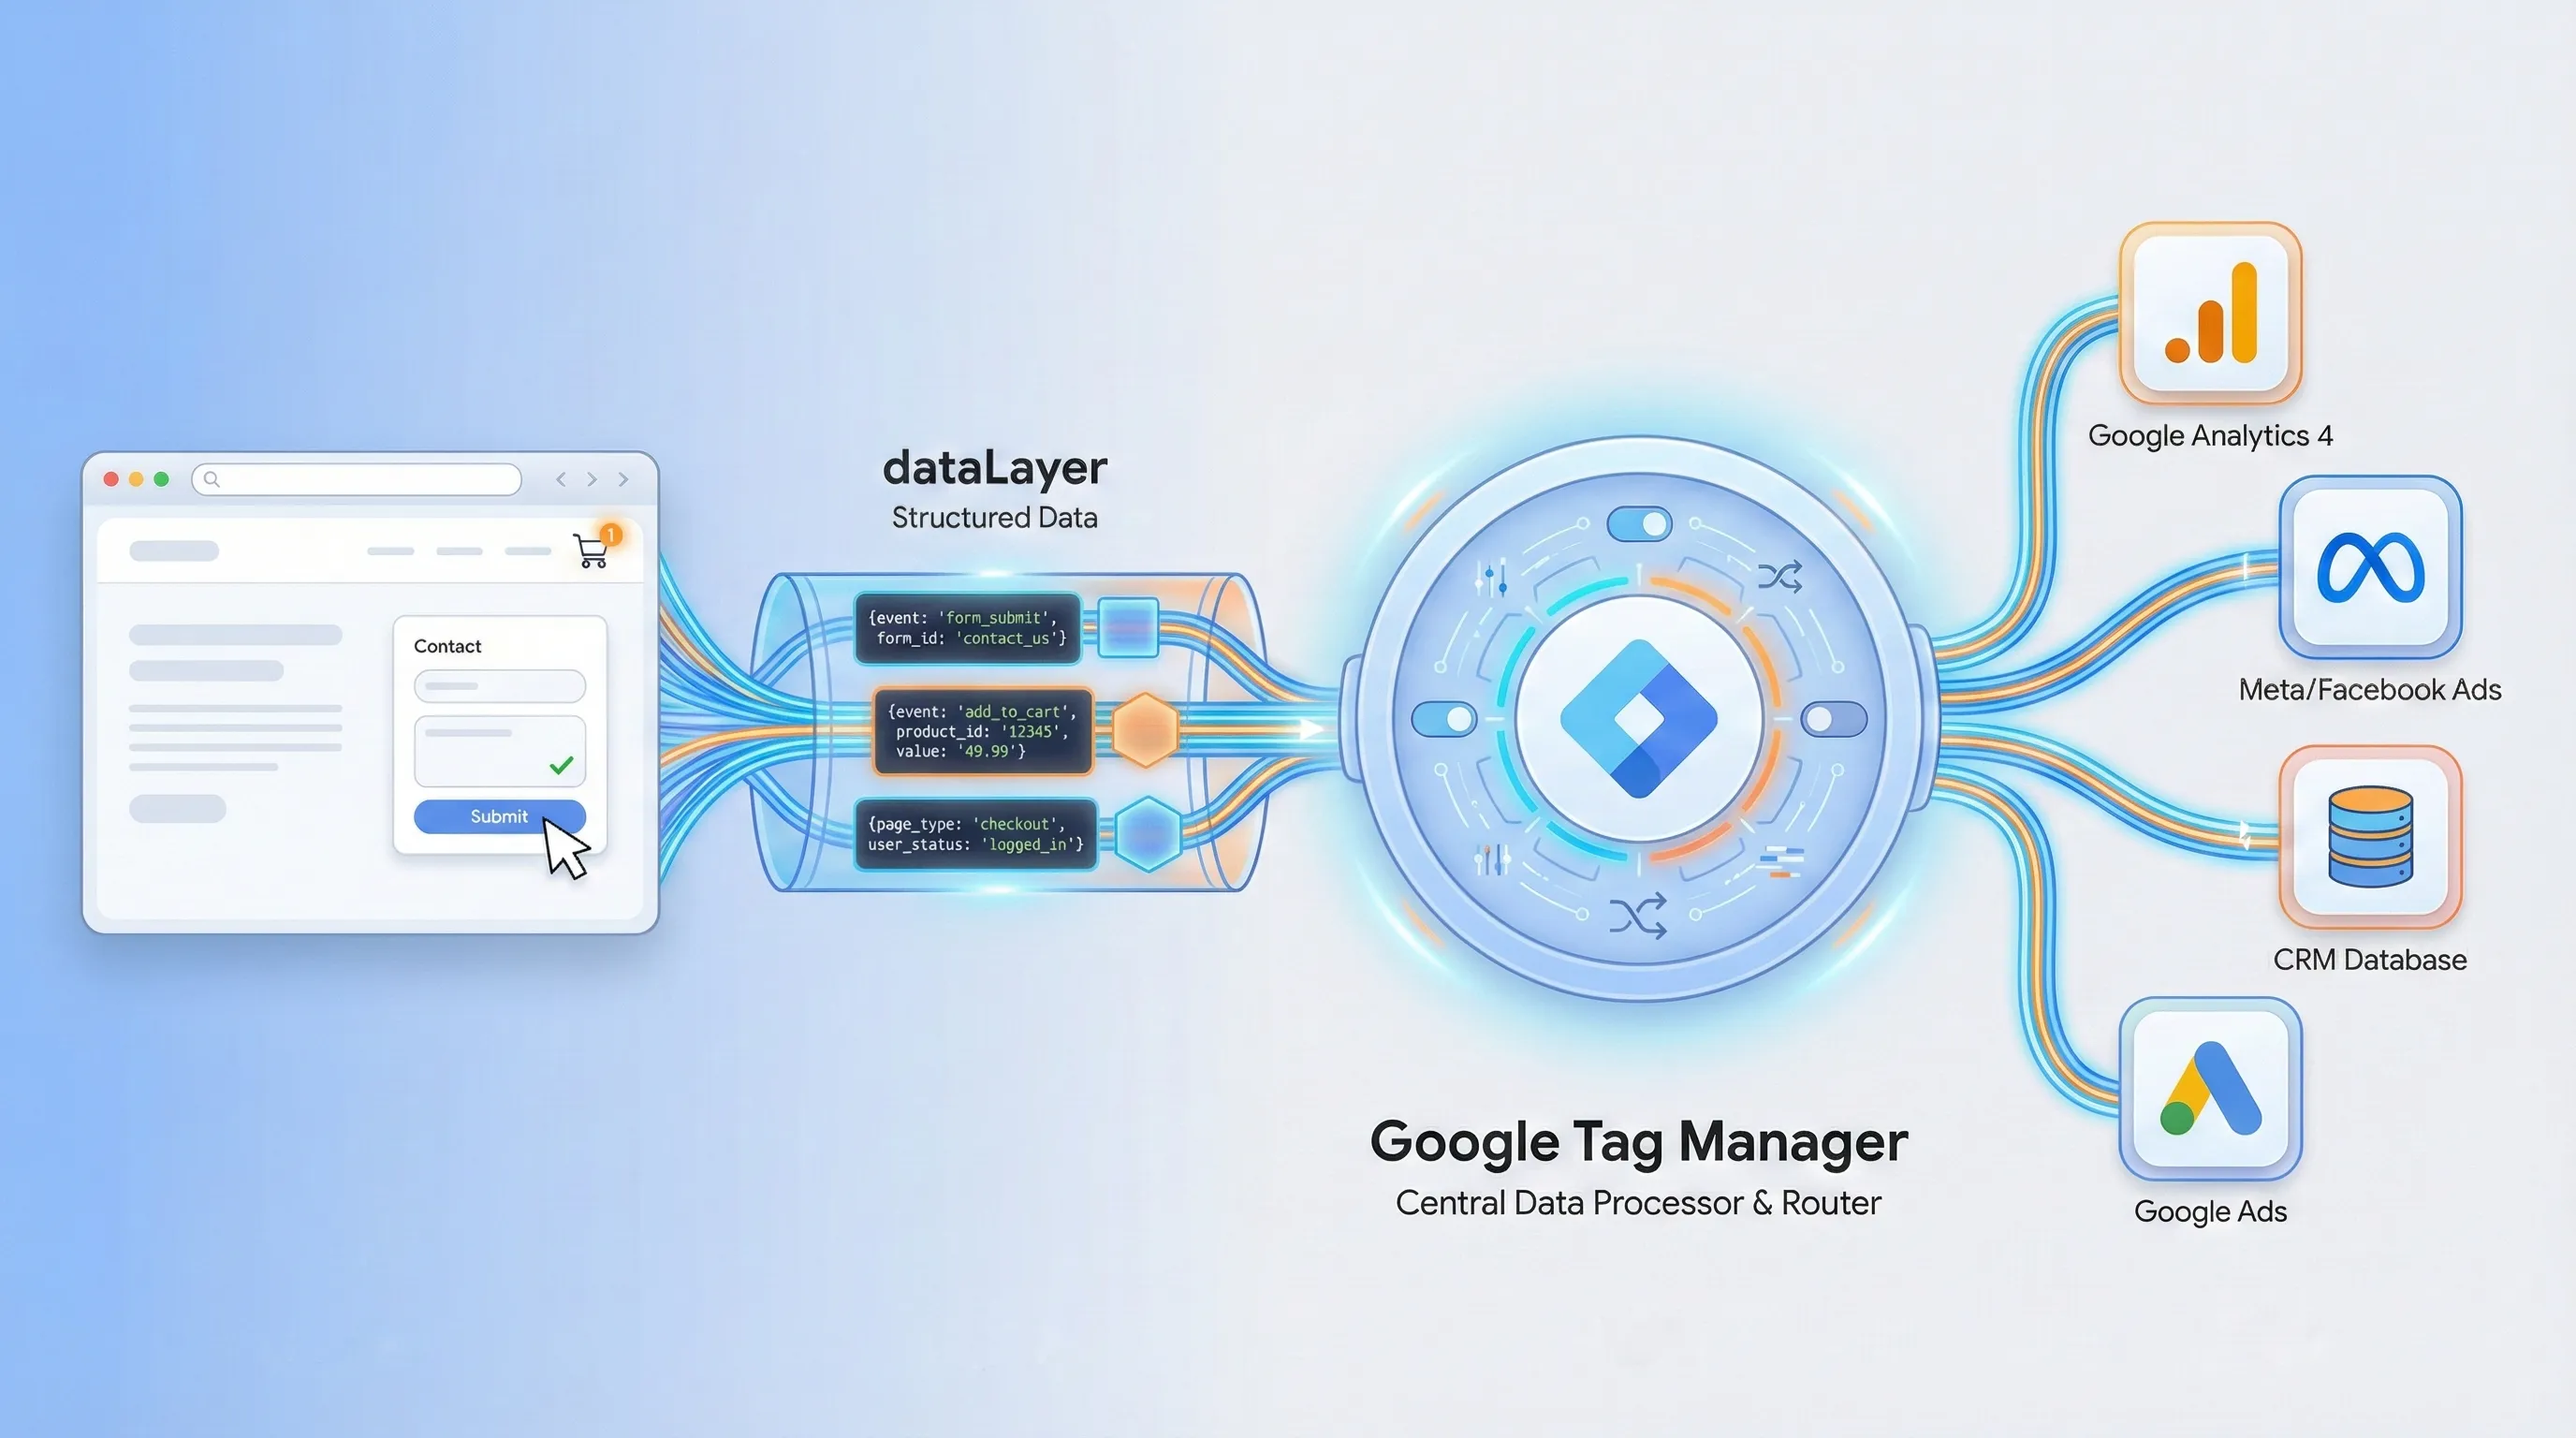
This model, which should feel familiar from a systems design perspective, offers several advantages:
- Decoupling: Your tracking logic is separated from your website's presentation layer. Developers can change the site's look and feel without breaking your marketing measurement.
- Centralized Management: All your tracking scripts (Meta, Google Analytics, etc.) live in one GTM container, keeping your website's source code clean.
- Efficiency: Once a solid data foundation (the
dataLayer) is in place, adding new tracking tags for other platforms becomes a simple configuration exercise within the GTM interface.
The article "Meta Pixel Tracking using Google Tag Manager & GA4 Datalayer" provides an excellent overview of this architectural philosophy.
Meta Pixel Tracking using Google Tag Manager & GA4 ...
This article eloquently explains the strategic and technical benefits of using GTM with a data layer, framing it as building a "single source of truth" for all marketing platforms.
Read the introductory sections, starting from The “single source of truth” principle, to fully grasp the architectural advantages of this approach.
2. Foundational Setup in Google Tag Manager
With the architecture decided, let's proceed with the foundational setup in GTM. We will use the official Meta Pixel template, which is a pre-built, secure, and user-friendly component available in the GTM Community Gallery.

The process involves four key steps: obtaining your Pixel ID, installing the template, creating a reusable variable for the ID, and deploying the base PageView tag. The following comprehensive guide from Analytics Mania will be our primary reference for the practical implementation steps.
How to Install Meta Pixel with Google Tag Manager ...
This guide provides a clear, step-by-step walkthrough of the entire setup process, from finding your Pixel ID to testing the final implementation. We will follow its instructions closely.
First, follow the steps in the section How to get the Meta Pixel code? to locate your unique Pixel ID within the Meta Events Manager. This ID is what links your website's tracking to your specific ad account. Next, implement the steps under #1.3. Constant Variable for the Pixel ID. This will guide you through adding the official "Facebook Pixel" template from the Community Gallery, creating the base PageView tag, and, crucially, storing your Pixel ID in a Constant Variable. Using a variable is a core principle of good software development (DRY - Don't Repeat Yourself) and makes your GTM container much easier to maintain. Finally, read the section on testing, #1.4. Test the Facebook Pixel Tag. This introduces the three essential tools for debugging: GTM's Preview Mode, the Meta Pixel Helper browser extension, and the Test Events tool inside Meta Events Manager. Do not skip this step. Thoroughly verifying that the PageView tag fires correctly on all pages is non-negotiable.
For a visual demonstration of this three-part testing process, you can also watch this segment from a MeasureSchool video.
Meta Facebook Pixel Conversion Tracking with Google Tag Manager | Lesson 5 GTM for Beginners
This video shows the testing process in action, which can be helpful for seeing how the three tools work together.
Watch the segment from this point to see how the instructor uses GTM Preview Mode, the Pixel Helper, and Meta's Test Events to confirm the PageView tag is working as expected.
3. Tracking User Actions: Standard and Custom Events
With the base pixel installed, your website is now sending a PageView event to Meta every time a page loads. However, the real power of the pixel comes from tracking more specific, meaningful user actions, or "events."
Meta categorizes events into two types: Standard and Custom.
- Standard Events: These are predefined actions that Meta's advertising system understands intrinsically (e.g.,
Purchase,Lead,AddToCart). When you use a standard event, you are feeding data directly into Meta's optimization algorithms, allowing it to find users who are more likely to perform that specific action. You should always use a standard event if one fits the action you're tracking. - Custom Events: These are events you name yourself for actions unique to your business that don't fit into a standard category (e.g., "Downloaded_Brochure", "Used_Calculator"). Custom events are excellent for building custom audiences for retargeting but cannot be used as the primary optimization goal for a conversion campaign.
The video "Facebook Custom Events & Conversions" offers a clear explanation of this distinction.
Facebook Custom Events & Conversions: Easy Setup Guide with GTM
This video provides a solid conceptual breakdown of standard events, custom events, and custom conversions.
Watch the first part of the video, from this introduction, to solidify your understanding of the difference between standard and custom events and when you should use each.
3.1. Implementing a Standard Event: The Lead
Let's implement a Lead event, a common standard event for service businesses, consultants, or anyone with a contact form. We'll configure this to fire when a user successfully submits a form and lands on a "thank you" page.
This requires two components in GTM:
- A Trigger: This tells GTM when to fire the tag. In this case, it will be a Page View trigger that activates only when the page URL contains
/thank-you. - A Tag: This tells GTM what to do. It will be a Meta Pixel tag configured to send the
Leadevent.
The same Analytics Mania guide we used earlier provides a perfect walkthrough.
How to Install Meta Pixel with Google Tag Manager ...
This part of the guide details the creation of the tag and trigger for a standard event.
Follow the instructions in the sections #3.3 Test the Standard Facebook Pixel Event. This will show you how to create a trigger for a confirmation page and configure a new Meta Pixel tag to send the Lead event when that trigger fires. Again, make sure to follow the testing steps to verify your implementation.
3.2. Implementing a Custom Event with Parameters
Now, let's tackle a more complex scenario that involves a custom event and passing additional data, known as parameters. Imagine you want to track a Purchase event for an e-commerce store. This is a standard event, but to make it useful, you must include parameters for the value and currency of the transaction.
This is where the dataLayer becomes critical. A well-implemented e-commerce site should push transaction details to the data layer upon a successful purchase. Your job is to configure GTM to read this data and pass it along to Meta.
For example, your developer might make the following data available after a purchase:
window.dataLayer.push({
  event: 'purchase',
  ecommerce: {
    transaction_id: 'T-12345',
    value: 99.99,
    currency: 'USD',
    items: [{
      item_id: 'SKU-ABC',
      item_name: 'My Awesome Product',
      price: 99.99,
      quantity: 1
    }]
  }
});
To use this data, you'll need to:
- Create Data Layer Variables in GTM to capture
ecommerce.valueandecommerce.currency. - Create a Custom Event Trigger that listens for the
purchaseevent name. - Create a new Meta Pixel tag for the
Purchaseevent. - In the tag's Object Properties, map Meta's expected parameters (
value,currency) to the Data Layer Variables you created.
The Analytics Mania guide demonstrates this exact process.
How to Install Meta Pixel with Google Tag Manager ...
This section is a masterclass in connecting the data layer to your tracking tags.
Read the section #4.2. Test the event. Pay close attention to how it defines Data Layer Variables to read from the dataLayer push and then maps those GTM variables to the value and currency fields in the Purchase tag's Object Properties. This is a core competency in advanced tag management.
This same principle applies to any event, standard or custom, where you want to send additional contextual data. For a custom event, you simply define your own parameter names (e.g., video_title, scroll_depth) in the Object Properties section.
Conclusion
In this lesson, we have moved from theory to a robust, practical implementation of the Meta Pixel. You've learned how to leverage Google Tag Manager not just as an installer, but as a central component in a scalable marketing data architecture. By understanding the underlying data flow, you are now equipped to build tracking systems that are both powerful and maintainable.
Key Takeaways:
- Architect with GTM: Using Google Tag Manager provides a decoupled, centralized, and efficient way to manage all your tracking pixels.
- Use the Official Template: The
facebookarchiveMeta Pixel template in the GTM gallery is the secure and recommended standard for implementation. - Variables are Your Friend: Storing your Pixel ID in a Constant Variable is a best practice that simplifies maintenance and reduces errors.
- Events are Actions: Use Standard Events (
Lead,Purchase) to feed Meta's optimization algorithms and Custom Events to track unique business actions for audience building. - The Data Layer is the Bridge: The
dataLayeris the critical communication layer between your website and GTM, allowing you to pass rich, dynamic data like purchase values and product details. - Always Verify: A three-pronged testing approach using GTM Preview, the Meta Pixel Helper, and the Test Events tool is essential to ensure data accuracy.
With the Meta Pixel now collecting rich, first-party data, our next step is to build out our own internal analytics capabilities. In the upcoming lesson, we will set up and configure Google Analytics 4 (GA4). You'll see how the event-based data model we've explored today is also the core of GA4, and how a well-structured dataLayer can seamlessly power both platforms, giving you a complete view of your marketing performance.