Hello! Welcome to your next lesson on advanced model fine-tuning.
In the past few lessons, we've explored several powerful techniques for personalizing diffusion models:
- DreamBooth, for high-fidelity subject training by modifying the whole model.
- LoRA, for efficient fine-tuning by injecting small, trainable matrices.
- Textual Inversion, for a non-destructive approach that finds a new "pseudo-word" in the embedding space.
So far, we've used different tools for these tasks, such as the diffusers library scripts or the features built into the Automatic1111 Web UI. Today, we'll level up by learning to use a dedicated, powerful, and widely-used framework that brings these techniques under one roof.
This lesson will address the learning outcome: Use training frameworks like Kohya_ss to fine-tune Stable Diffusion models. We will focus on a complete, practical workflow for training a LoRA, from installation and data preparation to configuring advanced parameters and evaluating the final model.
1. Introduction to Kohya_ss
Kohya_ss is a graphical user interface (GUI) built on top of a set of powerful training scripts (sd-scripts) developed by a researcher named Kohya. In the Stable Diffusion community, it has become the gold standard for serious fine-tuning, offering granular control over the training process far beyond what's available in more general-purpose UIs.
While it can be used for DreamBooth and Textual Inversion, its most common and powerful application is for training LoRA models.

2. Installation and Setup
Getting Kohya_ss running involves a few more steps than a simple pip install. It requires specific versions of libraries and a configuration step for your GPU. The video below provides an excellent step-by-step guide for a Windows environment.
SDXL LORA Training locally with Kohya - FULL TUTORIAL // stable diffusion
First, let's get the tool installed. This video by CreatixAi provides a clear walkthrough of the installation process for Windows.
Watch from 00:42 to 03:22. The key steps are: Prerequisites: Ensure you have Python, Git, and the Visual Studio C++ build tools installed. Cloning: Create a folder for Kohya and clone the repository using git clone. Setup Script: Run the setup.bat file, which guides you through the installation of dependencies like PyTorch. accelerate Configuration: This is a crucial step. The script will ask you questions to configure the accelerate library. A key choice is the mixed precision type: use bf16 if you have an NVIDIA 30xx series GPU or newer; otherwise, choose fp16.
Once installed, you can launch the GUI by running the gui.bat file. This will open a web interface in your browser, ready for you to start the training process.
3. The Heart of Training: Data Preparation
As the adage goes, "garbage in, garbage out." The quality of your fine-tuned model is overwhelmingly determined by the quality of your training data. This process has two main parts: selecting your images and captioning them.
3.1. Image Selection and Organization
First, you need to gather a high-quality, diverse set of images of your subject or style.
SDXL LORA Training locally with Kohya - FULL TUTORIAL // stable diffusion
Let's review the principles of selecting a good dataset. This section of the CreatixAi video covers where to find images and what to look for.
Watch from 03:22 to 05:40. Pay attention to the advice on: Image Quality: Use high-resolution, clear images. Avoid blurriness. Variety: This is critical. Collect images with different angles, lighting, facial expressions, clothing, and backgrounds. This helps the model learn the subject itself, not just the context of a few specific photos. Quantity: For a character, 10-25 high-quality images are often sufficient. For a style, you may need more (20+). Cropping: The video mentions that modern workflows using 'bucketing' (which we'll discuss later) mean you don't strictly need to crop all images to a square aspect ratio anymore, which is a major advantage.
Once you have your images, you need to set up a specific folder structure that Kohya_ss expects. This is a common point of failure for beginners.
- Create a main project folder (e.g.,
my_lora_project). - Inside it, create three subfolders:
image,model, andlog. - Inside the
imagefolder, create your actual training data folder. This folder's name is special and follows the pattern:[repeats]_[trigger] [class].repeats: How many times each image is shown to the model per epoch. A good starting point is 10-20.trigger: The unique word you'll use to invoke your LoRA (e.g.,ohwx).class: The general category of your subject (e.g.,man,woman,style).
For example, a folder named 15_ohwxman would contain the training images for a man, invoked by the trigger ohwx, with each image being repeated 15 times per epoch. Place all your selected images inside this folder.
3.2. Captioning
Captioning is arguably the most important step for creating a flexible, high-quality LoRA. A caption is a text file (.txt) that accompanies each image file (.jpg/.png) and has the exact same name (e.g., photo1.jpg and photo1.txt). Its purpose is to describe everything in the image except for the concept you are trying to teach.
This allows the model to "subtract" the described elements and associate the remaining, undescribed visual information with your trigger word.
Kohya_ss has built-in utilities to automate the initial captioning process.
SDXL LORA Training locally with Kohya - FULL TUTORIAL // stable diffusion
Let's use Kohya's utilities to generate our initial captions. This part of the CreatixAi video demonstrates how to use the built-in BLIP and WD14 captioners.
Watch from 06:23 to 09:37. This section will show you how to: Navigate to the Utilities -> Captioning tab. Select a captioning model (e.g., WD14-Tagger for tag-based captions, BLIP for sentence-based). Point it to your image folder and run the process. It will generate a .txt file for each image. Optionally, add a prefix like your_trigger_word, to every caption. This is a common practice.
Crucially, automated captions are just a starting point. You must manually review and edit them.
Fine-tuning with LoRA - Captioning
Now, let's learn the principles of writing good captions. This article from 'kix' provides excellent guidelines that we will adopt.
Please read the 'Captioning' section of the article. Focus on these key rules: Your goal is to associate the trigger token with your subject's likeness. Do not include descriptions of features that are constant across all photos (e.g., if you're training on yourself and have black hair in every photo, remove black hair from the captions). This forces the model to learn that 'black hair' is part of your trigger word's concept. Explicitly caption things that are different in each photo (e.g., wearing sunglasses, smiling, at the beach). This teaches the model that these are not part of the core concept and can be changed with prompting.
3.3. Regularization Images (Optional but Recommended)
Regularization images are a large set of generic images of your subject's class (e.g., hundreds of pictures of a 'woman' if you're training a specific woman). Their purpose is to prevent the model from overfitting and "forgetting" what a general woman looks like. This makes your LoRA more editable and less likely to bake in specific backgrounds or lighting from your training set.
Training LoRA with Kohya (theory included!)
The concept of regularization images is important for high-quality results. The following video by Laura Carnevali gives an excellent explanation and a clever method for generating them.
Watch from 08:25 to 12:57. Focus on understanding: Why they are used: To preserve the general class concept and prevent overfitting. How many you need: A common rule of thumb is (Number of training images) * (Repeats). So for 25 images with 10 repeats, you'd want around 250 regularization images. How to generate them: The video shows a brilliant trick: use a base model in Stable Diffusion with a simple prompt (e.g., 'woman'), set the batch count to run indefinitely, and let it generate hundreds or thousands of images.
You would place these generated images in a separate folder, which you can then specify in the Kohya training interface.
4. Configuring and Launching the Training
This is where Kohya_ss truly shines, offering a wealth of parameters to control your training. We'll walk through the most important ones. Navigate to the Dreambooth LoRA tab.
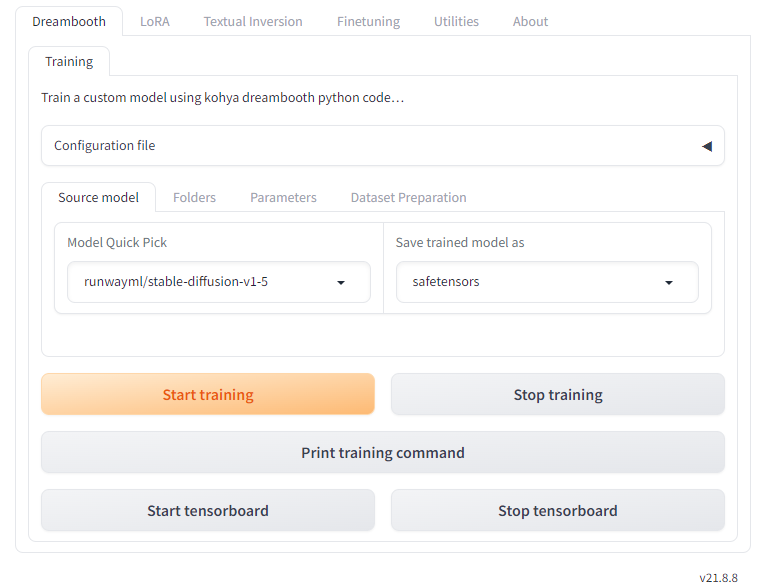
Source Model Tab
- Pretrained model name or path: Select the base model you want to fine-tune (e.g.,
stable-diffusion-v1-5or an SDXL model). It's best to use the original base models for maximum compatibility.
Folders Tab
- Image folder: Path to your
imagefolder (e.g.,C:/my_lora_project/image). - Output folder: Path to your
modelfolder (e.g.,C:/my_lora_project/model). - Logging folder: Path to your
logfolder (e.g.,C:/my_lora_project/log). - Model output name: Give your LoRA file a name (e.g.,
my_character_v1).
Training parameters Tab
This is the most complex tab. Here are the crucial settings and solid starting points.
Fine-tuning with LoRA - Hyperparameter selection
This article by 'kix' contains an excellent, in-depth discussion of the key hyperparameters. It's perfect for understanding the theory behind the numbers.
Read the 'Hyperparameter selection' section. It covers Training steps, Learning rates, Scheduler & Optimizer, and Network Rank/Alpha. We will refer back to its insights as we go through the parameters below. Don't worry about mastering it all at once; focus on getting a feel for what each parameter does.
Here's a breakdown of the essential parameters with recommended starting values:
- LoRA type:
Standard. - Train batch size:
1is safest and often best for character training. Can be increased for style training if you have enough VRAM. - Epoch: An epoch is one full pass through your entire dataset.
5to10is a good range. The trainer will save a file after each epoch. - Save every N epochs:
1. This saves a separate LoRA file for each epoch, allowing you to test and find the one that isn't under- or over-fitted. - Mixed precision: As configured during installation (
fp16orbf16). - Caption Extension:
.txt. Don't forget this! - Optimizer:
AdamW8bitis a robust, reliable default. For SDXL,Adafactoris often recommended. - Learning Rate: This is critical.
- Learning Rate:
1e-4(or0.0001). This will be the UNet learning rate. - Text Encoder learning rate:
5e-5(or0.00005). As thekixarticle explains, training the text encoder at a lower rate (often half the main LR) is a community best practice that yields better results. - LR Scheduler:
constantorcosine_with_restarts.constantis simple and effective.cosinevaries the learning rate over time, which can sometimes find a better optimum.
- Learning Rate:
- Max resolution: Set this to the resolution of your training images (e.g.,
768,768or1024,1024for SDXL). - Enable buckets: Check this box. It allows Kohya_ss to intelligently handle images of different aspect ratios by grouping them into 'buckets' of similar shapes. This is a huge quality-of-life improvement over older workflows that required cropping everything to a square.
- Network Rank (Dimension) and Network Alpha: These are core to LoRA.
- Rank defines the "size" or capacity of your LoRA. A higher rank can capture more detail but results in a larger file and can overfit more easily.
- Alpha acts as a scaling factor.
- While theory might suggest a low rank, a widely adopted practice for high-quality results is to set Rank and Alpha to the same value. A common starting point is a Rank of
128and an Alpha of128. Thekixarticle you read has a great discussion on this "controversial" but effective setting.
Once everything is configured, press Train model and monitor the command line window that launched with the GUI. You will see the progress, including the current step and the loss value (which should generally decrease over time).
5. Evaluation: Finding the "Golden" Epoch
After training completes, you'll find several LoRA files in your model output folder, one for each epoch (e.g., my_character_v1-000001.safetensors, my_character_v1-000002.safetensors, etc.). Your final task is to find the best one.
Early epochs might be underfit (don't look enough like your subject), while later epochs might be overfit (look exactly like your training photos and are not flexible).
The most effective way to test this is using the X/Y/Z plot script in a UI like Automatic1111.
SDXL LORA Training locally with Kohya - FULL TUTORIAL // stable diffusion
Let's see how to systematically test our output files to find the best-performing LoRA. This final clip from the CreatixAi video demonstrates using an X/Y/Z plot.
Watch from 17:50 to the end. The key idea is: Copy your generated .safetensors files to your UI's models/Lora folder. In the txt2img tab, write a test prompt including your trigger word and LoRA reference (e.g., photo of ohwxman, <lora:my_character_v1-000001:1>). Open the X/Y/Z plot script. Set the X type to Prompt S/R (Search/Replace). In X values, list all your LoRA file names, separated by commas (e.g., my_character_v1-000001, my_character_v1-000002, ...). This will generate one image for each epoch, allowing you to see the progression of learning at a glance.
When evaluating, look for the "sweet spot" that has good likeness to your subject but also good adaptability (e.g., you can change the hair color or style via the prompt without the LoRA overriding it).
Conclusion
Congratulations! You have just walked through the complete, end-to-end professional workflow for fine-tuning a Stable Diffusion LoRA. While more complex than using integrated UI buttons, Kohya_ss provides the power and control necessary to create truly high-quality, personalized models.
Key Takeaways:
- Kohya_ss is the community-standard GUI for fine-tuning diffusion models, offering deep control over hyperparameters.
- A successful training run depends heavily on a high-quality, diverse, and well-captioned dataset.
- The folder structure (
[repeats]_[trigger] [class]) is a specific convention you must follow. - Key hyperparameters to master are Learning Rate (for both UNet and Text Encoder), Optimizer, LR Scheduler, and Network Rank/Alpha.
- A common and effective starting point for Rank and Alpha is
128for both. - Evaluation is a critical final step. Use X/Y/Z plots to systematically compare the outputs from each epoch to find the one with the best balance of likeness and flexibility.
Preview of the next lesson:
We've just learned the mechanics of using a training framework and its many parameters. In the next lesson, we will dive deeper into the art of tuning these settings. We'll learn how to configure hyperparameters and use negative prompts for targeted content generation (SFW and NSFW), giving you the tools to steer your fine-tuned models toward exactly the output you desire.