Hello! Welcome to your next lesson on personalizing generative models.
In our previous two lessons, we explored DreamBooth and LoRA. Both are powerful fine-tuning techniques that work by modifying the model's weights—either the entire UNet in classic DreamBooth or small, injected matrices in LoRA—to teach it a new concept or subject.
Today, we're going to explore a fundamentally different and elegant approach that achieves a similar goal. This lesson addresses the learning outcome: Apply textual inversion to teach new concepts to a model without changing its weights.
That's right—we will learn how to introduce a new concept to a model like Stable Diffusion while keeping the base model entirely frozen. We'll examine the theory behind how this is possible, the practical steps to implement it, and the unique advantages and trade-offs of this method compared to DreamBooth and LoRA.
1. What is Textual Inversion? The Core Idea
Imagine you want to teach a model about a specific object, like a unique, handmade teapot. You could fine-tune the model, but this risks altering its vast knowledge. Textual Inversion proposes a different path: what if, within the model's enormous "dictionary" of concepts, there already exists a perfect description of your teapot, just not one that's tied to an English word?
Textual Inversion is the process of finding this perfect description—a specific point in the model's embedding space—that represents your new concept. It doesn't create new knowledge; it finds a "pseudo-word" that precisely unlocks a combination of existing knowledge to render your subject.
Textual Inversion with Automatic1111 (I Read The Paper)
To start, let's get a high-level overview. This video clearly explains the core concept of Textual Inversion and how it contrasts with destructive methods like DreamBooth.
Watch the first 5 minutes and 51 seconds of the video. Focus on understanding: How Textual Inversion uses the model's existing knowledge by finding a very precise embedding. Why this process is non-destructive to the base model. The main advantages: tiny output files and the ability to train many concepts without model degradation.
2. Diving Deeper: The Theory and the Paper
As the video explained, the key is to freeze the entire text-to-image model and only optimize a new vector in the text encoder's embedding lookup table. Let's ground this in the original academic paper that introduced the technique.
We'll now turn to the source: the paper 'AN IMAGE IS WORTH ONE WORD: PERSONALIZING TEXT-TO-IMAGE GENERATION USING TEXTUAL INVERSION'. Reading a few key sections will give you a solid theoretical foundation.
Please read the following sections from the PDF: Abstract and Section 1 (Introduction): This will set the stage, explaining the motivation and the high-level idea of finding 'new words' (pseudo-words). Section 3 (Method): This is the most crucial part. Read through 'Latent Diffusion Models', 'Text embeddings', and 'Textual inversion'. Pay close attention to Figure 2 (p. 3) and Equation 2 (p. 5). Don't worry about understanding every nuance of the LDM loss; focus on what is being optimized (v*) and what is kept fixed (the model cθ and ϵθ). Section 6 (Conclusions): This summarizes the strengths and limitations of the approach.
From the paper, let's crystallize the mechanism with a visual aid.
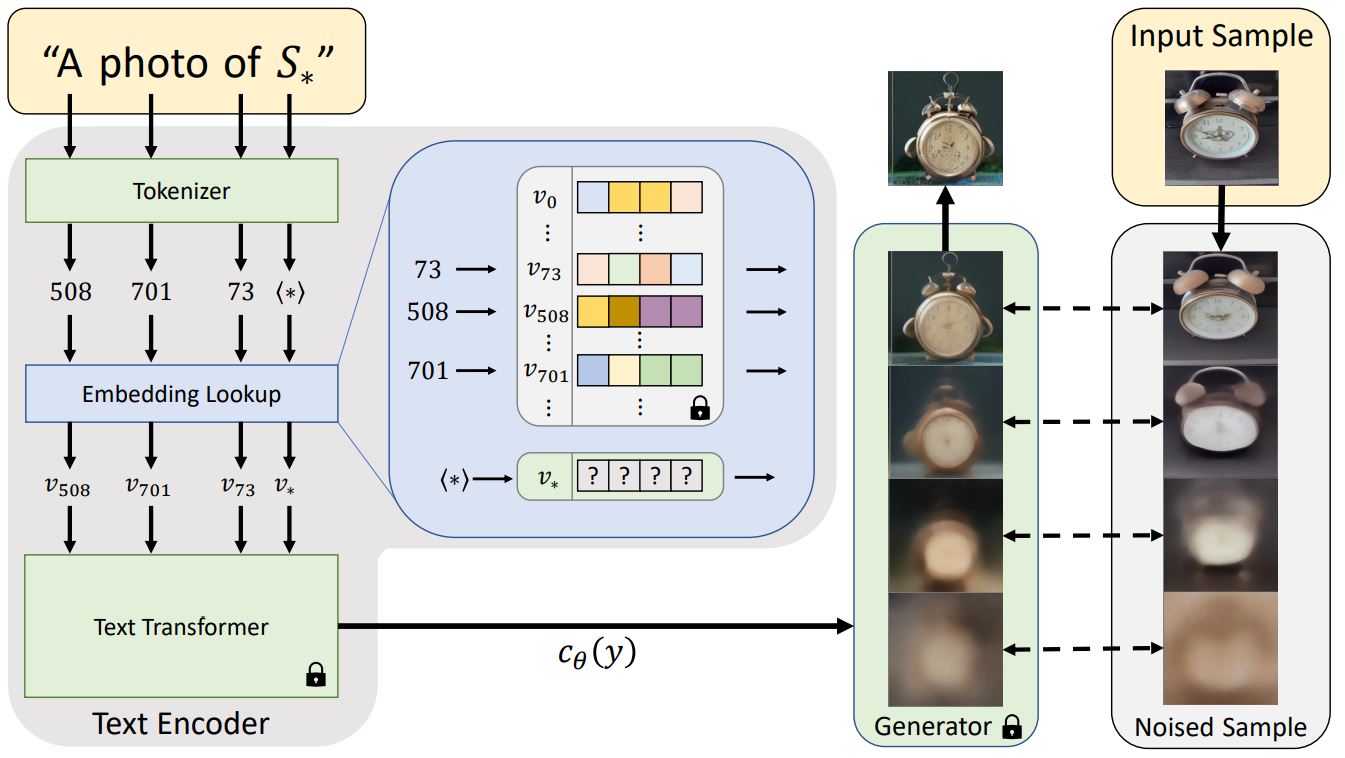
The optimization goal from the paper can be summarized as:
This looks complex, but it's the standard diffusion model loss function. The key insight is that we are not optimizing θ (the model weights). We are only finding the optimal embedding vector v (which becomes v*) that minimizes the reconstruction error for our training images.
3. A Practical Dive with Automatic1111
While the diffusers library has a script for this (which we'll touch on later), one of the most popular and intuitive ways to perform Textual Inversion is through the Automatic1111 Web UI. It provides excellent visual tools for understanding the process. We'll use a detailed video tutorial as our guide.
A. Understanding Tokens and Vectors
Before you train, it's vital to grasp what you're manipulating. A prompt like "a beautiful landscape" is not a single entity to the model. It's broken down into tokens, and each token has a corresponding numerical representation, an embedding vector.
How To Do Stable Diffusion Textual Inversion (TI) / Text Embeddings By Automatic1111 Web UI Tutorial
Let's make this abstract idea concrete. This section of the tutorial brilliantly uses extensions in the Automatic1111 UI to let you 'see' how prompts are tokenized and what embeddings look like.
Watch from 11:39 to 17:50. The narrator uses the 'Embedding Inspector' and 'Tokenizer' to show: That single words can be single or multiple tokens (e.g., 'Artstation' -> 'art', 'station'). Each token has a unique ID and a large vector of numbers associated with it. Textual Inversion aims to create a new, custom vector (or a few of them) for our concept.
B. The Training Workflow
Now, let's walk through the actual training setup. You'll need a small dataset of your subject (typically 3-10 high-quality images). As the video will explain, it's crucial that these images are varied in background and pose to help the model isolate the subject itself.
How To Do Stable Diffusion Textual Inversion (TI) / Text Embeddings By Automatic1111 Web UI Tutorial
This next segment covers the entire training setup, from creating the embedding to configuring all the crucial hyperparameters.
Watch from 17:50 to 34:33. This is a dense but very important section. Focus on understanding the purpose of these settings: Name: The trigger word for your embedding. Initialization text: Starting with an empty (zeroed) vector vs. a word like 'dog'. This relates to starting your optimization from a random point or a point that's already close. Number of vectors per token: A key hyperparameter. Note the video's practical advice (2 is often good) and how it aligns with the paper's findings (they used up to 3). Learning Rate: The paper suggests 0.005 as a starting point for LDM, but this can be adjusted. Prompt Template: This is unique to this training style. Understand how templates like a photo of [name] are used during training to provide context and guide the learning process.
Test your understanding!
You are training an embedding for a specific person. You set the Number of vectors per token to 4. After training, you use the trigger word in a prompt. How many of your 75 available tokens in the prompt will this single trigger word consume?
Show answer
It will consume 4 tokens. Each vector you train corresponds to a new "pseudo-token" that occupies one of the 75 available token slots in the prompt sequence. This is why using a very high number of vectors can be detrimental, as it leaves less room for descriptive language in your prompt.
C. Monitoring Training and Using the Result
How do you know when to stop training? If you train for too long, the embedding can become "overcooked"—it will produce perfect reconstructions of your training images but will be inflexible and hard to use in new contexts (overfitting).
How To Do Stable Diffusion Textual Inversion (TI) / Text Embeddings By Automatic1111 Web UI Tutorial
The same video provides an excellent guide on monitoring the training process to avoid overtraining and then using your final embedding.
Watch from 36:36 to 47:04 and then skip to 54:28 to 1:09:16. These sections cover: Analyzing Loss: Understanding that a decreasing loss means the model is getting better at reconstructing your subject. Vector Strength: Using a community script to measure the 'strength' of your embedding vectors to detect when overtraining begins (a value > 0.2 is a warning sign). Testing Checkpoints: Using the X/Y plot script to generate images from embeddings saved at different training steps to visually determine the best one. Combining Embeddings: A quick look at how you can use multiple embeddings in a single prompt.
4. Textual Inversion vs. DreamBooth vs. LoRA
You now have three personalization techniques in your toolkit. It's crucial to understand their differences.
| Feature | Textual Inversion | LoRA | DreamBooth (Full) |
|---|---|---|---|
| What it Trains | Only a new embedding vector. | Small, low-rank matrices. | The entire UNet (and/or text encoder). |
| Model Weights | Frozen (non-destructive) | Frozen (LoRA matrices are separate) | Modified (destructive) |
| Output Size | Tiny (few KB) | Small (1-200 MB) | Huge (2-5 GB) |
| Flexibility | High. Can mix multiple embeddings. | Highest. Can mix, change strength easily. | Low. A single monolithic model. |
| Fidelity | Good, but can struggle with difficult concepts. | Good to Great. | Very High. Best for subject likeness. |
| "Knowledge" | Finds a path to existing knowledge. | Adds a small amount of new knowledge. | Adds significant new knowledge. |
The LINK video contains a great visual summary of these differences between 48:20 and 52:11, which is worth a quick review.
5. Textual Inversion with diffusers
For completeness, and to connect back to your Python background, here's how the concepts map to the Hugging Face diffusers training script, textual_inversion.py.
Textual Inversion - Hugging Face Diffusers
Let's briefly look at the official diffusers documentation to see how the parameters we learned in the UI map to a command-line script.
Skim Section 2, 'Script parameters', and the example command in Section 4, 'Launch the script'. You'll see direct parallels: --placeholder_token: The trigger word (e.g., <cat-toy>). --initializer_token: The word to initialize the embedding from (e.g., toy). --num_vectors: Same as 'Number of vectors per token'. --learning_rate: 5.0e-04 is a recommended starting point here. --train_data_dir: The path to your images.
The underlying process is identical; it's just a different interface for the same fundamental technique.
Conclusion
Congratulations! You have now mastered a third, conceptually distinct method for model personalization. Textual Inversion is a powerful and efficient technique that shines due to its non-destructive nature and incredibly small footprint.
Key Takeaways:
- Textual Inversion teaches a model a new concept by finding a new pseudo-word (an embedding vector) in the text encoder's vocabulary.
- It is non-destructive, as the weights of the core model (UNet and text encoder) are completely frozen during training.
- The output is a tiny file (a few KB), making embeddings very easy to share and use.
- Training involves optimizing the new embedding vector to minimize reconstruction loss on a small set of example images.
- Key hyperparameters include the number of vectors, the learning rate, and the prompt templates used during training.
- It offers a different trade-off than DreamBooth/LoRA: potentially less fidelity for difficult subjects, but with maximum efficiency and zero impact on the base model.
Preview of the next lesson:
So far, we've used either official scripts or the Automatic1111 UI. In the community, a powerful, dedicated training framework called Kohya_ss has become a standard for fine-tuning Stable Diffusion models. In our next lesson, we will learn to use training frameworks like Kohya_ss to fine-tune Stable Diffusion models, bringing together the concepts from our last three lessons into a unified, powerful workflow.