
Hello! Welcome to the next step in our journey to mastering production-ready microservices.
In our last lesson, we focused on managing application releases directly using Helm commands like upgrade and rollback. While powerful for manual control and incident response, in a modern development environment, these operations are rarely performed by hand. The goal is always to automate the path from code commit to a running service in production.
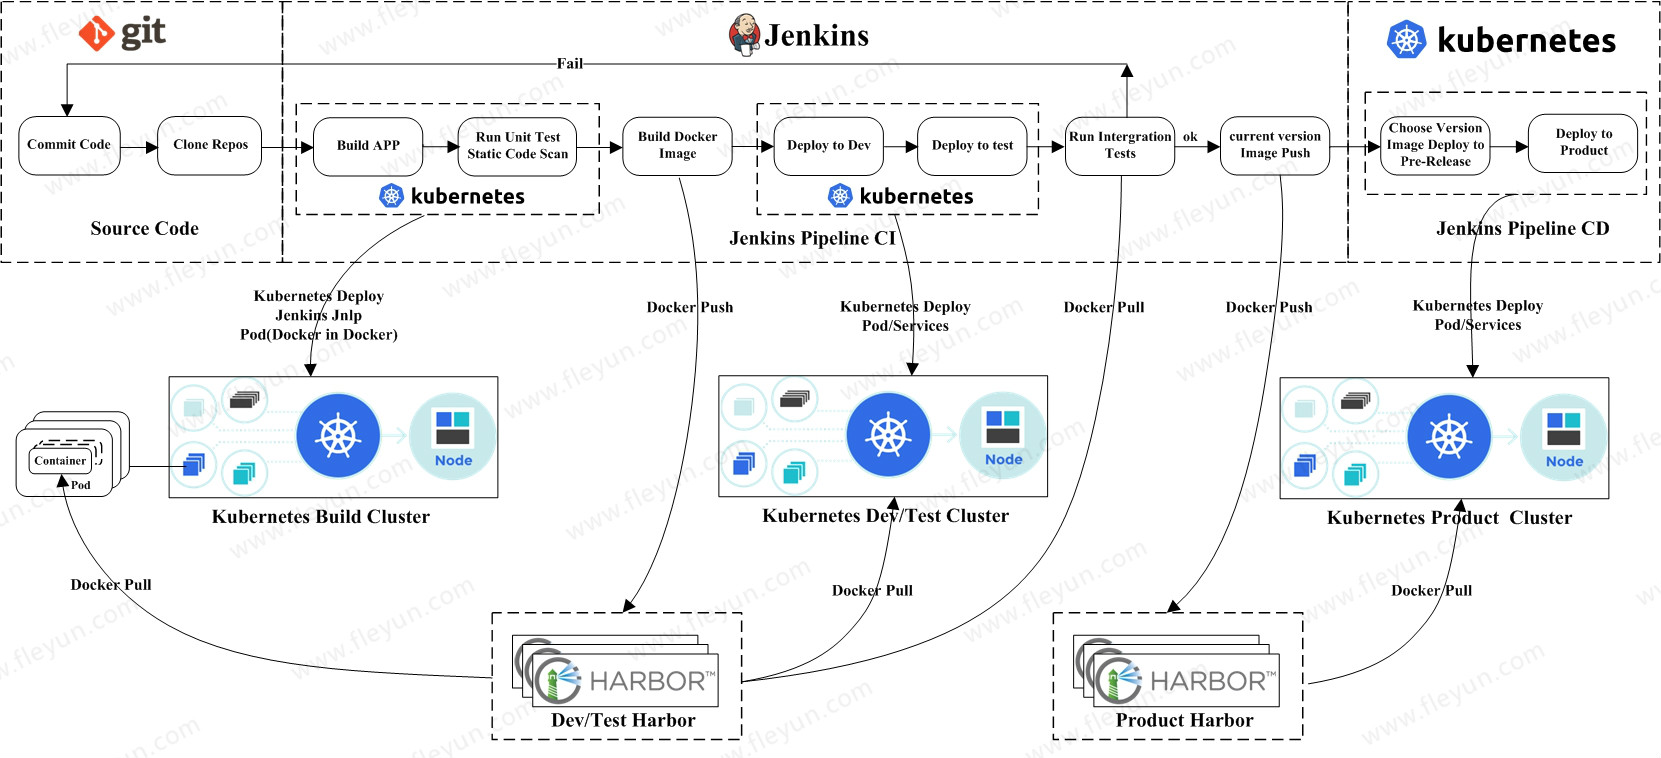
Today, we will design the blueprint for that automation. Your learning outcome is to design a CI/CD pipeline for a microservice, including build, test, containerize, and deploy stages. We'll break down what a typical, production-grade pipeline looks like, exploring the purpose of each stage and the decisions you'd need to justify in a system design interview. This lesson focuses on the "what" and "why," creating the architectural foundation that we will implement in the next lesson.
1. What is a CI/CD Pipeline?
At its core, CI/CD is the practice of automating the software delivery process. It acts as an assembly line for your code, moving it from a developer's machine to a production environment through a series of automated quality checks and deployments.
- Continuous Integration (CI) is the practice of frequently merging code changes from multiple developers into a central repository. Each merge triggers an automated build and test sequence. The primary goal of CI is to detect integration issues early.
- Continuous Delivery (CD) extends CI by automatically deploying all code changes to a testing and/or production environment after the build stage.
- Continuous Deployment is a step further, where every change that passes all stages of the pipeline is automatically released to production users.
For a mid-senior role, it's crucial to articulate the business value of CI/CD: it increases development velocity, improves code quality and stability, and reduces the risk associated with manual deployments.
2. Anatomy of a Production-Grade CI/CD Pipeline
A CI/CD pipeline is a sequence of stages. Each stage is a logical unit that performs a specific task. If any stage fails, the pipeline stops, providing immediate feedback that something is wrong.
Let's design a pipeline for a typical Spring Boot microservice. The following article provides an excellent, real-world overview of the stages involved.
How to Build a Real-World CI/CD Pipeline for ...
The article 'How to Build a Real-World CI/CD Pipeline for Microservices' provides a fantastic high-level flow of a production pipeline. We will use its list of stages as the blueprint for our design.
Please read the 'High-level flow' at the very beginning of the article, and then skim the list of stages in the 'CI pipeline stages (Jenkinsfile, declarative)' section. Don't worry about the Jenkinsfile code itself for now; focus on understanding the name and purpose of each stage listed, from 'checkout' to 'post-deploy'.
Based on that structure, we can group the stages into three main phases: CI (Build & Verify), Containerization, and CD (Delivery).

Phase 1: Continuous Integration (CI) - The Quality Gate
This phase focuses on building the application and ensuring it meets quality standards before it's packaged. It's typically triggered on every code push to any branch.
-
Checkout Code: The pipeline's first step is to pull the latest source code from the Git repository (e.g., GitHub, GitLab).
-
Build & Unit Test: The CI server compiles the source code and runs unit tests.
- Action: For our Spring Boot service, this means running
./mvnw clean packageor./gradlew build. - Purpose: This verifies that the code compiles and that individual components function correctly in isolation. A failure here indicates a fundamental bug or a broken build. Given your background, this stage should be very familiar.
- Action: For our Spring Boot service, this means running
-
Static Code Analysis: The code is analyzed for quality issues, potential bugs, and security vulnerabilities without actually running it.
- Action: Tools like SonarQube or Checkstyle scan the codebase.
- Purpose: This enforces coding standards, identifies "code smells" (e.g., overly complex methods), and finds common bug patterns. In an interview, mentioning this stage shows you care about long-term code maintainability.
Phase 2: Containerization - The Shipping Department
Once the CI phase passes, we have a high-quality, tested artifact (a .jar file). The next step is to package it for deployment.
-
Build Docker Image: The artifact is baked into a Docker image using the
Dockerfilein the repository.- Action: The pipeline runs
docker build. - Purpose: This creates a portable, self-contained unit that includes the application and all its dependencies (like the JRE). We use multi-stage builds here to keep the final image small and secure. The image is tagged with a unique identifier, typically the Git commit SHA, to ensure immutability and traceability.
- Action: The pipeline runs
-
Scan Image for Vulnerabilities: The newly built Docker image is scanned for known security vulnerabilities in its layers and dependencies.
- Action: Tools like Trivy, Clair, or Snyk are used to scan the image.
- Purpose: This is a critical security gate. If a high-severity vulnerability is found in the base image or a library, the pipeline should fail, preventing insecure code from ever reaching a runtime environment.
-
Push Image to Registry: The validated, secure image is pushed to a central container registry.
- Action: The pipeline runs
docker push. - Purpose: This makes the image available for the Kubernetes cluster to pull during deployment. Registries can be public (Docker Hub) or private (AWS ECR, Google GCR, Artifactory).
- Action: The pipeline runs
Phase 3: Continuous Delivery (CD) - The Rollout
With a versioned, secure image in our registry, we are ready to deploy.
-
Deploy to Staging: The application is deployed to a staging or pre-production environment. This environment should mirror production as closely as possible.
- Action: The pipeline runs
helm upgrade --install ...pointing to the staging Kubernetes cluster. It uses the Git commit SHA tag to deploy the exact image we just built. - Purpose: To validate the application's behavior in an integrated environment before it impacts real users.
- Action: The pipeline runs
-
Run Automated Integration & E2E Tests: After a successful deployment to staging, automated tests are run against the live service.
- Action: A test suite (e.g., using Postman/Newman, Cypress, or REST Assured) is executed.
- Purpose: This verifies that the microservice interacts correctly with other services, databases, and message brokers in the staging environment. This is where you catch issues that unit tests miss.
-
Manual Approval Gate (for Production): This is an optional but common stage for production deployments.
- Action: The pipeline pauses and waits for a human (e.g., a team lead, product manager) to give explicit approval to proceed.
- Purpose: Provides a final business-level check before releasing to customers. The trade-off is speed vs. control. For many critical systems, this manual gate is non-negotiable. Discussing this trade-off is a great senior-level interview topic.
-
Deploy to Production: Upon approval, the same image is deployed to the production environment.
- Action: The pipeline runs
helm upgrade --install ...against the production Kubernetes cluster. - Purpose: To release the new version to users. Using Helm ensures the deployment is managed, repeatable, and can be rolled back.
- Action: The pipeline runs
-
Post-Deployment Verification (Smoke Tests): After the production deployment, a small set of automated tests are run to ensure the service is healthy.
- Action: A script might call the
/actuator/healthendpoint or a key API endpoint. - Purpose: A quick sanity check to catch catastrophic failures immediately. If a smoke test fails, an automatic rollback can be triggered.
- Action: A script might call the
3. Organizing for Success: Repository Structure
A clean pipeline relies on a well-organized repository. For a single microservice, a good structure includes all the pipeline-related assets alongside the application code.
The "How to Build a Real-World CI/CD Pipeline" article you read earlier suggests a practical layout.
How to Build a Real-World CI/CD Pipeline for ...
Let's revisit the article to look at its recommendation for organizing your project repository. This structure makes it easy for the CI/CD system to find everything it needs.
Please read the section titled 'Repo layout'. Notice how the Dockerfile, Jenkinsfile, and helm/ directory are placed at the root of the service's repository.
A typical structure would look like this:
/my-microservice
├── src/                  # Java source code
├── helm/                 # Helm chart for this service
├── Dockerfile            # Instructions to build the Docker image
├── Jenkinsfile           # The pipeline definition (pipeline-as-code)
├── pom.xml               # Maven project configuration
└── README.md
This "pipeline-as-code" approach, where the Jenkinsfile (or .gitlab-ci.yml) lives in the repository, is the industry standard. It versions your pipeline along with your code, making it auditable and easy to manage.
Test your understanding!
An interviewer asks: "You've just pushed a code change that introduces a major security flaw in a third-party library. Describe the stages in your CI/CD pipeline that should prevent this flawed code from reaching production."
Show answer
"My pipeline has several gates for this. First, the Static Code Analysis stage might flag the use of a library with a known vulnerability, depending on the tool (e.g., SonarQube with dependency-check).
However, the most critical gate is the Scan Image for Vulnerabilities stage, which happens right after the Docker image is built. This stage uses a tool like Trivy or Snyk to scan all layers of the container image against a database of Common Vulnerabilities and Exposures (CVEs). I would configure this stage to fail the pipeline automatically if any 'CRITICAL' or 'HIGH' severity vulnerabilities are detected. This stops the flawed build immediately, and the insecure image is never pushed to our container registry or deployed to any environment."
Conclusion
In this lesson, we designed a comprehensive, production-ready CI/CD pipeline from the ground up. You learned how to break down the software delivery process into distinct, automated stages, each with a clear purpose that contributes to quality, security, and velocity.
Key Takeaways:
- A CI/CD pipeline automates the journey from code to production.
- CI stages (
Build,Unit Test,Static Analysis) focus on code quality and correctness. - Containerization stages (
Build Image,Scan Image,Push Image) package the application into a secure, portable format. - CD stages (
Deploy to Staging,Integration Test,Deploy to Production) manage the rollout across environments safely. - Thinking in terms of pipeline stages allows you to build a robust, repeatable, and automated delivery process—a core competency for a senior microservices developer.
You now have the architectural blueprint. In our next lesson, we will bring this design to life by implementing a CI/CD pipeline using Jenkins to automatically deploy our Spring Boot microservice to Kubernetes. We'll write a Jenkinsfile that executes the stages we've designed today.
Can't find a good explanation? Sign up and we'll make it for you
Sign up