
Hello! Welcome back to our series on building production-ready microservices.
In our last lesson, we designed the architectural blueprint for a CI/CD pipeline. We broke down the process into logical stages: building and verifying the code, containerizing it into a secure package, and delivering it across multiple environments.
Today, we transition from design to implementation. Your learning outcome is to implement a CI/CD pipeline using Jenkins or GitLab CI to automatically deploy a microservice to Kubernetes. We will translate our architectural design into "pipeline-as-code," a practice that treats your pipeline configuration as a version-controlled artifact, just like your application code. We'll focus on a detailed implementation with Jenkins, the industry workhorse, and then compare it with GitLab CI, a popular integrated alternative.
1. Implementing the Pipeline with Jenkins
Jenkins remains one of the most powerful and widely used automation servers. Its strength lies in its vast ecosystem of plugins, allowing it to integrate with virtually any tool. We'll implement our pipeline using a Jenkinsfile.
A Jenkinsfile is a text file that contains the definition of a Jenkins pipeline and is checked into your source control repository. This is the essence of pipeline-as-code.
The article "How to Build a Real-World CI/CD Pipeline for Microservices with Jenkins and Kubernetes" provides an excellent, modern example of a declarative Jenkinsfile. Let's use it as our guide.
How to Build a Real-World CI/CD Pipeline for ...
This article contains a complete, declarative Jenkinsfile that implements the pipeline design we discussed. It uses modern practices like Kaniko for building images and Helm for deployment.
Please read the section titled 'Example Jenkinsfile (declarative) — Kaniko build + Helm deploy'. Focus on understanding the structure: the pipeline, agent, environment, and the sequence of stages. We will break down its key parts next.
Deconstructing the Jenkinsfile
Let's dissect the example Jenkinsfile from the article to understand how it executes our pipeline design.
// A simplified version based on the article's example
pipeline {
    // 1. Agent: Where the pipeline runs
    agent { label 'jenkins-k8s-agent' }

    // 2. Environment: Variables for the pipeline
    environment {
        REGISTRY = 'your-docker-registry/your-team'
        IMAGE_NAME = 'my-microservice'
        GIT_COMMIT = sh(returnStdout: true, script: 'git rev-parse --short HEAD').trim()
        IMAGE_TAG = "${REGISTRY}/${IMAGE_NAME}:${GIT_COMMIT}"
    }

    // 3. Stages: The steps of our pipeline
    stages {
        stage('Checkout') { /* ... */ }
        stage('Unit tests') { /* ... */ }
        stage('Build artifact') { /* ... */ }
        stage('Build & Push Image (Kaniko)') { /* ... */ }
        stage('Image scan') { /* ... */ }
        stage('Deploy to Staging') { /* ... */ }
        stage('Manual approval to Prod') { /* ... */ }
        stage('Deploy to Prod') { /* ... */ }
    }
}
1. Agent: The agent directive tells Jenkins where to execute the pipeline. In modern setups, this is often a dynamically provisioned container running inside your Kubernetes cluster. This agent is configured with all the necessary tools (like maven, kaniko, helm, trivy).
2. Environment: This block defines environment variables used throughout the pipeline. Notice how the IMAGE_TAG is constructed using the Git commit SHA. This ensures that every image is immutable and directly traceable to a specific code version—a critical practice for reliable rollbacks and debugging.
3. Stages: This is where the work happens. Let's look at the implementation of the key stages.
-
Build & Unit Test:
stage('Unit tests') {
    steps {
        sh './mvnw test' // Executes your JUnit tests
        junit 'target/surefire-reports/*.xml' // Archives test results
    }
}
stage('Build artifact') {
    steps {
        sh './mvnw -DskipTests package' // Compiles code and packages it into a JAR
    }
}
These stages use shell commands (
sh) to run the Maven wrapper, a process you're likely familiar with from local development. -
Build & Push Image:
stage('Build & Push Image (Kaniko)') {
    steps {
        withCredentials(...) {
            sh """
            # Creates a Docker config file for authentication
            echo "{\"auths\":...}" > /kaniko/.docker/config.json

            # Runs Kaniko to build and push the image
            /kaniko/executor --dockerfile=Dockerfile --context=${WORKSPACE} --destination=${IMAGE_TAG}
            """
        }
    }
}
This stage is crucial. Instead of using
docker build, it uses Kaniko.- Why Kaniko? Building Docker images traditionally requires access to the Docker daemon. Running Docker-in-Docker (DinD) within a pipeline agent poses a significant security risk. Kaniko builds a container image from a
Dockerfileentirely inside a user-space container, without needing a Docker daemon. Mentioning this trade-off (security vs. simplicity) is a strong signal in an interview. - The
withCredentialsblock securely injects the container registry credentials into the stage.
- Why Kaniko? Building Docker images traditionally requires access to the Docker daemon. Running Docker-in-Docker (DinD) within a pipeline agent poses a significant security risk. Kaniko builds a container image from a
-
Deploy to Staging/Production:
stage('Deploy to Staging') {
    steps {
        withCredentials([file(credentialsId: 'kubeconfig-staging', variable: 'KUBECONFIG')]) {
            sh """
            helm upgrade --install myapp ./helm \
                --namespace staging \
                --set image.repository=${REGISTRY}/${IMAGE_NAME} \
                --set image.tag=${GIT_COMMIT} \
                --wait
            """
        }
    }
}
This stage brings together our previous work with Helm. It uses the
helm upgrade --installcommand to deploy the application. The image tag is passed using--set, ensuring that the Kubernetes deployment pulls the exact version we just built and tested. ThewithCredentialsblock provides thekubeconfigfile needed to access the target Kubernetes cluster. -
Manual Approval:
stage('Manual approval to Prod') {
    when { branch 'main' } // Only run this stage on the main branch
    steps {
        input message: "Approve deployment to production?"
    }
}
The
inputstep pauses the pipeline and waits for human confirmation. This is a simple but effective way to implement a control gate before a production release.
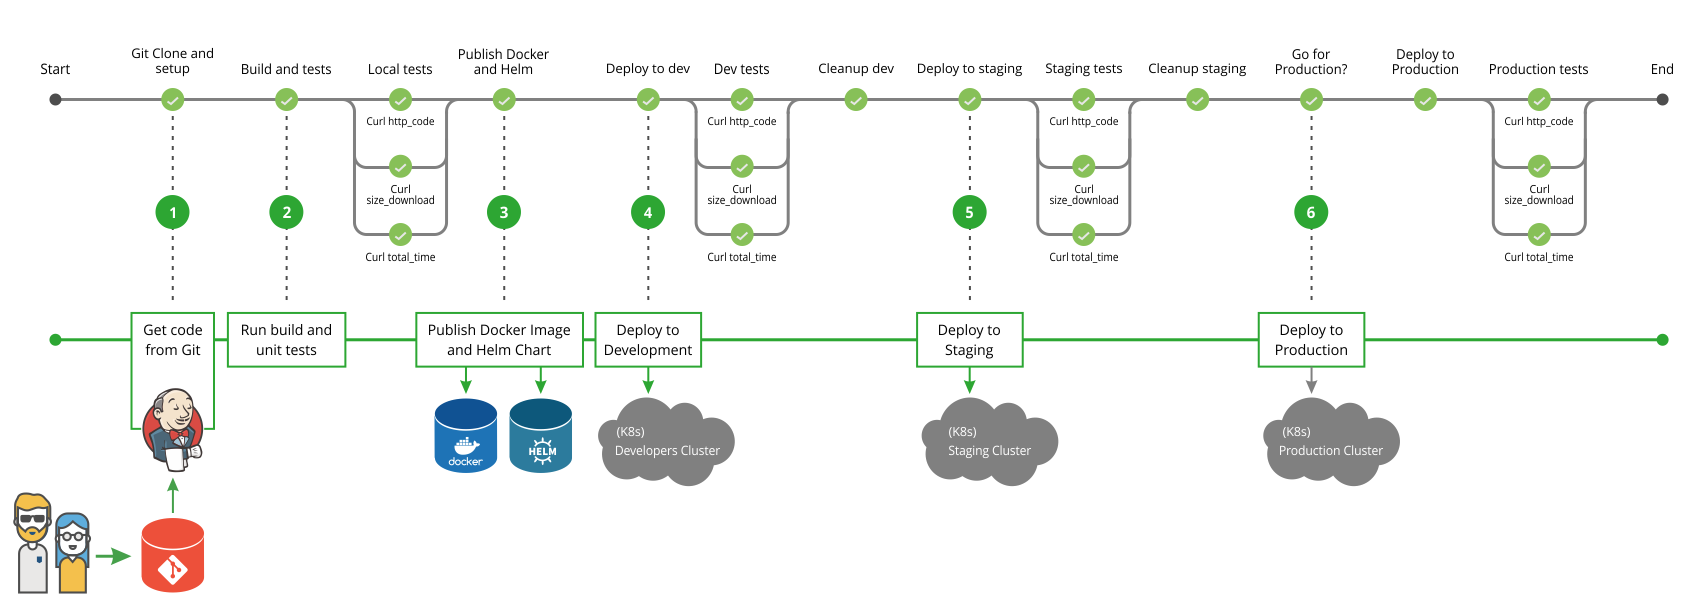
2. An Alternative: Implementing with GitLab CI
While Jenkins is a powerful standalone tool, many teams prefer CI/CD solutions that are tightly integrated with their source code management system. GitLab CI is a prime example.
The pipeline is defined in a YAML file named .gitlab-ci.yml at the root of your repository.
Let's explore how to implement the same pipeline logic using GitLab CI. This article provides a clear example of building and deploying a Java application to Kubernetes.
Please read the section 'Create application pipeline' up to the part about pushing images to docker.io. Pay attention to the YAML syntax, the definition of stages, and how each job is configured with an image and a script.
Deconstructing .gitlab-ci.yml
Here’s a look at the structure from the article:
# Defines the base image for jobs if not specified otherwise
image: maven:latest

# Defines the order of execution
stages:
  - build
  - test
  - image-build
  - deploy-tb # Deploy to test/staging
  - deploy-prod

# A "job" that runs in the "test" stage
test:
  stage: test
  script:
    - mvn test

# A "job" for building the image
image-build:
  stage: image-build
  script:
    # The example uses Jib, another docker-less build tool for Java apps
    - mvn -s .m2/settings.xml compile jib:build

# A "job" for deploying to production
deploy-prod:
  # Use a specific image that has kubectl installed
  image: bitnami/kubectl:latest
  stage: deploy-prod
  script:
    - kubectl apply -f k8s/deployment.yaml -n prod
  when: manual # This job requires manual triggering
  only:
    - master # This job only runs on the master/main branch
Key concepts in GitLab CI:
stages: This top-level key defines the sequence of pipeline stages. Jobs assigned to the same stage run in parallel.- Jobs: Each block (like
test,image-build,deploy-prod) is a job. A job runs ascriptwithin a specified Dockerimage. script: A series of shell commands to execute.when: manual: This is GitLab's equivalent of Jenkins'inputstep, creating a manual gate for the job.only: [master]: A rule to restrict the job to run only on commits to themasterbranch.

Test your understanding!
Your team lead asks you to add a static code analysis stage using SonarQube to your GitLab CI pipeline. This stage should run after the test stage but before the image-build stage. How would you modify the .gitlab-ci.yml file?
Show answer
You would need to make two changes:
- Add the new stage: Update the
stageslist to include the new stage in the correct order.stages: - build - test - static-analysis # Add the new stage here - image-build - deploy-tb - deploy-prod - Define the new job: Add a new job for static analysis, assigning it to the
static-analysisstage.# Assuming SONAR_TOKEN is configured as a CI/CD variable in GitLab sonar-scan: stage: static-analysis # SonarSource provides official Docker images for their scanner image: sonarsource/sonar-scanner-cli:latest script: - sonar-scanner -Dsonar.projectKey=my-app -Dsonar.sources=. -Dsonar.host.url=https://sonarqube.mycompany.com -Dsonar.token=$SONAR_TOKEN
3. Interview Prep: Jenkins vs. GitLab CI
Being able to discuss the trade-offs between these tools is a hallmark of a senior developer. Here's a quick comparison:
| Feature | Jenkins | GitLab CI |
|---|---|---|
| Setup & Management | Self-hosted. Can be complex, requiring management of the server, agents, and plugins ("plugin hell"). | Tightly integrated into the GitLab platform. Can be self-hosted or use GitLab.com with managed runners, simplifying setup. |
| Configuration | Jenkinsfile (Groovy). More programmatic and powerful, but can have a steeper learning curve. | .gitlab-ci.yml (YAML). Declarative and generally easier to read and write. |
| Extensibility | Massive plugin ecosystem. Can integrate with almost anything. This is its biggest strength. | Good integration with Kubernetes and cloud-native tools, but the plugin ecosystem is much smaller. |
| Ecosystem | A standalone CI/CD tool that acts as a central hub connecting other tools (like GitHub, Artifactory, SonarQube). | An all-in-one DevOps platform that includes SCM, CI/CD, package registry, security scanning, etc. |
The bottom line for an interview: The choice is strategic.
- Choose Jenkins for: Maximum flexibility, complex integrations across a heterogeneous toolchain, and when the organization wants a central, tool-agnostic automation server.
- Choose GitLab CI for: Simplicity, speed, and a seamless developer experience when the organization is already using or standardizing on the GitLab ecosystem.
Conclusion
In this lesson, we put theory into practice by implementing a CI/CD pipeline using pipeline-as-code. You learned how to define stages, manage credentials, and automate deployments to Kubernetes using both Jenkins and GitLab CI.
Key Takeaways:
- Pipeline-as-code (
Jenkinsfile,.gitlab-ci.yml) is the industry standard for creating maintainable, version-controlled automation. - A modern CI pipeline for containerized apps uses tools like Kaniko or Jib to build images securely without a Docker daemon.
- Deployment stages leverage Helm or kubectl to apply configurations to Kubernetes, using image tags from the pipeline to ensure you deploy the correct version.
- Understanding the trade-offs between Jenkins and GitLab CI is essential for making informed architectural decisions.
Now that we have a fully automated pipeline capable of deploying our service, we can focus on making the deployment process itself more robust. In our next lesson, we will implement a blue-green deployment strategy using Kubernetes service selectors to achieve zero-downtime releases.
Can't find a good explanation? Sign up and we'll make it for you
Sign up