
Hello! Welcome back.
In our last lesson, we mastered the blue-green deployment strategy, a powerful technique for achieving zero-downtime releases. We saw how it reduces risk by allowing us to fully test a new version before an instantaneous, "all-or-nothing" traffic switch.
However, what if an "all-or-nothing" switch is too risky? What if you want to test a new feature's performance or business impact with a small subset of real users before committing to a full rollout? This is where our next strategy comes in.
Today, your learning outcome is to implement a canary release strategy for a microservice using traffic splitting. This method is a cornerstone of modern, progressive delivery and a frequent topic in senior engineering interviews because it demonstrates an advanced understanding of risk management in a distributed system. We will explore two primary ways to achieve this in Kubernetes: first using a standard Ingress controller, and then with the more powerful capabilities of a service mesh like Istio.
1. What is a Canary Release?
A canary release (or canary deployment) is a strategy for gradually introducing a new version of an application into production. The name comes from the old mining practice of using canaries to detect toxic gases—if the canary showed signs of distress, the miners knew to evacuate.
In software, we do something similar: we deploy the new version (the "canary") alongside the stable version and route a small percentage of live user traffic to it. We then closely monitor its performance (error rates, latency, CPU/memory usage) and business metrics. If the canary performs well, we gradually increase its traffic share until it handles 100% of the load, at which point the old version is decommissioned.

Canary vs. Blue-Green: The Interview Trade-off Analysis
In an interview, you'll be expected to compare canary with blue-green. Here's how to articulate the trade-offs:
| Feature | Blue-Green Deployment | Canary Release |
|---|---|---|
| Risk | Lower initial risk (new version is fully tested before getting live traffic), but higher risk at switch-over (100% of users are exposed at once). | Higher initial risk (canary gets live traffic immediately), but a much smaller "blast radius" if issues occur. |
| Rollout | "All-or-nothing" instantaneous switch. | Gradual, incremental, and controlled. |
| Cost | High. Requires running double the infrastructure capacity during deployment. | Lower. Only a small number of canary instances are needed initially. |
| Observability | Important for post-release monitoring. | Critical. The entire strategy relies on high-quality metrics to decide whether to proceed or roll back. |
| Complexity | Simpler traffic routing logic (one switch). | More complex traffic splitting and automation logic is required. |
The key takeaway is that canary releases are ideal for de-risking changes with real users and for performance testing under production load without affecting your entire user base.
2. Method 1: Canary Releases with Kubernetes Ingress
The most straightforward way to implement a canary release in Kubernetes is by using an Ingress controller that supports weighted traffic splitting. The NGINX Ingress Controller, one of the most popular, allows us to do this using simple annotations.
The setup requires three key components:
- Two Deployments: A
stabledeployment for the current version and acanarydeployment for the new version. - Two Services: A
stableservice that selects the stable pods and acanaryservice that selects the canary pods. - One Ingress: A single Ingress resource configured with special annotations to split traffic between the two services.
Let's look at how to configure this.
High Availability and Scalability deployment Microservices ...
This article provides a concise example of configuring a canary release using NGINX Ingress annotations. It clearly shows the labels and annotations required.
Please read the section 'Configure Canary Deployment Strategy'. Pay close attention to the labels on the stable (version:1.0.0.1) and canary (version:1.0.0.2) deployments, and especially the annotations in the ingress-resource.yaml.
Dissecting the Ingress Manifest
Based on the reading, let's analyze the Ingress resource that makes this possible.
# ingress-canary.yaml
apiVersion: networking.k8s.io/v1
kind: Ingress
metadata:
  name: myapp-ingress
  annotations:
    # Tell NGINX to enable canary functionality for this Ingress
    nginx.ingress.kubernetes.io/canary: "true"
    # Route 25% of traffic to the canary service
    nginx.ingress.kubernetes.io/canary-weight: "25"
spec:
  rules:
  - host: myapp.example.com
    http:
      paths:
      - path: /
        pathType: Prefix
        backend:
          # This backend receives the canary traffic (25%)
          service:
            name: myapp-canary-service
            port:
              number: 80
---
# The main Ingress for stable traffic
apiVersion: networking.k8s.io/v1
kind: Ingress
metadata:
  name: myapp-ingress
spec:
  rules:
  - host: myapp.example.com
    http:
      paths:
      - path: /
        pathType: Prefix
        backend:
          # This backend receives the remaining traffic (75%)
          service:
            name: myapp-stable-service
            port:
              number: 80
Note: In some configurations, you might see two Ingress resources with the same host but one marked as the canary. Both approaches achieve traffic splitting.
How it Works:
- You have two services:
myapp-stable-serviceandmyapp-canary-service. - You define an Ingress rule pointing to the stable service.
- You add annotations to that same Ingress definition (or a separate one) to enable the canary (
canary: "true") and specify the percentage of traffic (canary-weight: "25") that should be diverted to the service defined in the canary Ingress rule. - A CI/CD pipeline would automate this by first deploying the
canarydeployment and service, then applying the Ingress with a small weight (e.g., 5%). After a monitoring period, the pipeline would runkubectl patchor re-apply the manifest with an increased weight (e.g., 25%, 50%, etc.) until it reaches 100%.
Test your understanding!
You are managing a canary release using NGINX Ingress. The current weight is set to 10. Your monitoring dashboard shows that the canary version has a 5% higher error rate than the stable version. What is the immediate action you should take, and what kubectl command would you use to perform it?
Show answer
The immediate action is to roll back the canary by shifting all traffic back to the stable version. You can do this by setting the canary weight to 0.
The command would be:
kubectl patch ingress myapp-ingress -p '{"metadata":{"annotations":{"nginx.ingress.kubernetes.io/canary-weight":"0"}}}'
This command instantly tells the NGINX Ingress controller to stop sending any traffic to the canary service, effectively taking it out of the request path while you investigate the issue.
3. Method 2: Canary Releases with a Service Mesh (Istio)
While Ingress-based canaries are effective, they operate at the edge (Layer 7 HTTP). For more advanced scenarios, like splitting traffic based on headers (e.g., for specific users) or managing TCP traffic, a service mesh is the superior tool. Istio is a prime example and a skill highly valued in top tech companies.
Istio decouples traffic management from your application and Kubernetes networking. It uses two key custom resources:
DestinationRule: Defines the named versions (subsets) of a service that are available to receive traffic. For example, it tells Istio thatorders-servicehas av1subset and av2subset.VirtualService: Defines the routing rules. It tells Istio how to route traffic to the subsets defined in theDestinationRule. This is where you configure the traffic weights.
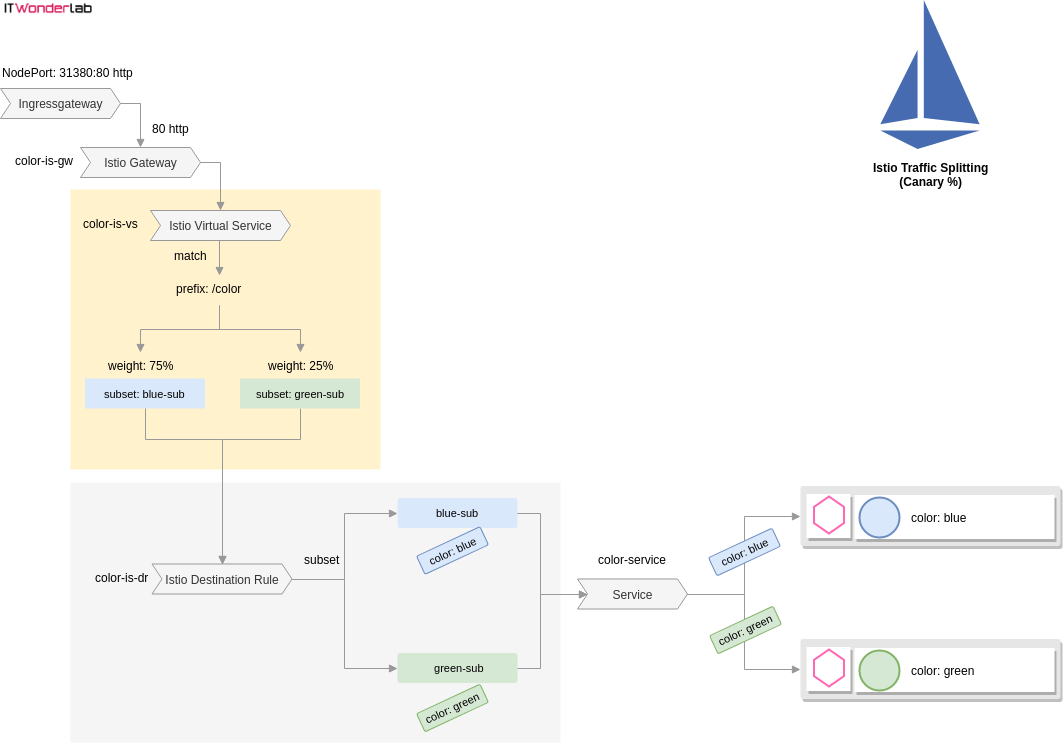
Let's walk through a practical implementation.
Mastering Istio: A Complete Hands-On Microservices ...
The following guide provides a complete, hands-on example of a canary deployment using Istio. We will focus on the specific Kubernetes and Istio manifests that enable traffic management.
First, skim the 'Architecture of Our Istio Project' section to understand the setup. Then, review the YAML in 'Deploy Microservices (v1 & v2)' to see how two Deployments (orders-service-v1, orders-service-v2) and one unified Service (orders-service) are created. Finally, carefully study the section 'Traffic Management with Istio (Canary for orders-service)' to understand the DestinationRule and VirtualService manifests.
Dissecting the Istio Manifests
Let's break down the two critical Istio resources from the guide.
Step 1: Define Service Subsets with DestinationRule
First, you tell Istio about the different versions of your orders-service.
# orders-destrule.yaml
apiVersion: networking.istio.io/v1beta1
kind: DestinationRule
metadata:
  name: orders-service
spec:
  # The host is the standard Kubernetes service name
  host: orders-service.microservices.svc.cluster.local
  subsets:
  - name: v1
    labels:
      version: v1  # Selects pods with label version=v1
  - name: v2
    labels:
      version: v2  # Selects pods with label version=v2
This rule doesn't route any traffic. It simply creates two named pointers, v1 and v2, which our VirtualService can now use.
Step 2: Split Traffic with VirtualService
Now, we create the routing rule. Here we'll start by sending 10% of traffic to the canary (v2).
# orders-vs-canary.yaml
apiVersion: networking.istio.io/v1beta1
kind: VirtualService
metadata:
  name: orders-service
spec:
  hosts:
  - orders-service.microservices.svc.cluster.local
  http:
  - route:
    - destination:
        host: orders-service.microservices.svc.cluster.local
        subset: v1
      weight: 90  # 90% of traffic goes to the stable version
    - destination:
        host: orders-service.microservices.svc.cluster.local
        subset: v2
      weight: 10  # 10% of traffic goes to the canary version
This is the core of Istio's power. By simply applying this manifest, Istio's sidecar proxies (Envoy) are configured to split traffic precisely according to these weights.
To progress the canary, your CI/CD pipeline would simply patch this VirtualService resource, changing the weights from 90/10 to 70/30, and so on, until you reach 0/100. This happens without changing any Kubernetes Deployments or Services.
The guide "Mastering Istio" also mentions how this fits into a CI/CD pipeline, reinforcing that this is an automated process driven by metrics.
Conclusion
You have now learned how to implement canary releases, one of the most sophisticated and safest deployment strategies for microservices. This approach empowers teams to innovate faster by reducing the risk associated with releasing new code.
Key Takeaways:
- Canary releases gradually expose new versions to real users, minimizing the blast radius of potential failures.
- This strategy is heavily reliant on robust observability (metrics, logs, traces) to validate the health of the canary.
- In Kubernetes, you can implement canaries using:
- NGINX Ingress: A simpler method using annotations like
canary-weight. Best for straightforward HTTP traffic splitting at the cluster edge. - Service Mesh (Istio): A more powerful and flexible method using
DestinationRuleto define versions andVirtualServiceto apply weighted routing rules. It works for any traffic (HTTP, gRPC, TCP) between any services in the mesh.
- NGINX Ingress: A simpler method using annotations like
- The entire process, from deploying the canary to incrementally increasing traffic and rolling back on failure, should be automated in a CI/CD pipeline.
In both this lesson and the previous one on blue-green deployments, we've largely ignored a major challenge: database schema changes. How do you perform a zero-downtime deployment when your new code requires a database change that the old code doesn't understand?
In our next lesson, we will tackle this problem head-on by exploring strategies for handling database schema migrations in a zero-downtime deployment context, such as the expand/contract pattern.
Can't find a good explanation? Sign up and we'll make it for you
Sign up