
Hello! Welcome back to our course on advanced microservices deployment.
In our last lesson, we built a fully automated CI/CD pipeline, transforming our source code into a deployable artifact on Kubernetes. This automation is the foundation of modern software delivery. However, a standard deployment, even an automated one like a rolling update, can sometimes lead to brief downtime or expose all users to a faulty release.
Today, we'll build on that foundation to implement a more sophisticated, zero-downtime deployment strategy. Your learning outcome is to implement a blue-green deployment strategy using Kubernetes service selectors. This is a classic pattern and a very common topic in senior engineering interviews, as it demonstrates a mature approach to release management and production stability.
1. The "What" and "Why" of Blue-Green Deployment
At its core, blue-green deployment is a strategy to release a new version of an application with zero downtime. It involves running two identical production environments, which we call "Blue" and "Green."
- Blue Environment: The current, live version of the application that is handling all user traffic.
- Green Environment: A new, idle environment where the next version of the application is deployed.
The process is simple but powerful:
- While the Blue environment is live, you deploy the new version of your application to the Green environment.
- Once deployed, you run a series of automated tests (smoke tests, integration tests, health checks) against the Green environment to ensure it's stable and working as expected. Crucially, this happens without impacting any live users.
- After the Green environment is fully verified, you switch the router to direct all user traffic from the Blue environment to the Green one. This switch is instantaneous.
- The Green environment is now live. The Blue environment is kept on standby for a short period, ready for an immediate rollback if any issues are discovered in the new version.
To get a more detailed overview, let's turn to a great explanation.
Dev → Staging → Production | Canary vs. Blue-Green ...
The following article gives a clear definition of blue-green deployment, how it works technically, and its primary pros and cons. Understanding these trade-offs is key for any system design interview.
Please read the sections titled 'Blue-Green Deployment: Seamless Swapping' and 'How It Works Technically'. Focus on the sequence of events and the role of the router/load balancer.
Key Trade-offs: An Interview Perspective
When discussing blue-green deployments in an interview, you'll be expected to analyze its trade-offs, not just describe how it works.
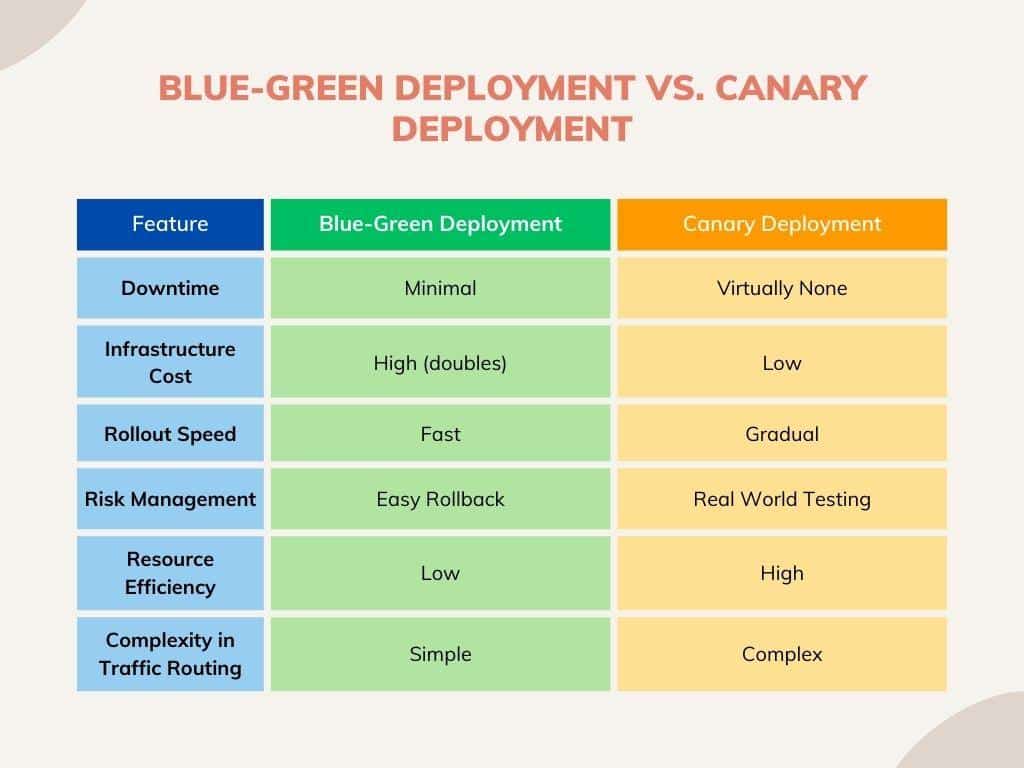
Based on the reading and the table above, here are the key points to articulate:
Advantages:
- Zero Downtime & Instant Rollback: The traffic switch is atomic. If something goes wrong, you just switch the router back to the Blue environment. This provides a simple, fast, and reliable recovery mechanism.
- Reduced Risk: You can perform comprehensive testing on the new version in a production-identical environment before it receives any live traffic.
Disadvantages:
- Cost: You are effectively running double the infrastructure, which can be expensive, especially for large-scale services.
- Database Migrations: This is the most common challenge. If your new application version requires a backward-incompatible database schema change, you cannot simply switch traffic. This forces teams to adopt strategies like the expand-contract pattern to ensure database changes are always backward-compatible, a topic we'll cover later.
- "All or Nothing": All users are switched to the new version at once. This isn't ideal if you want to test the impact of a new feature with a small subset of users first.
2. Implementing Blue-Green in Kubernetes
Now, let's get practical. How do we implement this using the Kubernetes resources we're familiar with? The magic lies in the interplay between Deployments and Services.
- We will use two separate
Deploymentresources to manage the pods for our Blue and Green versions. - We will use a single
Serviceto act as the traffic router. TheServiceuses a selector to target pods with specific labels. By changing the label in theService's selector, we can atomically switch traffic from the Blue pods to the Green pods.

Step-by-Step Manifests
Let's assume our application is named my-app. Here’s how you would structure the YAML files.
1. The Blue Deployment (blue-deployment.yaml)
This is our initial, live version (e.g., v1.0). Note the version: blue label.
# blue-deployment.yaml
apiVersion: apps/v1
kind: Deployment
metadata:
  name: myapp-blue
spec:
  replicas: 3
  selector:
    matchLabels:
      app: myapp
      version: blue
  template:
    metadata:
      labels:
        app: myapp
        version: blue
    spec:
      containers:
      - name: app
        image: my-app:v1.0
        ports:
        - containerPort: 8080
        # Your readiness and liveness probes go here!
        readinessProbe:
          httpGet:
            path: /actuator/health/readiness
            port: 8080
          initialDelaySeconds: 15
          periodSeconds: 10
2. The Green Deployment (green-deployment.yaml)
This is for our new version (e.g., v1.1). It's almost identical, but with an updated image and the version: green label.
# green-deployment.yaml
apiVersion: apps/v1
kind: Deployment
metadata:
  name: myapp-green
spec:
  replicas: 3
  selector:
    matchLabels:
      app: myapp
      version: green
  template:
    metadata:
      labels:
        app: myapp
        version: green
    spec:
      containers:
      - name: app
        image: my-app:v1.1
        ports:
        - containerPort: 8080
        readinessProbe:
          httpGet:
            path: /actuator/health/readiness
            port: 8080
          initialDelaySeconds: 15
          periodSeconds: 10
3. The Service (service.yaml)
This is the traffic router. Initially, it points to the Blue deployment.
# service.yaml
apiVersion: v1
kind: Service
metadata:
  name: myapp-service
spec:
  selector:
    app: myapp
    version: blue   # <-- The magic switch! Initially points to blue.
  ports:
    - protocol: TCP
      port: 80
      targetPort: 8080
To see the complete set of manifests, you can refer back to the resource we just reviewed.
Dev → Staging → Production | Canary vs. Blue-Green ...
This section of the article provides the exact Kubernetes manifests we've been discussing. It's a great reference to see the code in one place.
Review the three YAML files under the heading 'A. Blue-Green Deployment (Kubernetes + Service Switch)'. Notice how the service.yaml selector is the only thing that needs to change to redirect traffic.
The Deployment and Switch Flow
-
Deploy Blue:
kubectl apply -f blue-deployment.yamlkubectl apply -f service.yaml
At this point,myapp-serviceroutes traffic to thev1.0pods. -
Deploy Green:
kubectl apply -f green-deployment.yaml
Thev1.1pods will start up, butmyapp-serviceignores them because its selector doesn't match. -
Verify Green: You can now test the green deployment independently. For example, using
kubectl port-forward:kubectl port-forward deployment/myapp-green 8081:8080
Then, you can run your automated smoke tests againstlocalhost:8081. You are hitting the new version without any public traffic doing so. -
Perform the Switch:
This is the critical step. You update the service's selector to point to the green pods. The simplest way is to patch the service object directly.kubectl patch service myapp-service -p '{"spec":{"selector":{"version":"green"}}}'As soon as this command completes, Kubernetes updates its routing rules, and all new traffic to
myapp-servicewill now go to thev1.1pods. -
Rollback (if needed):
If you detect a problem, rolling back is just as easy. You simply patch the service back to the blue version.kubectl patch service myapp-service -p '{"spec":{"selector":{"version":"blue"}}}'
Test your understanding!
After a successful blue-green deployment, the myapp-blue deployment is still running but receiving no traffic. Your manager asks you to clean up the old resources to save costs, but only after a 1-hour "bake time" to ensure the green version is truly stable. What kubectl command would you run to remove the old blue deployment?
Show answer
You would use the kubectl delete command, targeting the Deployment resource specifically.
kubectl delete deployment myapp-blue
This command will safely terminate the ReplicaSet and Pods associated with the old blue deployment, freeing up cluster resources. You would typically automate this step in your CI/CD pipeline with a timed delay.
3. Automating Blue-Green in a CI/CD Pipeline
Manually running kubectl commands is fine for learning, but in production, you'll automate this flow in your CI/CD pipeline. Building on our last lesson, here's how you might structure the final stages in a Jenkinsfile or .gitlab-ci.yml.
The resource we've been using also provides a clear example of this automation.
Dev → Staging → Production | Canary vs. Blue-Green ...
Let's see how the manual steps we just practiced can be scripted into a CI/CD pipeline. This example uses GitHub Actions, but the commands are directly translatable to Jenkins or GitLab CI.
Read the pipeline definition under 'A. GitHub Actions for Blue-Green'. Focus on the sequence of steps: 'Deploy Green Version', 'Run Tests', and 'Switch Traffic to Green'.
A conceptual pipeline would look like this:
// Conceptual Jenkinsfile stages
stage('Deploy Green') {
    steps {
        // Deploy the green-deployment.yaml with the new image tag
        sh "helm upgrade --install myapp-green ./helm --set image.tag=${NEW_VERSION} --set version=green"
    }
}
stage('Verify Green') {
    steps {
        // Run smoke tests against the green service endpoint
        sh "./run-smoke-tests.sh --target=myapp-green"
    }
}
stage('Promote to Live') {
    // This could be a manual approval step
    input message: "Approve promotion of Green to Live?"
    steps {
        // Patch the main service to point to the green deployment
        sh "kubectl patch service myapp-service -p '{\"spec\":{\"selector\":{\"version\":\"green\"}}}'"
    }
}
stage('Cleanup Blue') {
    // After a delay (e.g., 1 hour)
    steps {
        // Delete the old blue deployment
        sh "helm uninstall myapp-blue"
    }
}
This script automates the entire process, providing a safe, repeatable, and zero-downtime release mechanism. This is what FAANG and fintech companies mean when they talk about "production-ready" deployment pipelines.
Conclusion
Congratulations! You've just learned how to implement one of the most important zero-downtime deployment strategies. This is a significant step up from basic automated deployments and a key skill for any senior engineer working with microservices.
Key Takeaways:
- Blue-green deployment minimizes risk and eliminates downtime by running two identical production environments and switching traffic between them.
- In Kubernetes, this pattern is implemented with two
Deployments(one for blue, one for green) and a singleServicewhoseselectoris updated to redirect traffic. - The primary trade-offs are increased infrastructure cost versus the benefit of instant, safe rollbacks.
- The process should be fully automated in a CI/CD pipeline with stages for deploying the new version, verifying it with tests, and then promoting it by switching traffic.
In this lesson, we saw that blue-green is an "all-or-nothing" switch. While safe, it doesn't allow for gradually testing a new feature with real users. In our next lesson, we will address this by exploring another powerful strategy: implementing a canary release for a microservice using traffic splitting.
Can't find a good explanation? Sign up and we'll make it for you
Sign up