
Good to see the debugger workspace in place. In the previous lesson, you separated WinDbg’s symbol, source, and image paths so that a future crash can be tied to the exact executable, PDB, and source tree that produced it. Now you will create those artifacts deliberately.
This lesson builds two native x64 Win32 desktop targets from one small C++ source file:
- NativeLabPlain: modern baseline protections, but no CFG/EH continuation metadata and no Segment Heap request.
- NativeLabHardened: adds CFG, EH continuation metadata, CET compatibility marking, and an embedded Segment Heap manifest.
They are not “secure” and “insecure” labels. They are controlled experimental profiles. Later, you will inspect their PE metadata, observe their heaps at runtime, and use the same fixed builds during crash and exploitation labs.
1. Treat a target build as an experiment specification
For exploitation research, “Debug x64” is not a sufficient target description. A meaningful build record identifies at least:
- Compiler and architecture — which compiler generated the code and whether it is truly native x64.
- Compiler settings — which checks and metadata generation were requested.
- Linker settings — which PE security properties and load-configuration data were emitted.
- Manifest settings — process-facing metadata such as requested privilege level and heap selection.
- Runtime environment — OS build, process-mitigation policy, and debugger state.
The first four are determined at build time; the fifth is determined when Windows creates the process. This distinction prevents a frequent analytical mistake:
A compiler or linker switch can make a binary eligible for a defense, but it does not by itself prove that the operating system enforced that defense for a particular process.
For example:
/guard:cfinstruments eligible indirect transfers and causes the linker to emit Control Flow Guard metadata./CETCOMPATmarks the image as compatible with CET; it does not by itself activate a shadow stack.- A
<heapType>SegmentHeap</heapType>manifest entry requests Segment Heap for the process default heap; it does not mean every allocation in every loaded component necessarily follows one uniform allocator path. /GSadds stack-cookie protection where the compiler judges it applicable; it is not a general memory-safety guarantee.
For this course, both profiles retain core baseline linker properties:
| Property | Why retain it in both profiles |
|---|---|
/DYNAMICBASE | Keeps ASLR enabled. |
/HIGHENTROPYVA | Allows higher-entropy ASLR for a 64-bit process. |
/NXCOMPAT | Declares compatibility with DEP. |
/GS | Retains compiler stack-cookie instrumentation where applicable. |
/DEBUG | Produces PDB information needed for precise lab analysis. |
The hardened profile then changes only the variables that later lessons need to inspect:
| Setting | Plain | Hardened | Build phase |
|---|---|---|---|
/guard:cf | No | Yes | Compiler and linker |
/guard:ehcont | No | Yes | Compiler and linker |
/CETCOMPAT | No | Yes | Linker |
| Segment Heap request | No | Yes | Embedded manifest |
| Requested execution level | asInvoker | asInvoker | Embedded manifest |
Keep both applications at asInvoker. Administrator access is appropriate for provisioning the isolated VM and selected diagnostic tools, but a desktop target should normally run unelevated. That preserves the ordinary user-mode boundary you want to study rather than quietly granting the target privileges it does not need.
2. Make compiler, architecture, and output locations explicit
Use CMake presets rather than relying on whichever configuration happened to be selected in an IDE window. The preset becomes a version-controlled statement of the intended compiler, target architecture, generator, and configuration.
Create this project layout under the source directory established in the previous lesson:
C:\Lab\Source\NativeLab\
  CMakeLists.txt
  CMakePresets.json
  src\
    NativeLab.cpp
  manifests\
    NativeLabPlain.manifest
    NativeLabHardened.manifest
Open an x64 Native Tools Command Prompt for Visual Studio. That environment matters: it makes cl.exe, link.exe, the Windows SDK tools, and x64 libraries available. A 64-bit host OS alone does not guarantee that a command-line build is targeting x64.
Read the relevant portions of Microsoft’s CMake preset guidance before creating the preset. It explains both the role of a preset’s architecture/toolset strategy and Visual Studio’s supported Segment Heap automation. We will use a manually embedded manifest here because it makes the per-target setting visible in the project itself; the Visual Studio script is a useful alternative for a larger CMake project.
Configure and build with CMake Presets | Microsoft Learn
Read Microsoft Learn’s CMake preset guidance to understand how architecture, compiler selection, and the Visual Studio Segment Heap helper are represented in a reproducible configuration.
In “Select your target and host architecture when building with the Microsoft C++ Build Tools,” read the full discussion of architecture and strategy choices. In “Edit presets” under “Select your compilers,” read the compiler-selection examples through the generator discussion. Then read “Enable Segment Heap,” including the allowlist and exclusion behavior. Focus especially on architecture strategy and the Segment Heap purpose. In this lesson, do not combine the Visual Studio-provided Segment Heap script with the manual manifest below: choose one manifest-generation mechanism per target.
Create CMakePresets.json:
{
  "version": 6,
  "configurePresets": [
    {
      "name": "msvc-x64-debug",
      "displayName": "MSVC x64 Debug",
      "generator": "Ninja",
      "binaryDir": "${sourceDir}/out/build/${presetName}",
      "architecture": {
        "value": "x64",
        "strategy": "external"
      },
      "environment": {
        "CC": "cl",
        "CXX": "cl"
      },
      "cacheVariables": {
        "CMAKE_BUILD_TYPE": "Debug",
        "CMAKE_EXPORT_COMPILE_COMMANDS": "ON"
      }
    }
  ],
  "buildPresets": [
    {
      "name": "msvc-x64-debug",
      "configurePreset": "msvc-x64-debug"
    }
  ]
}
A few details deserve attention:
CCandCXXstate that the intended compiler is MSVC’scl.exe. They are resolved during the first configure, so delete the CMake build directory if you intentionally change compilers later.- The x64 Native Tools environment supplies the actual x64 compiler and libraries. With the Ninja generator,
architecture.strategy: "external"means that environment—not CMake’s generator platform option—provides that architecture setup. CMAKE_BUILD_TYPEis explicit because Ninja is a single-configuration generator.compile_commands.jsonis not required by WinDbg, but it gives other analysis tools an exact record of compiler invocations.
Now add CMakeLists.txt:
cmake_minimum_required(VERSION 3.24)

project(NativeLab LANGUAGES CXX)

if(NOT MSVC)
  message(FATAL_ERROR "This laboratory project requires MSVC.")
endif()

set(CMAKE_CXX_STANDARD 20)
set(CMAKE_CXX_STANDARD_REQUIRED ON)
set(CMAKE_CXX_EXTENSIONS OFF)

# Explicitly select the dynamic MSVC runtime: /MDd for Debug.
set(CMAKE_MSVC_RUNTIME_LIBRARY
    "MultiThreaded$<$<CONFIG:Debug>:Debug>DLL")

set(LAB_OUTPUT_DIR "C:/Lab/Targets/NativeLab/x64/Debug")

function(configure_native_lab_target target_name manifest_name)
  add_executable(${target_name} WIN32 src/NativeLab.cpp)

  target_compile_definitions(${target_name} PRIVATE
    UNICODE
    _UNICODE
    WIN32_LEAN_AND_MEAN
  )

  target_compile_options(${target_name} PRIVATE
    /W4
    /permissive-
    /EHsc
    /GS
    $<$<CONFIG:Debug>:/Od>
    $<$<CONFIG:Debug>:/Zi>
  )

  target_link_options(${target_name} PRIVATE
    /DEBUG
    /INCREMENTAL:NO
    /DYNAMICBASE
    /HIGHENTROPYVA
    /NXCOMPAT
    /MANIFEST:EMBED
    "/MANIFESTINPUT:${CMAKE_CURRENT_SOURCE_DIR}/manifests/${manifest_name}"
  )

  set_target_properties(${target_name} PROPERTIES
    RUNTIME_OUTPUT_DIRECTORY_DEBUG "${LAB_OUTPUT_DIR}"
    PDB_OUTPUT_DIRECTORY_DEBUG "${LAB_OUTPUT_DIR}"
    COMPILE_PDB_OUTPUT_DIRECTORY_DEBUG
      "${LAB_OUTPUT_DIR}/objpdb/${target_name}"
  )
endfunction()

configure_native_lab_target(
  NativeLabPlain
  NativeLabPlain.manifest
)

configure_native_lab_target(
  NativeLabHardened
  NativeLabHardened.manifest
)

target_compile_options(NativeLabHardened PRIVATE
  /guard:cf
  /guard:ehcont
)

target_link_options(NativeLabHardened PRIVATE
  /guard:cf
  /guard:ehcont
  /CETCOMPAT
)
This structure prevents accidental profile drift. Shared baseline options live in one function; only the hardened target receives the additional control-flow and compatibility settings.
Notice that /INCREMENTAL:NO is explicit even for a Debug profile. It is not a security mitigation. Its role here is operational: a nonincremental link produces a simpler, more consistent build artifact for debugger and binary-comparison work. It does not remove ASLR, does not make addresses fixed across launches, and does not eliminate the need to record the exact build.
3. Build a small desktop target that actually allocates memory
Add src\NativeLab.cpp:
#include <windows.h>

#include <cstdint>
#include <memory>

struct LabRecord {
    std::uint64_t marker;
    wchar_t label[64];
};

int WINAPI wWinMain(
    HINSTANCE,
    HINSTANCE,
    PWSTR,
    int)
{
    auto record = std::make_unique<LabRecord>();
    record->marker = 0x4C41424E41544956ULL; // "VITANBAL" as bytes

    auto* process_heap_buffer = static_cast<unsigned char*>(
        HeapAlloc(GetProcessHeap(), HEAP_ZERO_MEMORY, 0x180));

    if (process_heap_buffer == nullptr) {
        return 1;
    }

    process_heap_buffer[0] = 0x41;
    process_heap_buffer[0x17F] = 0x5A;

    MessageBoxW(
        nullptr,
        L"NativeLab allocation baseline completed.",
        L"NativeLab",
        MB_OK | MB_ICONINFORMATION);

    HeapFree(GetProcessHeap(), 0, process_heap_buffer);
    return 0;
}
This is intentionally unremarkable. It gives you two useful allocation forms without introducing a vulnerability:
std::make_unique<LabRecord>()creates a C++ object allocation.HeapAlloc(GetProcessHeap(), ...)visibly invokes the process heap API with a known request size, bytes.
The later heap lessons will distinguish allocator metadata from the application bytes in these allocations and measure placement behavior under the hardened target’s Segment Heap request. For now, the target simply gives the build an observable, repeatable allocation workload.
4. Embed the manifest rather than leaving heap choice implicit
An application manifest is loader-visible metadata. It belongs in the executable rather than existing as an undocumented machine-local setting or debugger convenience.
The Microsoft documentation is particularly important on two points: Segment Heap is selected by a heapType application-manifest element on supported Windows versions, and the manifest should preferably be embedded in the executable resource.
Application manifests - Win32 apps - Microsoft Learn
Read Microsoft Learn’s application-manifest reference to connect the XML below to Windows loader behavior, embedding conventions, and privilege declarations.
Read the “File location” and “File name” sections first, then the complete “heapType” subsection and the “trustInfo” subsection. The key platform constraint is stated in the heapType description; Windows Server 2022 satisfies this OS-version requirement. In “trustInfo,” read the table of asInvoker, requireAdministrator, and highestAvailable values, with particular attention to execution-level intent.
Create manifests\NativeLabPlain.manifest:
<?xml version="1.0" encoding="UTF-8" standalone="yes"?>
<assembly
    xmlns="urn:schemas-microsoft-com:asm.v1"
    manifestVersion="1.0">

  <assemblyIdentity
      version="1.0.0.0"
      processorArchitecture="amd64"
      name="Grasp.NativeLabPlain"
      type="win32" />

  <trustInfo xmlns="urn:schemas-microsoft-com:asm.v2">
    <security>
      <requestedPrivileges
          xmlns="urn:schemas-microsoft-com:asm.v3">
        <requestedExecutionLevel
            level="asInvoker"
            uiAccess="false" />
      </requestedPrivileges>
    </security>
  </trustInfo>
</assembly>
Then create manifests\NativeLabHardened.manifest:
<?xml version="1.0" encoding="UTF-8" standalone="yes"?>
<assembly
    xmlns="urn:schemas-microsoft-com:asm.v1"
    manifestVersion="1.0"
    xmlns:asmv3="urn:schemas-microsoft-com:asm.v3">

  <assemblyIdentity
      version="1.0.0.0"
      processorArchitecture="amd64"
      name="Grasp.NativeLabHardened"
      type="win32" />

  <trustInfo xmlns="urn:schemas-microsoft-com:asm.v2">
    <security>
      <requestedPrivileges
          xmlns="urn:schemas-microsoft-com:asm.v3">
        <requestedExecutionLevel
            level="asInvoker"
            uiAccess="false" />
      </requestedPrivileges>
    </security>
  </trustInfo>

  <asmv3:application>
    <asmv3:windowsSettings
        xmlns="http://schemas.microsoft.com/SMI/2020/WindowsSettings">
      <heapType>SegmentHeap</heapType>
    </asmv3:windowsSettings>
  </asmv3:application>
</assembly>
The hardened manifest’s heapType element is the relevant difference. The linker’s /MANIFEST:EMBED and /MANIFESTINPUT: options incorporate that file into the executable. A sidecar .manifest file may be useful during troubleshooting, but the embedded resource is the artifact you should preserve and inspect.
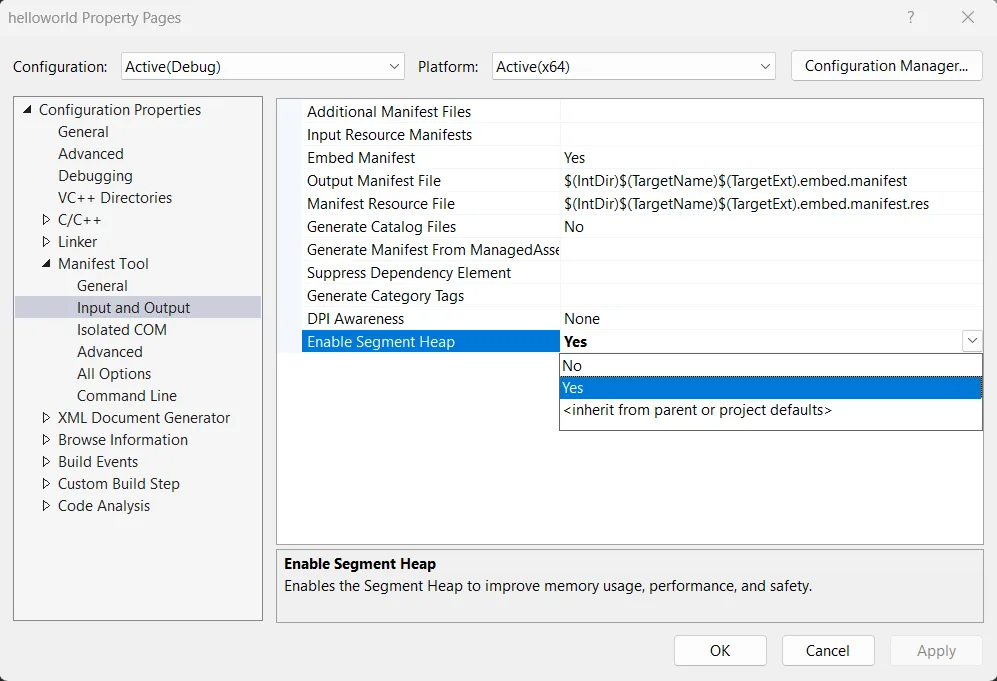
If you later build a conventional .vcxproj rather than a CMake project, the Visual Studio property shown above is a legitimate way to enable the setting. Do not enable it in both the project property page and an additional hand-authored manifest without first inspecting the final embedded manifest. The goal is one unambiguous configuration, not duplicated XML fragments.
5. Configure, build, and validate only what this lesson established
From the x64 Native Tools Command Prompt, run:
cd /d C:\Lab\Source\NativeLab
cmake --preset msvc-x64-debug
cmake --build --preset msvc-x64-debug
The expected outputs are:
C:\Lab\Targets\NativeLab\x64\Debug\NativeLabPlain.exe
C:\Lab\Targets\NativeLab\x64\Debug\NativeLabPlain.pdb
C:\Lab\Targets\NativeLab\x64\Debug\NativeLabHardened.exe
C:\Lab\Targets\NativeLab\x64\Debug\NativeLabHardened.pdb
First, confirm that the files exist and record hashes:
Get-ChildItem C:\Lab\Targets\NativeLab\x64\Debug

Get-FileHash `
  C:\Lab\Targets\NativeLab\x64\Debug\NativeLabPlain.exe,
  C:\Lab\Targets\NativeLab\x64\Debug\NativeLabHardened.exe `
  -Algorithm SHA256
Second, confirm that each file is a 64-bit PE. From the same developer command environment:
dumpbin /headers C:\Lab\Targets\NativeLab\x64\Debug\NativeLabPlain.exe
dumpbin /headers C:\Lab\Targets\NativeLab\x64\Debug\NativeLabHardened.exe
At this stage, check only these facts:
FILE HEADER VALUESidentifies an AMD64 machine.OPTIONAL HEADER VALUESlistsDynamic base,High Entropy VA, andNX compatiblefor both executables.- The hardened build reports the extra Guard/CET-related characteristics expected from its linker options.
Do not try to infer full exploitability from this output. The next lesson will make a disciplined comparison of PE security properties and distinguish header flags from load-configuration details.
Finally, extract the embedded manifests with the Windows SDK Manifest Tool:
mt.exe -inputresource:"C:\Lab\Targets\NativeLab\x64\Debug\NativeLabPlain.exe;#1" -out:Plain.extracted.manifest

mt.exe -inputresource:"C:\Lab\Targets\NativeLab\x64\Debug\NativeLabHardened.exe;#1" -out:Hardened.extracted.manifest
Open the extracted files in a text editor. The hardened version must contain:
<heapType>SegmentHeap</heapType>
The plain version must not. This is a direct build-artifact check, not an assumption based on a CMake file or an IDE checkbox.
Because the PDBs are now beside the executables in the directory added to WinDbg’s symbol path last lesson, perform a short debugger validation:
.reload /f NativeLabHardened.exe
lmvm NativeLabHardened
x NativeLabHardened!wWinMain
lmvm should identify matching private symbols, and the symbol lookup should resolve wWinMain. If it does not, stop and resolve that mismatch before proceeding to later crash-analysis work. A build that runs but lacks the matching PDB is not yet a complete lab target.
Add the following to your lab record:
Target source revision: <commit or archive identifier>
Compiler environment: MSVC cl.exe, x64 Native Tools environment
CMake preset: msvc-x64-debug
Build configuration: Debug
Plain EXE SHA256: <value>
Hardened EXE SHA256: <value>
Plain manifest: embedded, asInvoker, no heapType
Hardened manifest: embedded, asInvoker, heapType SegmentHeap
PDB validation: NativeLabPlain / NativeLabHardened private symbols loaded
Key takeaways
A modern exploit-development target is not defined merely by its C++ source. Its behavior depends on a specific chain: compiler instrumentation, linker-emitted PE metadata, embedded manifest settings, and runtime process policy.
You now have two native x64 desktop targets with fixed, inspectable differences:
- Both preserve ASLR, DEP compatibility, stack cookies, debug symbols, and an unelevated
asInvokerexecution level. NativeLabHardenedadditionally requests CFG and EH continuation instrumentation, CET compatibility, and Segment Heap.- The executable and matching PDB are placed in the controlled directories already configured in WinDbg.
Next, you will compare the two builds using linker output and PE-inspection tools, turning these declared build settings into concrete properties visible in the resulting binaries.
Can't find a good explanation? Sign up and we'll make it for you
Sign up