
Good progress: you now have two deliberately controlled x64 builds, matching PDBs, and embedded manifests. This lesson turns the build settings into verifiable artifacts. Rather than trusting CMake, compiler switches, or an IDE property page, you will compare what the linker was asked to do with what the final PE files actually contain.
By the end, you should be able to produce a concise, evidence-based comparison of NativeLabPlain.exe and NativeLabHardened.exe, separating:
- build-time intent shown in the verbose linker command;
- PE header and load-configuration metadata;
- embedded manifest properties; and
- conclusions that still require runtime validation.
This distinction matters throughout modern Windows exploitation. A PE header can show that an image advertises or contains mitigation support; it does not, by itself, prove the associated process policy is active for a particular launch.
1. Read a PE comparison as a chain of evidence
A useful comparison has three layers:
| Layer | Evidence source | What it establishes | What it does not establish |
|---|---|---|---|
| Build intent | Verbose compiler/linker command | The flags passed during this build | That the output file is the expected artifact or that all metadata materialized |
| Static image metadata | dumpbin, link /dump, PE-bear | Fields and tables embedded in that exact PE file | That Windows enabled every corresponding runtime policy |
| Process behavior | WinDbg and process-mitigation queries | Which protections apply to the running target | Whether every potential corruption is blocked |
For this lesson, concentrate on the first two layers. Module 3 will make the runtime-policy question explicit.
The basic PE header properties you will inspect reside in several distinct locations:
- The COFF file header identifies architecture and broad image attributes.
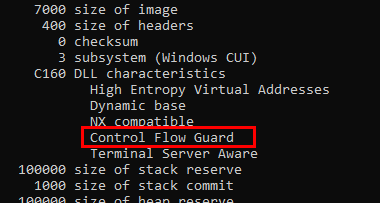
- The optional header’s DLL Characteristics field contains loader-facing flags such as Dynamic Base, NX compatibility, high-entropy VA support, and the CFG-support bit.
- The Load Configuration Directory holds richer structures, including the
/GSsecurity-cookie pointer and CFG tables and flags. - The executable’s resource section contains the embedded application manifest, which is where the Segment Heap request lives.
Do not merge those locations into one vague idea of “PE mitigations.” Their position tells you what kind of claim the value supports.
What the expected profiles imply
From the prior build lesson, both executables should show the same baseline properties:
- AMD64 / PE32+ image;
- Dynamic Base;
- High Entropy VA;
- NX compatible;
- a security cookie entry where the compiler and linker emitted
/GSsupport; - an embedded
asInvokermanifest.
The hardened executable should additionally provide evidence of:
- CFG support in the DLL Characteristics field;
- CFG instrumentation and a function-ID table in Guard Flags;
- any EH continuation metadata that was materialized for this particular code;
- CET compatibility marking, as displayed by the installed toolchain’s
dumpbinversion; SegmentHeapin its embedded manifest.
There is an important qualification for EH continuation protection: requesting /guard:ehcont is not the same as guaranteeing that a nonempty continuation table is needed for every source file. If the compiler produces no relevant continuation targets in this small target, you may see the linker flag in the build transcript without a meaningful table in the image. Record that observation accurately rather than treating it as a failure by default.
2. The PE fields behind the labels
Before inspecting output, establish what the labels mean. In the PE specification, the optional header’s “DLL Characteristics” field applies to EXEs as well as DLLs; the historical name is misleading.
PE Format - Win32 apps - Microsoft Learn
Read the relevant Microsoft PE Format reference to connect dumpbin labels with the actual PE fields. Focus on the difference between the compact DLL Characteristics bitfield and the richer Load Configuration Directory.
In the “DLL Characteristics” subsection, read the flag table. Identify the values for High Entropy VA, Dynamic Base, NX compatible, and Guard CF. Then find “The Load Configuration Structure (Image Only),” especially the “Load Configuration Layout” table. Locate SecurityCookie, GuardCFCheckFunctionPointer, GuardCFDispatchFunctionPointer, GuardCFFunctionTable, GuardCFFunctionCount, and GuardFlags. Read the GuardFlags list and note the distinct meanings of “CF Instrumented” and “CF Function Table Present.”
Two conclusions are especially important:
DYNAMICBASEdoes not mean “the program loaded randomly this time.” It means the image is relocatable and compatible with loader relocation. The actual load base is a runtime fact.NXCOMPATdoes not make all memory nonexecutable. It is an image compatibility declaration relevant to DEP behavior. Legitimate executable image sections still exist, and runtime policy remains relevant.- Guard CF in DLL Characteristics is not the whole CFG story. A robust static confirmation includes the Guard Flags and CFG table information from Load Config.
The CFG compiler and linker options work as a pair: compiler instrumentation supplies checks at relevant indirect transfers, while the linker emits and assembles supporting metadata.
/guard (Enable Control Flow Guard)
Read Microsoft’s /guard reference to anchor the static evidence in the compiler-and-linker model of CFG. This will keep you from equating a single header flag with full protection.
In “Remarks,” begin at the explanation of CFG checks and read the mitigation model. Focus on the fact that CFG constrains indirect control transfers but does not repair the underlying memory corruption. Continue through the build and verification guidance beginning “If you build using a single cl command.” Read the verification guidance. Note the recommended dumpbin /headers /loadconfig command and the expected CF Instrumented and FID table present evidence.
A compact interpretation guide:
| Static evidence | Careful interpretation |
|---|---|
Dynamic base | Image declares support for loader relocation; inspect base relocations and runtime mapping separately when needed. |
High Entropy VA | The 64-bit image is compatible with higher-entropy ASLR. It does not measure the actual randomization distribution. |
NX compatible | Image is compatible with DEP/NX policy. It does not describe every virtual-memory region. |
Control Flow Guard | The PE’s DLL Characteristics field advertises CFG support. Confirm Load Config for instrumentation/table evidence. |
CF Instrumented | The image has CFG-related compiler/linker instrumentation metadata. |
FID table present | The Load Config contains a table of valid CFG function targets. |
Security Cookie | The image has a cookie pointer used by MSVC /GS; it does not prove coverage of every function or eliminate all stack corruption. |
| CET compatibility | An image declaration of CET compatibility, not proof that a user-mode shadow stack is active. |
SegmentHeap manifest entry | A request for Segment Heap as the process default heap on supported Windows versions, not proof that every allocation in every module uses one allocator path. |
3. Capture the linker’s own account of each build
Start in the x64 Native Tools Command Prompt for Visual Studio. Make a fresh verbose build transcript; this is your evidence of the exact command line passed to MSVC for the current artifacts.
mkdir C:\Lab\Records 2>nul

cd /d C:\Lab\Source\NativeLab

cmake --build --preset msvc-x64-debug --clean-first --verbose ^
  > C:\Lab\Records\NativeLab-build-verbose.txt 2>&1
Use --clean-first here because you are establishing a comparison baseline. It avoids relying on a stale object file built before a mitigation flag changed. It is not necessary for every later edit, but it is appropriate when recording the build profile for lab work.
Now filter the transcript for the profile-defining switches:
findstr /I ^
  /C:"/DYNAMICBASE" ^
  /C:"/HIGHENTROPYVA" ^
  /C:"/NXCOMPAT" ^
  /C:"/guard:cf" ^
  /C:"/guard:ehcont" ^
  /C:"/CETCOMPAT" ^
  /C:"/MANIFESTINPUT" ^
  C:\Lab\Records\NativeLab-build-verbose.txt
The exact visual formatting will vary with CMake and Ninja versions. Your task is to identify the link command for each named target, not merely find a switch somewhere in the overall transcript.
Record the following claims only when the relevant target’s command line supports them:
| Build evidence to record | Plain | Hardened |
|---|---|---|
/DYNAMICBASE, /HIGHENTROPYVA, /NXCOMPAT passed to linker | Yes | Yes |
/guard:cf supplied during compilation and linking | No | Yes |
/guard:ehcont supplied during compilation and linking | No | Yes |
/CETCOMPAT supplied to linker | No | Yes |
| Per-target manifest supplied as linker input | Plain manifest | Hardened manifest |
This is where a verbose build log has an advantage over a project file: it records what the build system actually invoked, after presets, generator logic, inherited defaults, and target-specific options were combined.
4. Compare the final executables with dumpbin
Now inspect the actual files that the build produced. In PowerShell, set paths once so that the commands remain readable:
$targetDir = 'C:\Lab\Targets\NativeLab\x64\Debug'
$recordDir = 'C:\Lab\Records'

$plain = Join-Path $targetDir 'NativeLabPlain.exe'
$hardened = Join-Path $targetDir 'NativeLabHardened.exe'

Get-FileHash $plain, $hardened -Algorithm SHA256
The hashes should differ. If they are identical, stop: you do not have two meaningfully distinct artifacts to compare.
Generate full header and load-configuration reports:
dumpbin /nologo /headers /loadconfig $plain |
    Set-Content -Encoding ASCII "$recordDir\NativeLabPlain.dumpbin.txt"

dumpbin /nologo /headers /loadconfig $hardened |
    Set-Content -Encoding ASCII "$recordDir\NativeLabHardened.dumpbin.txt"
dumpbin and link /dump use the same Microsoft parsing machinery for this purpose. As a cross-check, this should produce equivalent security-relevant content for the hardened target:
link /dump /headers /loadconfig C:\Lab\Targets\NativeLab\x64\Debug\NativeLabHardened.exe
The following short video shows the practical relationship between these tools and demonstrates a file-based header comparison workflow.
dumpbin.exe, link /dump, and the Portable Executable Format (PE Format)
Watch “dumpbin.exe, link /dump, and the Portable Executable Format (PE Format)” from AshleyPurringTech for a concise tool-oriented view of PE inspection and output comparison.
Watch tool orientation to see the relationship between dumpbin.exe and link /dump. Then watch header comparison for the workflow of saving dumpbin /headers output and comparing files. Apply that workflow to different mitigation profiles rather than to the video’s x86/x64 examples.
Inspect the output in context
Do not compare whole files blindly. Timestamps, image sizes, PDB paths, linker versions, and section layouts can make a raw diff noisy. Instead, open both reports side by side and inspect these areas in order:
-
File Header Values
- Both must identify
machine (x64)or8664 machine (x64). - Both should be PE32+ images.
- This confirms that you are comparing like architectures.
- Both must identify
-
Optional Header Values / DLL characteristics
- Both should list
High Entropy Virtual Addresses,Dynamic base, andNX compatible. - Only the hardened output should list
Control Flow Guard.
- Both should list
-
Load Configuration
- Look for a
Security Cookiefield in both builds. - In the hardened build, locate
Guard Flags. - Confirm that the decoded Guard Flags include
CF InstrumentedandFID table present. - Locate the Guard CF function table and count, if shown by your
dumpbinversion. - Note any CET compatibility or EH continuation fields that your current linker emitted.
- Look for a
-
Base Relocation Directory and
.reloc- A dynamically relocatable image needs relocation information for the loader to apply when it cannot use the preferred base.
- You do not need to manually decode relocation entries in this lesson. Simply ensure that the static ASLR claim is not being treated as an isolated bit with no surrounding context.
A targeted search makes navigation faster without replacing the full report:
$terms = @(
    'machine',
    'DLL characteristics',
    'Dynamic base',
    'High Entropy',
    'NX compatible',
    'Control Flow Guard',
    'Load Configuration',
    'Security Cookie',
    'Guard Flags',
    'CF Instrumented',
    'FID table',
    'EH Continuation',
    'CET'
)

Select-String -Path `
    "$recordDir\NativeLabPlain.dumpbin.txt",
    "$recordDir\NativeLabHardened.dumpbin.txt" `
    -Pattern $terms
For a direct line-oriented diff, use:
fc /n C:\Lab\Records\NativeLabPlain.dumpbin.txt C:\Lab\Records\NativeLabHardened.dumpbin.txt ^
  > C:\Lab\Records\Plain-vs-Hardened.dumpbin.diff.txt
Treat this diff as a navigation aid, not as the conclusion. For example, a changed timestamp is a difference but says nothing about exploitability; CF Instrumented is a difference with a clear security interpretation.
5. Verify the embedded manifest separately
The Segment Heap selection is not a normal DLL Characteristics flag and should not be inferred from dumpbin /headers. Inspect the final embedded manifest resource.
mt.exe -nologo -inputresource:"$plain;#1" `
    -out:"$recordDir\NativeLabPlain.extracted.manifest"

mt.exe -nologo -inputresource:"$hardened;#1" `
    -out:"$recordDir\NativeLabHardened.extracted.manifest"

Select-String `
    -Path "$recordDir\NativeLabPlain.extracted.manifest",
          "$recordDir\NativeLabHardened.extracted.manifest" `
    -Pattern 'requestedExecutionLevel', 'heapType', 'SegmentHeap'
The expected result is:
- both manifests contain
asInvoker; - only
NativeLabHardenedcontains:
<heapType>SegmentHeap</heapType>
This gives you a complete static comparison: headers and Load Config for linker-emitted image properties, plus the embedded manifest for the process-default heap request.
6. Write the comparison as defensible conclusions
Add a section like this to the lab record. Fill it with your exact hashes and observed wording rather than copying an expected result uncritically.
Comparison date:
OS build:
MSVC / linker version:

Plain executable:
  Path:
  SHA256:
  Architecture:
  Dynamic Base:
  High Entropy VA:
  NX compatible:
  Guard CF DLL characteristic:
  Security Cookie field:
  Guard Flags:
  Embedded heapType:

Hardened executable:
  Path:
  SHA256:
  Architecture:
  Dynamic Base:
  High Entropy VA:
  NX compatible:
  Guard CF DLL characteristic:
  Security Cookie field:
  Guard Flags:
  Guard CF function-table evidence:
  EH continuation evidence:
  CET compatibility evidence:
  Embedded heapType:

Build-log correlation:
  Plain linker command:
  Hardened linker command:
  Profile-defining differences:

Static conclusion:
  Both targets are native x64 PE32+ desktop images that retain ASLR- and
  DEP-related compatibility declarations. NativeLabHardened additionally
  contains CFG-related PE evidence and requests Segment Heap through its
  embedded manifest.

Runtime limitation:
  These static findings do not establish whether CFG, CET shadow stacks,
  ACG, CIG, or any other process mitigation was enabled for a particular
  launch. Runtime policy must be inspected separately.
A few mismatch patterns are worth recognizing:
| Observation | Likely interpretation | Immediate response |
|---|---|---|
| Hardened linker options absent from verbose log | Build configuration was not applied to the target | Check target-specific CMake options and rebuild cleanly. |
| Linker options present, but you inspected an old binary | Artifact-selection error | Recheck paths, timestamps, and hashes. |
| Guard CF appears but Guard Flags lack expected CFG evidence | Investigate tool version, stale build products, and whether compiler/linker options reached the intended stages | Preserve the output; do not overstate CFG coverage. |
| No EH continuation table in this small target | The requested option may have had no relevant continuation metadata to emit | Record build intent and observed absence; do not call it equivalent to runtime protection. |
| Segment Heap appears only in source manifest, not extracted executable manifest | Manifest embedding failed or the wrong output was inspected | Fix this before heap experiments. |
Key takeaways
You now have a repeatable method for comparing Windows PE security properties without confusing configuration with evidence:
- Use a verbose build transcript to establish which compiler and linker flags were actually supplied.
- Use
dumpbin /headers /loadconfigorlink /dumpto inspect the final PE’s architecture, DLL Characteristics, Load Configuration, security cookie, and CFG metadata. - Confirm CFG through both the Guard CF characteristic and the Load Config’s Guard Flags and function-table evidence.
- Inspect the embedded manifest with
mt.exe; Segment Heap is a manifest-level request, not a generic PE header flag. - State static results precisely: a mitigation-compatible or mitigation-instrumented image is not necessarily a process where the OS has enforced every relevant runtime defense.
Next, you will move from image metadata to the loaded process: extracting process-mitigation policy state and correlating it with the PE load-configuration properties you identified here.
Can't find a good explanation? Sign up and we'll make it for you
Sign up