
Welcome to the next lesson in our series on migrating from React to HTMX. So far, we've built the core "CRU" operations and, in the last session, tackled deletion with hx-delete. You're now equipped to manage the full lifecycle of data in a hypermedia-driven application.
Today, we'll address a fundamental aspect of any robust web application: form validation. Our goal is to perform server-side validation and return a form fragment with inline error messages on failure. This is a topic where the philosophical differences between a client-rendered SPA and a hypermedia system become crystal clear. Instead of fetching data and managing error states in client-side JavaScript, we'll have the server render the state directly into the HTML it sends back.
The Hypermedia Approach to Validation
In a typical React application, you might handle form validation by intercepting the submit event, making an API call, and if the API returns a 4xx error with a JSON body of validation messages, you would use useState to store those errors and conditionally render error components in your JSX.
The HTMX approach is more direct. The server is the single source of truth for validation. The flow looks like this:
- A user submits a form.
- The server receives the form data and validates it.
- If validation fails, the server does not send a JSON error object. Instead, it re-renders the HTML for the form itself, but this time includes the submitted values and the corresponding error messages directly in the markup.
- The server responds with this new HTML fragment.
- HTMX receives the fragment and swaps it into the DOM, replacing the old form. The user sees their input preserved, along with clear, inline error messages.
This architectural difference is key. The client remains "dumb," simply swapping in whatever HTML the server provides.
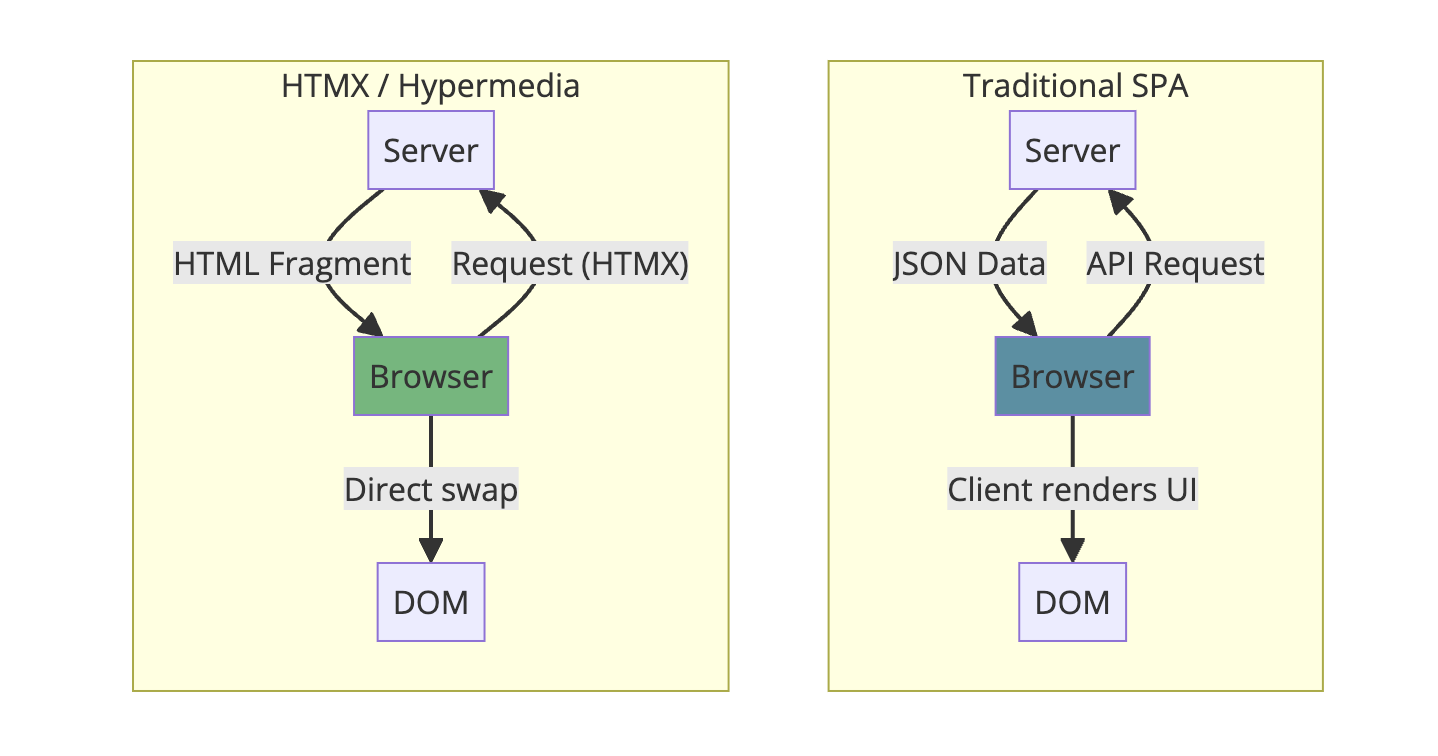
The result on the client side is a seamless update, but the mechanism is entirely server-driven. The image below shows what the HTML response might look like in your browser's network tools after a failed submission.

Pattern 1: Validating the Entire Form on Submission
The simplest approach is to validate the entire form when the user clicks "Submit." If there are errors, you just send back the whole form, updated with error messages.
Here's how you'd set up the form tag:
<form hx-post="/contact" hx-swap="outerHTML">
  <!-- Form fields go here -->
  <button type="submit">Submit</button>
</form>
hx-post="/contact": Submits the form data to the/contactendpoint.hx-swap="outerHTML": Instructs HTMX to replace the entire<form>element with the response from the server.
On the server, your Express handler would look something like this:
app.post('/contact', (req, res) => {
  const { name, email } = req.body;
  const errors = {};

  if (!name) {
    errors.name = 'Fullname is required';
  }
  if (!email) {
    errors.email = 'Email is required';
  }

  if (Object.keys(errors).length > 0) {
    // Validation failed. Re-render the form partial with errors and submitted values.
    // We use a 422 status code, which is semantically correct for a validation failure.
    // HTMX will process this response by default.
    return res.status(422).render('partials/contact-form', {
      errors: errors,
      values: req.body
    });
  }

  // Validation passed. Do something with the data...
  res.send('<p>Form submitted successfully!</p>');
});
In your EJS template (partials/contact-form.ejs), you would then conditionally display the errors and pre-fill the input values:
<div class="form-group">
  <input
    type="text"
    name="name"
    placeholder="Your Fullname"
    value="<%= values.name || '' %>"
    class="<%= errors.name ? 'is-invalid' : '' %>"
  >
  <% if (errors.name) { %>
    <div class="invalid-feedback"><%= errors.name %></div>
  <% } %>
</div>
This pattern is simple, robust, and ensures that validation logic is centralized on the server.
Pattern 2: Inline, Per-Field Validation
For a more dynamic user experience, you can validate individual fields as the user interacts with them (e.g., when they tab out of an input). This provides immediate feedback. The official HTMX documentation provides a great, concise example of this pattern.
</> htmx ~ Examples ~ Inline Validation
This example from the official HTMX website demonstrates the core pattern for inline field validation. It's the foundational technique we'll build upon.
Read through the entire example. Focus on two key aspects: In the HTML form, notice that the <input> has an hx-post attribute to trigger the validation request. Critically, the <div> containing the input has hx-target="this" and hx-swap="outerHTML". This is a common and powerful pattern. Examine the error response. The server sends back the entire <div> fragment, now including an error class and a div with the error message. This is HTML-over-the-wire in action.
This pattern isolates the validation to a specific field, preventing a full form re-render for a single field's error.
A Practical Implementation with Express & EJS
Let's look at a more detailed walkthrough that uses an Express and EJS stack, just like you're planning for your projects. The following tutorial from marcusoft.net provides an excellent, in-depth guide.
www.marcusoft.net – Learning by sharing since 2006
This tutorial walks through building inline validation for a todo app using Express and EJS. It covers creating partials, setting up the backend routes, and integrating them into the main form.
Start by reading the section on validating dates. This shows the complete implementation loop: A dedicated EJS partial (duedate.ejs) is created for the input field. This is analogous to creating a reusable React component. The input inside the partial is given an hx-post attribute to a validation-specific endpoint (/todo/duedate). The backend route validates the date and re-renders the duedate.ejs partial with an error message if needed. Next, see how this partial is integrated into the main form in the section "Update the new.ejs template". This demonstrates how you compose your UI from these self-validating partials.
The core takeaway here is structuring your UI into logical, reusable partials that encapsulate their own validation logic. This is a powerful way to organize your server-rendered code and will feel familiar given your background in component-based architectures.
Brad Traversy also provides a very clear video demonstration of this exact pattern, which can help solidify the concept.
HTMX Crash Course | Dynamic Pages Without Writing Any JavaScript
This segment of the HTMX Crash Course provides a complete, self-contained walkthrough of setting up inline email validation with Node.js/Express.
Watch the segment from inline validation. Brad demonstrates the entire flow: adding hx-post to the input, targeting the parent div for replacement, creating the Express route to handle the validation logic, and sending back the updated HTML fragment with either a success or error message.
Advanced Techniques for a Polished UX
As a senior developer, you'll appreciate that while the basic patterns work, there are subtle UX issues to solve for a truly polished feel, such as avoiding focus loss and handling network race conditions. A fantastic video from hypermedia-tv dives deep into these production-grade solutions.
This video explores advanced form validation techniques that solve common UX problems, moving from a basic implementation to a highly interactive and robust one.
Solving Focus Loss with Out-of-Band Swaps: When you replace a fragment containing an input, the input can lose focus. A more elegant solution is to update only the error message. Watch the segment from here to understand how to use Out-of-Band (OOB) swaps. The server sends back multiple fragments, each with an id and hx-swap-oob="true". This allows you to update error messages in place without touching the input fields themselves, preserving focus. This is an incredibly powerful HTMX feature. Handling Race Conditions: When validating on every keystroke, fast typing can create multiple in-flight requests that might return out of order, showing an incorrect validation state. Watch from this point to see how the hx-sync attribute is used to solve this. By setting hx-sync="...:replace", you ensure that any new request for a given element will abort the previous one, guaranteeing that only the result of the latest validation is displayed.
These advanced patterns—OOB swaps and hx-sync—allow you to build form validation experiences that are just as responsive and seamless as those in a top-tier SPA, but with a fraction of the client-side complexity.
Conclusion
Today we've explored one of the most important patterns in the HTMX toolkit: server-side validation. You've seen how this fundamental task is handled not by managing state on the client, but by having the server act as the single source of truth, rendering UI state directly into HTML.
Key Takeaways:
- Server-Driven UI State: Validation errors are not data to be interpreted by the client; they are part of the HTML fragment rendered by the server.
- The Re-render Pattern: The fundamental mechanism for validation failure is for the server to re-render the form partial with errors and user-submitted values.
- Inline Validation: For better UX, you can create dedicated validation endpoints for individual fields, triggered by
hx-poston input elements. This often involves targeting a containerdivwithhx-swap="outerHTML". - Partials as Components: Structuring your forms using server-side partials (
.ejsfiles) provides a level of organization and reusability similar to what you're used to with React components. - Advanced Robustness: For a production-quality experience, use Out-of-Band swaps to update error messages without losing input focus, and
hx-syncto prevent race conditions from rapid user input.
In our next lesson, we'll continue working with form inputs to implement live search. This will introduce you to the hx-trigger attribute and its powerful modifiers, like keyup changed delay, allowing you to finely control when requests are sent to the server.
Can't find a good explanation? Sign up and we'll make it for you
Sign up