
Welcome back. In our last lesson, we focused on handling form validation by having the server re-render form fragments with inline error messages. This reinforced the core hypermedia principle of the server being the single source of truth for UI state.
Today, we'll build on that foundation to implement another common and essential feature: live search. Our goal is to create a search input that dynamically updates a list of results as the user types, but in an efficient, debounced manner. In React, this would typically involve managing input state, debouncing a useEffect hook, fetching data, and re-rendering a list component. We will now explore the hypermedia-native approach to achieve the same polished user experience.
This lesson directly addresses the final learning outcome of our "Building CRUD Interfaces" module: implement live search with a debounced hx-trigger that updates a partial list of results.
The Core Mechanism: hx-trigger with Modifiers
The magic behind live search in HTMX lies in the hx-trigger attribute. While many HTMX requests are triggered by a simple click or form submit, hx-trigger allows for much finer control. For a live search input, we don't want to send a request on every single keystroke, as this would overload the server. Instead, we want to:
- Send a request when the user types.
- Wait for a brief pause in typing to avoid sending requests for every character in a word (this is called "debouncing").
- Avoid sending requests for keys that don't change the input's value (like Shift, Alt, or arrow keys).
HTMX accomplishes this with a combination of events and modifiers within the hx-trigger attribute. A typical setup for live search looks like this:
hx-trigger="keyup changed delay:300ms"
Let's break this down:
keyup: This specifies that the event which can initiate the trigger is a key being released.changed: This is a crucial modifier. It tells HTMX to only fire the request if the value of the input has actually changed since the last event. This prevents requests from being sent when a user presses a key likeShiftorCtrl.delay:300ms: This modifier debounces the event. HTMX will wait for 300 milliseconds after the lastkeyupevent before sending the request. If another key is pressed within that window, the timer resets.
The Net Ninja YouTube channel has an excellent, focused explanation of these modifiers in action.
HTMX Tutorial for Beginners #12 - Search & Trigger Modifiers
This short clip clearly explains the purpose and function of the keyup, changed, and delay modifiers for the hx-trigger attribute.
Watch the segment from this timestamp. Pay close attention to how the instructor explains the problem of sending too many requests and how the changed and delay modifiers solve it elegantly.
The Full Loop: HTML, Express, and Partials
Now let's see how this fits into the full request-response cycle.
- The Frontend (HTML): An
<input>element is configured with the necessary HTMX attributes. - The Backend (Express): An Express route receives the search query, filters a dataset, and renders an HTML partial containing only the results.
- The Update: HTMX receives the HTML fragment and swaps it into the correct location on the page.
A complete tutorial from noqta.tn walks through building a task manager app that includes this exact feature. It provides a clean, practical example using Express and EJS.
htmx and Alpine.js: Build Interactive Web Apps Without Heavy JavaScript Frameworks
This tutorial provides a complete, runnable example of a live search implementation. We will focus on the HTMX and Express parts.
First, examine the HTML for the search bar in the main layout. Find the <input> element in the code block for views/index.ejs. Notice the combination of <tf start="hx-get="/tasks/search"" end="hx-indicator=".search-spinner"">HTMX attributes that orchestrate the entire interaction: hx-get="/tasks/search": Sends a GET request to the search endpoint. The search term is automatically included as a query parameter from the input's name attribute. hx-trigger="input changed delay:300ms, search": This is slightly different from our keyup example but achieves a similar result. The input event fires immediately when the value changes. The delay and changed modifiers provide the same debouncing and efficiency. hx-target="#task-list": This is critical. It tells HTMX to place the response from the server inside the element with the ID task-list. hx-indicator=".search-spinner": A nice UX touch that shows a loading indicator while the request is in flight. Next, look at the server-side code in server.js. Find the route handler for <tf start="app.get("/tasks/search"" end="tasks: filtered });">/tasks/search. Observe how it gets the query from req.query.q, filters an in-memory array of tasks, and then renders the partials/task-list template, passing only the filtered results. This is the heart of the server's logic.
This pattern is the essence of HTML-over-the-wire for dynamic content filtering. The client is declarative, stating what it wants (hx-get), when it wants it (hx-trigger), and where the result should go (hx-target). The server is responsible for generating the precise HTML fragment needed for the update.
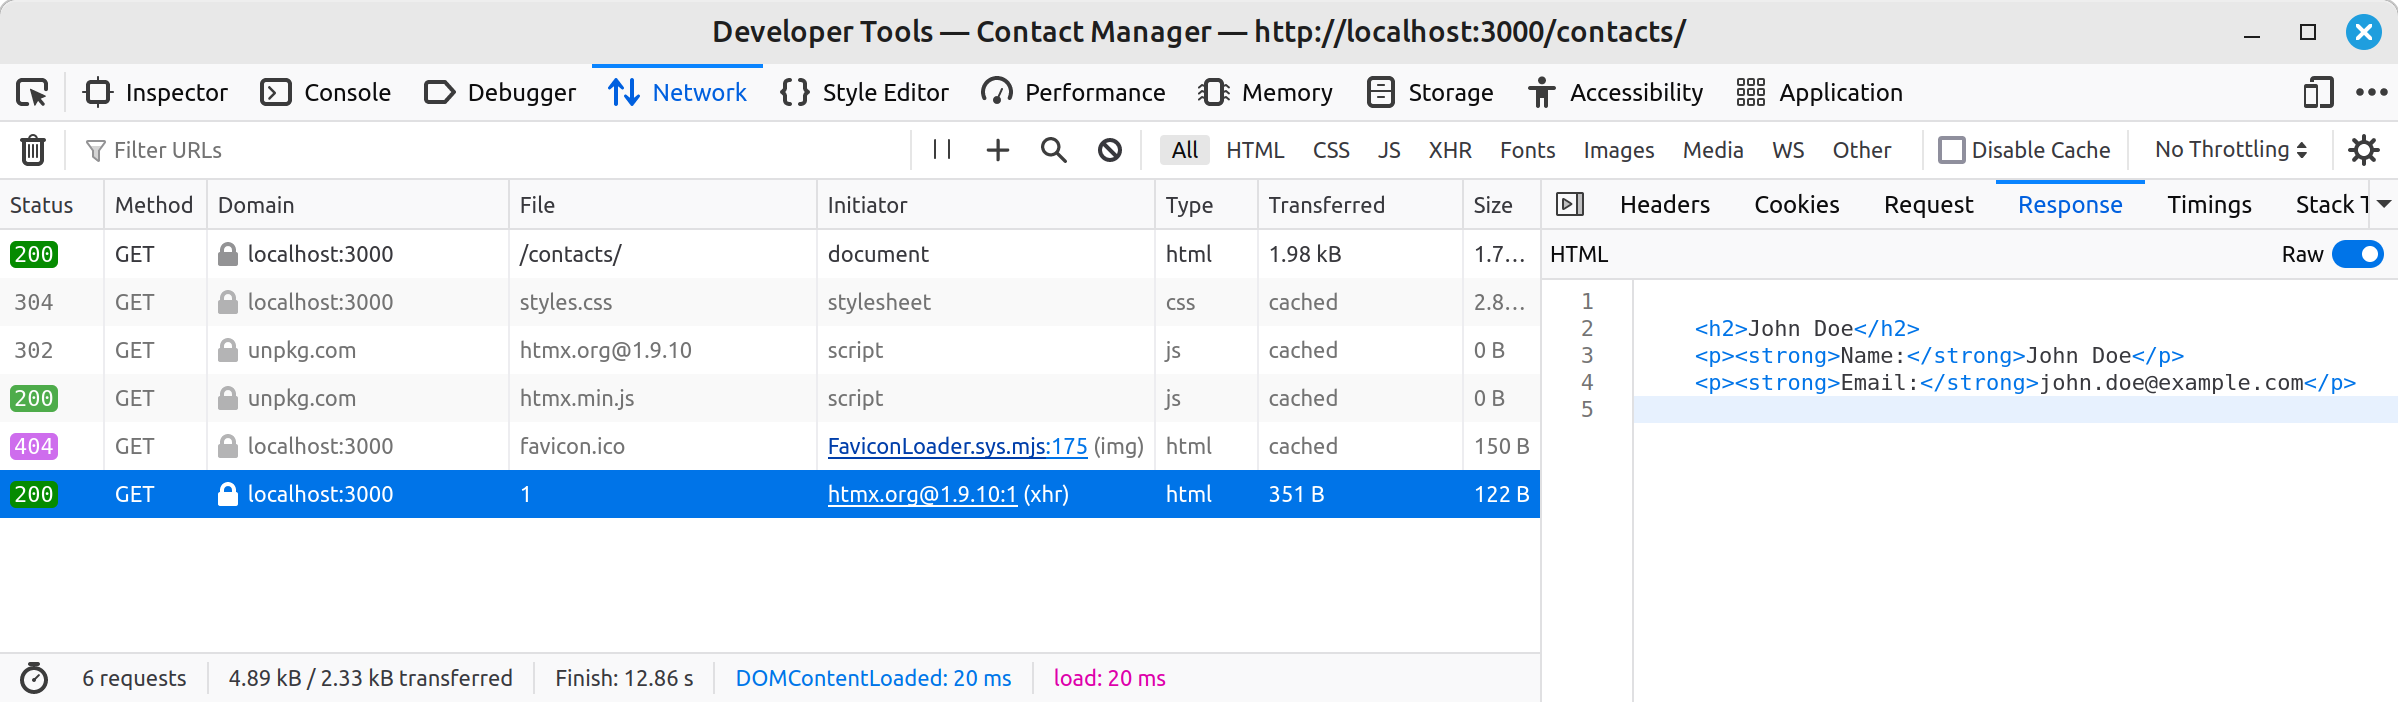
The following image from a different example shows what this looks like in your browser's developer tools. The HTMX-initiated request is highlighted, and the response pane shows the raw HTML fragment that the server sent back.
An Advanced Pattern: Optimizing Server Responses
In the example above, the /tasks/search endpoint is dedicated solely to returning search result partials. However, in many real-world applications, you might have a single endpoint (e.g., /contacts) that serves both the full page on initial load and the partial results for an active search.
How does the server know which version to send?
HTMX provides the answer by including special headers in its requests. The most important one for this pattern is HX-Request: true, which is present on every request HTMX makes. You can use this header on your server to conditionally render either a full page layout or just the necessary fragment.
The book "Hypermedia Systems" provides the definitive explanation of this powerful and efficient pattern.
More Htmx Patterns - Hypermedia Systems
This chapter delves deep into the "Active Search" pattern, contrasting it with naive approaches and explaining the professional way to handle server responses.
Start by reading the section "Targeting The Correct Element." It explains the problem of targeting a container (tbody in this case) but receiving a full HTML document, leading to a "double render." Next, skim "Paring Down Our Content," which introduces two solutions: client-side hx-select and a more efficient server-side approach. Read the section "HTTP Request Headers In Htmx" carefully. This explains how HTMX adds context to requests using headers like HX-Request and HX-Trigger. This is the key to enabling your server to distinguish between a full page load and an AJAX request for a partial. Finally, see how this is implemented by reading through "Factoring Your Templates" and the final code block that follows. This demonstrates the best practice of breaking your main template into smaller, reusable partials (like rows.html) and having your controller conditionally render either the full index.html or just the rows.html partial based on the presence of the HX-Trigger header.
This pattern of "template factoring" and conditional rendering based on HTMX headers is fundamental to building scalable and maintainable hypermedia applications. It keeps your endpoints clean and avoids duplicating logic.
To see all these pieces come together in a live-coded example, Brad Traversy's HTMX Crash Course includes a great segment on building a search widget from scratch.
HTMX Crash Course | Dynamic Pages Without Writing Any JavaScript
This is a complete, self-contained walkthrough that builds a live search feature with Node.js/Express, covering the HTML attributes, the backend route, and filtering logic.
Watch the segment on Live Search. This will solidify your understanding by showing the entire implementation step-by-step, including setting up the hx-trigger with a delay, writing the Express route to filter data, and using hx-target to update the results table.
Conclusion
You have now implemented the full set of CRUD operations using HTMX, culminating in a dynamic live search feature. This is a significant milestone that demonstrates the power of the hypermedia approach for building modern, interactive user interfaces without the complexity of a client-side rendering framework.
Key Takeaways:
- Debounced Triggers: Use
hx-trigger="keyup changed delay:..."to create efficient live search inputs that don't overload your server. - Partial Updates are Key: The server should respond to search requests with a small HTML fragment containing only the updated list, not the entire page.
hx-targetis the Destination: Thehx-targetattribute directs HTMX where to swap the incoming HTML fragment.- Conditional Server Rendering: For more robust applications, use the
HX-RequestorHX-Triggerheaders in your server-side logic to conditionally render either a full page or a partial fragment from a single endpoint. - UX with
hx-indicator: Always provide feedback to the user during network requests usinghx-indicator.
This lesson concludes our module on building core CRUD interfaces. In the next module, "Advanced Interactivity and UX," we will explore more powerful HTMX features. We'll begin by diving deeper into Out-of-Band (OOB) swaps, a technique you were briefly introduced to in the validation lesson, to see how a single request can update multiple, disconnected areas of the page at once.
Can't find a good explanation? Sign up and we'll make it for you
Sign up