
Welcome to our next lesson. In our previous sessions, we've covered how to create, read, and update data, essentially building out the 'CRU' of a standard CRUD application using HTMX. You've seen how hx-get, hx-post, and hx-put allow the server to drive UI changes by sending back HTML fragments.
Today, we'll complete the set by tackling the "Delete" operation. Our goal is to implement a robust delete feature that includes a crucial UX element: user confirmation. You'll learn how HTMX achieves this with its characteristic simplicity, using hx-delete to trigger the request, hx-confirm to prompt the user, and an outerHTML swap to seamlessly remove the item from the user's view without a page refresh.
The Hypermedia "Delete" Pattern
The process for deleting an item in HTMX is a straightforward and logical extension of the patterns you've already learned. It boils down to a single, confirmed request that results in the server orchestrating the removal of an element from the DOM.
Here's the flow:
- A user clicks a "Delete" button associated with a specific item.
- An
hx-confirmattribute on the button triggers a native browser confirmation dialog (e.g., "Are you sure?"). - If the user confirms, the
hx-deleteattribute sends aDELETErequest to a server endpoint, typically including the item's unique ID (e.g.,/todos/:id). - The server receives the request, authenticates the action, and deletes the corresponding record from the database.
- The server then sends back a
200 OKresponse with an empty body. - HTMX receives this empty response. Because the element was configured with
hx-swap="outerHTML", HTMX interprets this as "replace the target element with nothing," effectively removing it from the DOM.
This pattern is highly efficient, as the server only needs to send back a status code, not a large HTML fragment.
Implementing the Delete Action
Let's walk through building this feature, from the frontend attributes to the backend handler. The Net Ninja channel has an excellent tutorial that mirrors the exact steps you would take in your own Express project.
HTMX Tutorial for Beginners #8 - Delete Requests
This video provides a complete walkthrough of implementing a delete feature, covering the client-side HTMX attributes and the corresponding Express route handler. It also clearly demonstrates a common "gotcha" and how to solve it.
First, watch how the hx-delete attribute is added to the delete button in the EJS template from the start. Notice how the item's ID is dynamically included in the URL. Next, observe the backend implementation from the Express route setup. A new app.delete('/books/:id', ...) handler is created. Pay attention to how it extracts the id from req.params, finds and removes the item from the data array, and finally sends an empty response with res.send(). The final section is crucial. Watch from this point to see the result of the initial implementation. You'll see that only the button's text disappears. The video then explains why this happens (default target and swap behavior) and shows the fix: adding hx-target="closest li" to target the entire list item and hx-swap="outerHTML" to replace the whole element, not just its contents. This debugging process is a core part of mastering HTMX.
The key insight from the video is that you must be explicit about both what to swap (hx-target) and how to swap it (hx-swap).
The Core Attributes for Deletion
Let's formalize what we saw in the video. For a clean deletion, you need a combination of attributes on your button or link.
The Complete HTMX Guide: From Zero to Production - Ajit Singh
This guide provides a very concise and clear code example of the delete-with-confirmation pattern.
In the "CRUD Patterns" section, find the subsection titled "Delete with Confirmation." Read through this example.
As the guide shows, a typical delete button within a list item or table row would look like this:
<li id="todo-<%= todo.id %>">
  <span><%= todo.label %></span>
  <button
    hx-delete="/todos/<%= todo.id %>"
    hx-target="closest li"
    hx-swap="outerHTML"
    hx-confirm="Are you sure?">
    Remove
  </button>
</li>
Let's break down these attributes:
hx-delete="/todos/<%= todo.id %>": Sends aDELETErequest to the specified URL.hx-target="closest li": Tells HTMX not to target the button itself, but to find the nearest ancestor<li>element. This is the element we want to remove.hx-swap="outerHTML": Specifies that the entire target element (the<li>) should be replaced by the server's response. Since the response is empty, the element is removed.hx-confirm="Are you sure?": Displays a browser confirmation dialog with the given message before the request is sent.
The image below shows these attributes in a real code snippet, highlighting how they work together.

To better understand where outerHTML fits in, here is a helpful diagram of the different hx-swap options.
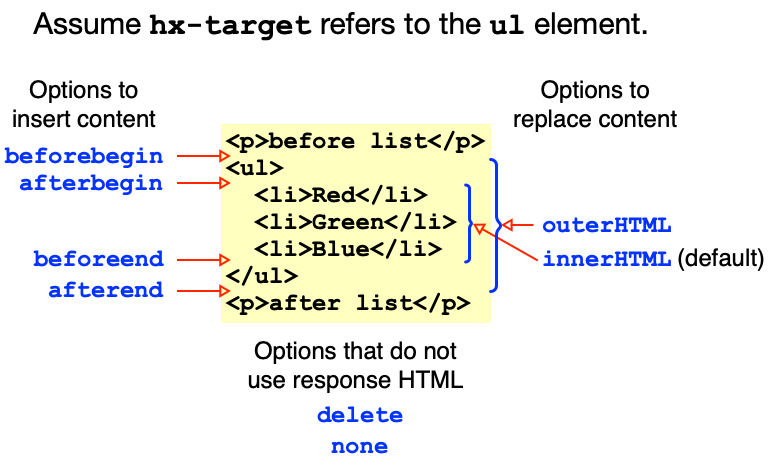
An Expert's Perspective on Debugging Swaps
As a senior developer, you know that understanding how to debug a new technology is as important as learning its features. The process of getting a delete swap to work correctly is a common learning experience with HTMX.
In the following video, Duncan Hunter gives a talk at NDC Sydney and, in a moment of unscripted live-coding, runs into the exact hx-target issue we've been discussing. Watching an expert reason through the problem is highly instructive.
HTMX: Why You Don't Always Need a SPA Framework - Duncan Hunter - NDC Sydney 2024
This video segment showcases a live debugging session where the presenter fixes a delete action that isn't working as intended, highlighting the importance of hx-target.
Watch the segment from this timestamp. The presenter clicks "delete," and only the button disappears, not the whole list item. He immediately recognizes the cause: "I didn't say what I want to Target to do this swap." He then adds hx-target="closest li" to fix it. This demonstrates the exact mental model you'll use when building and debugging your own HTMX interactions.
This real-world example reinforces that a solid grasp of hx-target and hx-swap is fundamental to moving beyond basic HTMX usage.
Conclusion
You have now completed the full tour of basic CRUD operations with HTMX. By combining the techniques from this and previous lessons, you can build the core functionality of many web applications—creating, reading, updating, and deleting data—in a way that is robust, efficient, and aligns perfectly with the hypermedia model.
Key Takeaways:
- The Delete Verb: Use the
hx-deleteattribute to send aDELETErequest to your server. - User Confirmation: The
hx-confirmattribute is a simple, declarative way to prevent accidental deletions by leveraging the browser's native confirm dialog. - The Removal Pattern: The standard pattern for removing an element is to combine
hx-target(often withclosest) andhx-swap="outerHTML", and have the server return an empty200 OKresponse. - Server's Role: The server is responsible for the business logic of deleting the data from your persistent store and signaling success to the client.
In our next lesson, we will shift our focus to another critical aspect of building user-friendly interfaces: server-side form validation. You will learn how to handle invalid form submissions and display inline error messages to the user without writing complex client-side validation logic.
Can't find a good explanation? Sign up and we'll make it for you
Sign up