
Hello! Welcome back to our course on building your secure ThinkPad.
Introduction
In our last lesson, we successfully installed the Whonix Gateway and Workstation templates, which provided us with the default sys-whonix and anon-whonix AppVMs. This was a crucial step in adding the architecture for anonymity to our Qubes OS installation.
Today, we will build directly on that foundation. The learning outcome for this lesson is to create a new AppVM based on the Whonix Workstation template for anonymous browsing. While we already have anon-whonix, the principle of compartmentalization—a cornerstone of Qubes' security model—dictates that we should use separate VMs for separate tasks. We will create a new, dedicated Whonix AppVM, reinforcing this core principle and preparing a clean environment for our future anonymous activities.
1. The Principle of Anonymous Compartmentalization
Before we create the new AppVM, let's briefly discuss why this is a necessary practice. Using a single anon-whonix VM for all anonymous tasks (browsing different sites, using different applications, managing cryptocurrency) would create a single point of failure. If one activity compromises the VM, it could potentially de-anonymize or interfere with all other activities within that same VM.
By creating separate Whonix AppVMs for different purposes (e.g., anon-research, crypto-wallet, social-media), you isolate these identities and activities from each other. This is the same logic we applied when creating work and personal-banking qubes, but now applied to the context of anonymity.
A powerful real-world example of this is managing cryptocurrencies like Monero, which requires a specific setup for maximum security. The following guide illustrates a setup that uses two separate Whonix workstations: one for the wallet (with networking disabled) and one for the daemon that connects to the network. We won't be setting up Monero today, but this guide's first step perfectly illustrates the practice of creating multiple, purpose-built Whonix AppVMs.
CLI Wallet/Daemon Isolation with Qubes + Whonix
This guide from the official Monero project demonstrates an advanced use case for Whonix in Qubes. We will focus only on the initial step, which describes the creation of two separate Whonix workstations.
Please read the introduction and section '1. Create Whonix AppVMs'. Notice how it calls for creating two distinct workstations from the same template, but with different network configurations ('NetVM' set to 'none' for one, and 'sys-whonix' for the other). This exemplifies the principle of creating purpose-built VMs.
This example highlights that creating new Whonix AppVMs is not just a theoretical exercise but a practical technique for implementing robust security and anonymity architectures.
2. Creating a New Whonix AppVM
Now, let's perform the practical steps to create our own new Whonix AppVM. We will name it anon-research. The primary method for this in Qubes OS is using the "Create new qube" tool.
The image below shows the dialog you will be using. Note the key fields: the qube's name, its type (AppVM), the template it's based on, and its networking configuration.
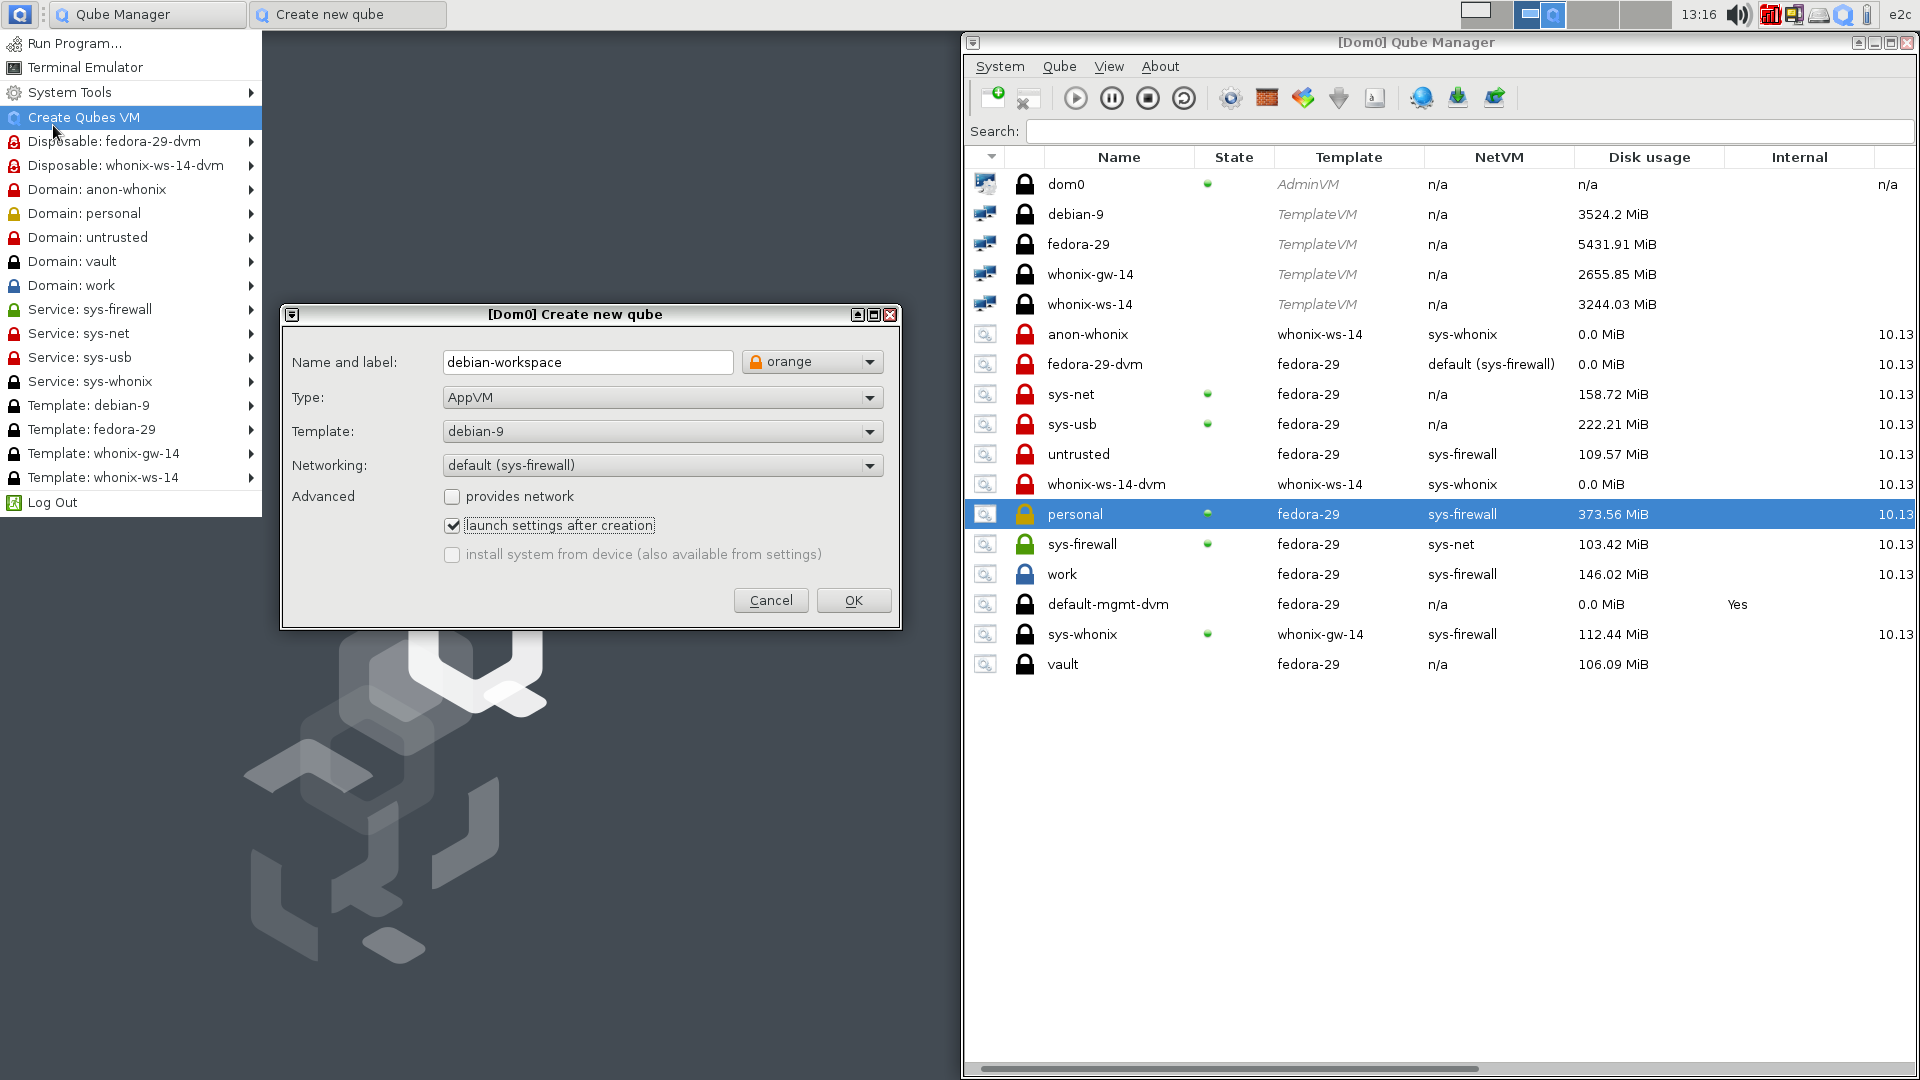
Please follow these steps on your Qubes machine:
- Open the Qubes App Launcher (the "Q" icon in the top-left corner).
- Go to
Qubes Tools > Create Qubes VM. This will open the dialog box shown in the image above. - Fill in the fields as follows:
- Name and label:
anon-research(you can choose any color label you like). - Type:
AppVM. This is the default and correct choice for a user-facing virtual machine. - Template: Select
whonix-ws-17from the dropdown menu. This is the Whonix Workstation template we installed in the last lesson. - Networking: Select
sys-whonixfrom the dropdown menu. This is critically important, as it ensures all network traffic from this new AppVM will be forced through the Tor network via your Whonix Gateway.
- Name and label:
- Leave the "Advanced" options at their defaults for now. You can always adjust settings like memory allocation later via the Qube Settings.
- Click OK.
Qubes will now create the new AppVM. This process may take a minute or two as it sets up the VM's private storage and configuration based on the whonix-ws-17 template.
3. Verification and First Launch
Once the creation process is complete, you can verify that your new anon-research AppVM is ready.
- Check the Qube Manager: Your new
anon-researchVM should be listed alongsideanon-whonixand your other VMs. Verify that its Template iswhonix-ws-17and its NetVM issys-whonix. - Check the App Launcher: Click the Qubes App Launcher. You will see a new entry for
anon-research.
Now, let's start the VM and an application inside it.
- In the Qubes App Launcher, navigate to
anon-research. - Click on
Tor Browser (AnonDist)to launch it.
What to Expect:
The first time you start anon-research, Qubes will automatically start its NetVM, sys-whonix, if it's not already running. You will see notifications as sys-whonix starts up and establishes its connection to the Tor network. After a short delay, the Tor Browser will launch inside your new, isolated anon-research AppVM.
As noted in the "How-to: Install Qubes-Whonix" guide we used previously, launching applications is done via the App Launcher, scoped to the specific domain (AppVM) you want to use.
Conclusion
In this lesson, you have put a core security principle into practice. By creating a new, dedicated Whonix AppVM, you have moved beyond the default setup and started building a truly compartmentalized environment for your anonymous activities.
Key Takeaways:
- The principle of compartmentalization should be applied to anonymous tasks by creating separate Whonix AppVMs for different purposes.
- New AppVMs are created in Qubes using the "Create Qubes VM" tool.
- The two most critical settings when creating a Whonix workstation are selecting the correct template (
whonix-ws-17) and the correct NetVM (sys-whonix).
Preview of the Next Lesson:
Now that we have a dedicated AppVM for anonymous browsing and know how to launch the Tor Browser within it, our next lesson will focus on using it effectively. We will explore the Tor Browser's features, understand its different security levels, and discuss best practices for maintaining anonymity while browsing.
Can't find a good explanation? Sign up and we'll make it for you
Sign up