Introduction
Welcome back. In our previous lesson, we established the conceptual foundation of pipeline parallelism. You learned that it's an inter-layer strategy that partitions a model by assigning sequential blocks of layers to different devices. We also identified its primary challenge—the "pipeline bubble"—and its solution: splitting input batches into smaller micro-batches to enable concurrent processing.
Today, we transition from theory to practice. Your goal is to implement a forward pass for a pipeline-parallel model. This is a critical step in building an inference engine. You will write the code to partition a model, manage the flow of micro-batches, and handle the data transfers between GPU stages using PyTorch's distributed communication primitives. We will focus exclusively on the forward pass, which is the core of inference, and defer the complexities of the backward pass.
1. Visualizing the Micro-Batch Flow
Before we write any code, let's solidify our mental model of how micro-batches flow through the pipeline. A naive implementation where one full batch is processed sequentially is highly inefficient. By breaking the batch into micro-batches, we can create an assembly line where multiple GPUs work in parallel.
Training LLMs at Scale - Deepak Narayanan | Stanford MLSys #83
This video from the Stanford MLSys Seminar series provides an excellent visualization of how pipelining with micro-batches works, significantly improving efficiency over the naive approach.
Watch the segment from 08:37 to 12:04. Pay close attention to the timeline diagrams. First, observe the diagram showing the naive, sequential execution and the resulting idle time. Then, see how splitting the input into micro-batches allows the stages to overlap their computation, filling in those idle periods.
As you saw, the key is that a stage (e.g., GPU 1) can begin its work on the first micro-batch as soon as it receives the necessary activations from the previous stage (GPU 0), while GPU 0 simultaneously begins processing the second micro-batch. This overlap is what boosts utilization.
2. Implementing the Pipeline Forward Pass in PyTorch
Now, let's translate this concept into code. A pipeline implementation requires three key components:
- Distributed Setup: Initializing a process group so the GPUs can communicate.
- Model Partitioning: Assigning different parts of the model to different GPUs (ranks).
- Communication Loop: A loop that iterates through micro-batches, performs computation, and uses
send/recvoperations to transfer data between stages.
The following article provides a clear, practical code example of a two-stage pipeline. While the example includes both forward and backward passes, we will focus exclusively on the forward pass logic.
Pipeline Parallelism Implementation
This article from ApX Machine Learning contains a superb, self-contained PyTorch code snippet that manually implements a pipeline. It's an ideal resource for understanding the low-level mechanics.
Read the section 'Implementing Pipeline Parallelism in PyTorch'. Study the Python function run_pipeline_step. For this lesson, focus your attention on the code block under the --- Forward Pass --- comment. Notice how the logic differs for current_rank == 0 (the first stage) and current_rank == 1 (the last stage).
Let's break down the core logic from that example for the forward pass:
-
First Stage (
rank == 0):- It takes a micro-batch from the input data.
- It computes the activations for its portion of the model:
activations = stage0(micro_batch). - It sends the resulting tensor to the next stage (rank 1):
dist.send(activations, dst=1).
-
Last Stage (
rank == 1):- It must first allocate an empty tensor with the correct shape and data type to receive the incoming data. This is a crucial detail for
dist.recv. - It waits to receive the activations from the previous stage:
dist.recv(received_activations, src=0). This is a blocking operation; the code will pause here until the data arrives. - It computes the final output using its portion of the model:
outputs = stage1(received_activations).
- It must first allocate an empty tensor with the correct shape and data type to receive the incoming data. This is a crucial detail for
This send/recv pattern repeats for every micro-batch, forming the backbone of the pipeline's forward pass.
3. A Complete, Runnable Example
Let's synthesize these concepts into a complete script you can run. The following code sets up a two-stage pipeline for inference. It defines a simple nn.Sequential model, partitions it across two processes, creates dummy micro-batches, and executes the forward pass we just analyzed.
import torch
import torch.nn as nn
import torch.distributed as dist
import os

def setup(rank, world_size):
    """Initializes the distributed environment."""
    os.environ['MASTER_ADDR'] = 'localhost'
    os.environ['MASTER_PORT'] = '12355'
    dist.init_process_group("nccl", rank=rank, world_size=world_size)

def cleanup():
    """Cleans up the distributed environment."""
    dist.destroy_process_group()

def run_pipeline_forward_pass(rank, world_size):
    """
    Runs a forward pass for a 2-stage pipeline-parallel model.
    """
    print(f"Running pipeline forward pass on rank {rank}.")
    setup(rank, world_size)
    torch.cuda.set_device(rank)


    # --- Model Definition & Partitioning ---
    # Define a simple sequential model
    full_model = nn.Sequential(
        nn.Linear(10, 20), nn.ReLU(),
        nn.Linear(20, 30), nn.ReLU(), # Split point
        nn.Linear(30, 40), nn.ReLU(),
        nn.Linear(40, 5)
    ).to(rank)


    # Manually partition the model into two stages
    if rank == 0:
        model_stage = full_model[:2]
    else: # rank == 1
        model_stage = full_model[2:]


    # --- Data and Micro-batching ---
    num_micro_batches = 8


    # On rank 0, create dummy input data split into micro-batches
    if rank == 0:


        # Full batch size: num_micro_batches * batch_size_per_micro
        input_data = [torch.randn(16, 10).to(rank) for _ in range(num_micro_batches)]


    # Determine the shape of the tensor being passed between stages
    # This is needed for the receiving rank to allocate memory
    if rank == 0:
        with torch.no_grad():
            inter_stage_shape = model_stage(input_data[0]).shape
    else:


        # In a real scenario, this shape info needs to be communicated
        # or known beforehand. Here we hardcode it for simplicity.
        inter_stage_shape = (16, 30)


    # --- Pipeline Execution (Forward Pass Only) ---
    final_outputs = []
    for i in range(num_micro_batches):
        if rank == 0:


            # 1. Compute activations for stage 0
            micro_batch = input_data[i]
            activations = model_stage(micro_batch)


            # 2. Send activations to the next stage (rank 1)
            print(f"Rank 0: Sending micro-batch {i}")
            dist.send(activations, dst=1)

        elif rank == 1:


            # 1. Allocate buffer and receive activations from rank 0
            received_activations = torch.empty(inter_stage_shape, device=rank)
            print(f"Rank 1: Receiving micro-batch {i}")
            dist.recv(received_activations, src=0)


            # 2. Compute final output for stage 1
            output = model_stage(received_activations)
            final_outputs.append(output.cpu())
            print(f"Rank 1: Computed output for micro-batch {i}, shape: {output.shape}")


    # --- Finalization ---
    dist.barrier() # Wait for all processes to finish
    if rank == 1:
        print("\nPipeline forward pass complete.")
        print(f"Number of final output tensors collected: {len(final_outputs)}")
        print(f"Shape of the first output tensor: {final_outputs[0].shape}")

    cleanup()

if __name__ == "__main__":


    # To run this, you need at least 2 GPUs.
    # Launch with: torchrun --nproc_per_node=2 your_script_name.py
    world_size = 2 # We are hardcoding a 2-stage pipeline


    # This part is a simple launcher, torchrun is the standard.
    # We get rank from environment variables set by torchrun.
    try:
        rank = int(os.environ["RANK"])
        world_size = int(os.environ["WORLD_SIZE"])
        if world_size != 2:
            raise ValueError("This script is designed for a world size of 2.")
        run_pipeline_forward_pass(rank, world_size)
    except KeyError:
        print("This script must be launched with torchrun.")
        print("Example: torchrun --nnodes=1 --nproc_per_node=2 your_script_name.py")
To Run This Code:
- Save the code above as a Python file (e.g.,
pipeline_forward.py). - You will need an environment with PyTorch and at least two available GPUs.
- Launch the script from your terminal using
torchrun.
torchrun --nnodes=1 --nproc_per_node=2 pipeline_forward.py
This command spawns two processes. torchrun automatically assigns rank=0 to the first and rank=1 to the second, allowing our script to execute the stage-specific logic correctly. If successful, you will see interleaved print statements from both ranks and a final confirmation from rank 1.
4. Revisiting the Pipeline Bubble
The schedule we've just implemented—where all forward passes for all micro-batches are executed in a sequence—is known as the GPipe schedule. While it's simple to implement, it's not the most efficient. Let's briefly analyze the idle time.
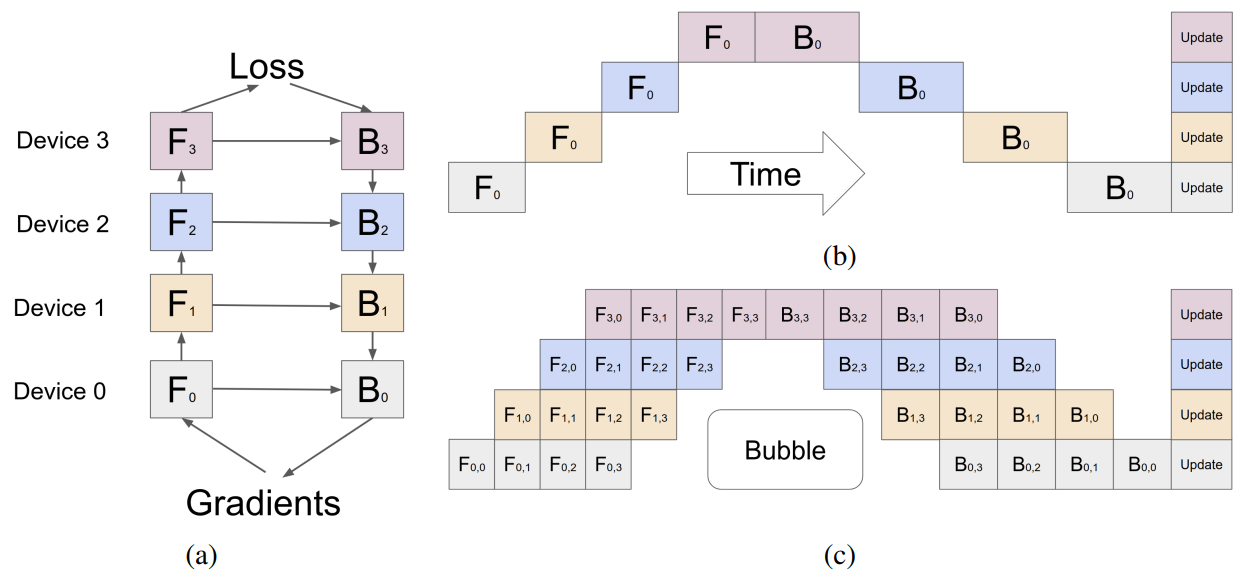
The idle time, or "bubble," is the period when some GPUs are waiting for the pipeline to either fill up at the start or drain at the end. For a GPipe schedule, the amount of time spent in this bubble is proportional to the number of pipeline stages.
Training LLMs at Scale - Deepak Narayanan | Stanford MLSys #83
Let's revisit the Stanford seminar video to quantify this bubble.
Watch from 12:04 to 13:27. The speaker precisely defines the 'pipeline bubble' and provides a formula for its size: it's equivalent to (P-1) micro-batches worth of computation, where P is the number of pipeline stages. This is a fundamental trade-off in pipeline parallelism.
Understanding this bubble is key for an AI Systems Engineer. In our 2-stage example, the bubble size is (2-1) = 1 micro-batch. For an 8-stage pipeline, the bubble would be equivalent to 7 micro-batches of wasted time. This highlights the importance of using a large number of micro-batches relative to the number of stages to maximize efficiency.
Conclusion
In this lesson, you have successfully moved from the theory of pipeline parallelism to a practical implementation. You wrote and executed code for a two-stage pipeline's forward pass, which is the cornerstone of distributed inference.
Key Takeaways:
- Pipeline implementation relies on a
send/recvloop that processes micro-batches sequentially across stages. - Each stage in the pipeline runs as a separate process (rank) with rank-specific logic. The first stage reads data and sends activations, intermediate stages receive and send, and the last stage receives and produces the final output.
- The
dist.sendanddist.recvprimitives in PyTorch are the fundamental tools for passing data between pipeline stages. - The GPipe schedule is a straightforward approach but inherently includes a pipeline bubble that creates idle time on GPUs, reducing efficiency. The size of this bubble is proportional to the number of pipeline stages.
Preview of the Next Lesson:
Reading print statements is one thing, but seeing the execution timeline is another. In the next lesson, we will visualize the GPU utilization timeline for the code we just wrote. Using a profiler like NVIDIA's Nsight Systems, you will be able to directly observe the pipeline bubble and see exactly when each GPU is active or idle, providing concrete evidence of the performance characteristics we've discussed.