Recommended resources
The freely available resources this lesson will direct you to.
- What is the best way to SCHEDULE POSTS for social media | 2026 Review Social Media Management Toolswww.youtube.com
- How To Create Your Social Media Calendar From Scratch | + Free Calendar Toolwww.youtube.com
- 13+ Free Social Media Calendar Templates to Help You ...buffer.com
- How Often to Post on Social Media in 2026 — Data-Backed Guidebuffer.com
Introduction
Welcome to the next phase of your influencer journey! Over the last few modules, you've built a strong foundation by creating fantastic content—from photos and graphics to a fully edited YouTube video complete with a clickable thumbnail. But creating great content is only half the battle. The key to growth is consistency.
This lesson marks the beginning of our module on Content Strategy & Planning. Our goal today is to select a content calendar tool and establish a weekly posting frequency for each platform. Think of this as building the engine for your content machine. We'll decide where you'll plan your content and how often you'll post, transforming your creative process from a series of one-off tasks into a sustainable, manageable system.
1. Why a Content Calendar is Your New Best Friend
Before we dive into tools, let's clarify why this step is so crucial. A content calendar isn't just a fancy spreadsheet; it's a strategic tool that helps you:
- Stay Consistent: It removes the daily "what should I post?" panic, which is the biggest barrier to consistent posting.
- Save Time: It enables "content batching," where you can plan and create a week's worth of content in one or two sessions, which is perfect for your 1-2 hour daily schedule.
- Be More Strategic: It gives you a bird's-eye view of your content, helping you plan for holidays, create balanced content, and ensure you're serving your audience well.
- Reduce Burnout: By planning ahead, you turn a stressful, reactive process into a calm, proactive one.
Essentially, a calendar moves you from being a content creator to a content strategist.
2. Step 1: Choose Your Planning Tool
Your content calendar can be as simple or as powerful as you need it to be. The most important factor is choosing a system you will actually use. There are two main categories: simple planning templates and all-in-one scheduling tools.
Option A: Simple Planning Templates
These are perfect if you want to start with the basics of planning without committing to a new software. You can use them to map out your ideas, dates, and captions, but you'll still need to post the content manually.
13+ Free Social Media Calendar Templates
The team at Buffer has compiled an excellent list of free, downloadable templates that are perfect for getting started. We'll explore a few different formats.
Scan through the article to see the different types of templates available. You don't need to download them all, just get a feel for the options: Simple Weekly/Monthly PDF Calendar (Sections 3 & 4): The most straightforward option. You can print it out or fill it in on your computer. Great for a high-level overview. Canva Calendar Templates (Section 5): Since you're already familiar with Canva, this is a great option. You can customize the template with your brand colors and fonts. Google Sheets Template (Section 7): This is more robust and allows you to store detailed information like exact captions, links, and hashtags right in the calendar.
Option B: All-in-One Scheduling Tools
These tools are a game-changer for efficiency. They not only provide a calendar for planning but also allow you to schedule your posts to go live automatically. This means you can create a week of content in one sitting and the tool will post it for you throughout the week. For your goal of building a presence on multiple platforms, this is the "work smarter, not harder" approach.
Most of these tools offer free plans that are perfect for a new creator. Let's watch a comparison of the most popular options to help you choose.
Best Social Media Management Tools 2026? | Best Way To Schedule Social Media Posts For FREE
In his video 'Best Social Media Management Tools,' Joe Zeplin gives a straightforward breakdown of the top three schedulers. We'll focus on the two best options for solo creators.
Watch the following sections to understand the pros and cons of each tool: What is a Scheduler? (00:00 - 02:19): This gives a great overview of why these tools are so powerful. Review of Metricool (02:19 - 06:51): Pay close attention to this one. Metricool's free plan allows you to connect all your platforms (Instagram, TikTok, X, Pinterest, YouTube) and schedule up to 50 posts per month. It's user-friendly and highly recommended for beginners. Review of Buffer (06:51 - 09:51): Buffer is another excellent tool. Its free plan is more limited (3 channels and 30 posts), but it's very easy to use. Recap (11:52 - 13:16): The video's conclusion does a great job of summarizing who each tool is best for.
A final option to consider is Canva's built-in Content Planner. If you upgrade to Canva Pro, it includes a scheduler. While not as robust as dedicated tools like Metricool or Buffer, it might be a good option if you plan to use Canva Pro for its other features anyway.

Your First Action Step: Select a Tool
Based on what you've just seen, make a decision for your starting tool.
- If you prefer to start simple: Download one of the Google Sheets or Canva templates from the Buffer article.
- If you want maximum efficiency (Recommended): Sign up for a free account with Metricool. Its generous free plan is the best fit for managing all five of your target platforms without spending any money.
3. Step 2: Establish Your Weekly Posting Frequency
Now that you've chosen where to plan, let's decide how often to post. This is a critical balance between platform best practices and what is realistic for you. Posting consistently is more important than posting constantly.
The recommendations below are based on data from social media studies. Use them as a starting point.
How Often to Post on Social Media
This guide from Buffer, 'How Often to Post on Social Media,' provides data-backed recommendations for each major platform. We'll use it to set our initial goals.
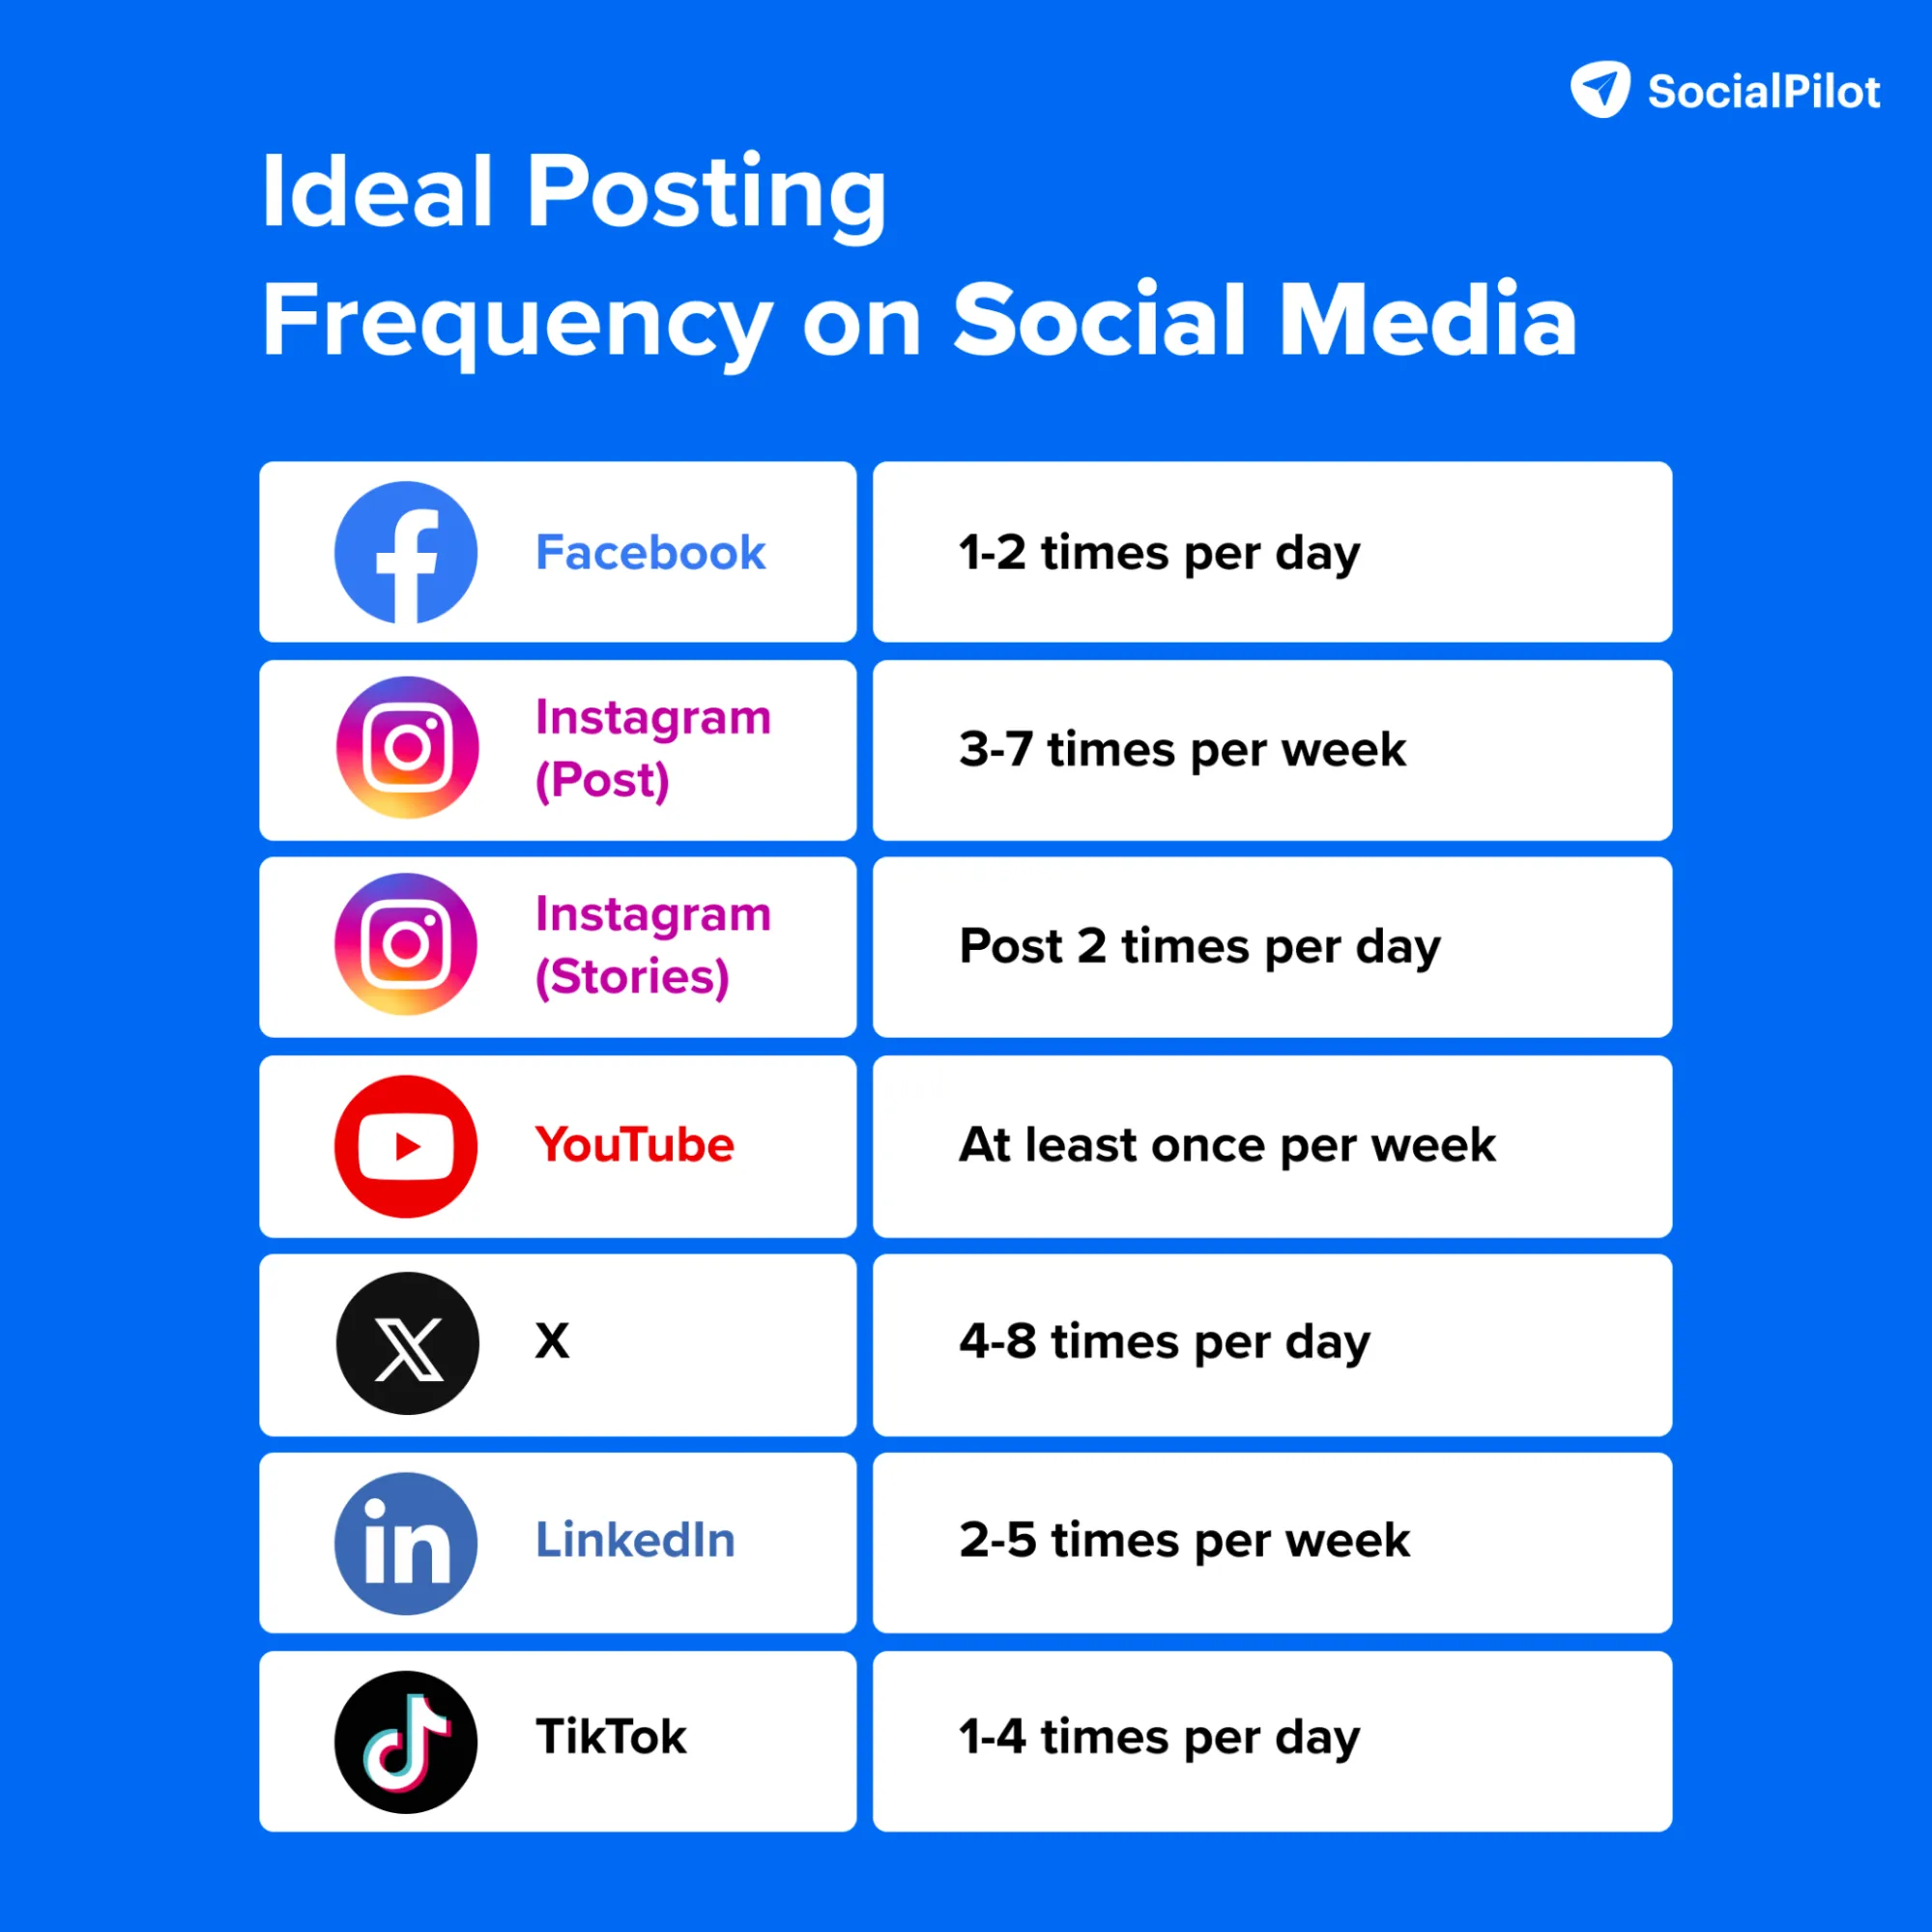
Read the following sections to understand the ideal frequency for your chosen platforms. Most importantly, read the section on small businesses. At a glance (Section 0): A quick summary table. Instagram (Section 1): 3-5 posts/week. TikTok (Section 2): 2-5 posts/week. X (Twitter) (Section 3): 3-4 posts/day. Pinterest (Section 4): The recommendation varies widely, from at least once a week to 15+ pins a day. As a beginner, aiming for 3-5 high-quality pins per week is a great start. A note for small businesses (Section 5): This is the most important part for you. It emphasizes that your 'right number' is the number you can stick to consistently without burning out.
Here is a summary of the recommended starting frequencies.
Your Second Action Step: Define Your Starting Schedule
Let's translate those recommendations into a realistic weekly schedule for you. Remember your 1-2 hour daily time limit. A good starting point that balances consistency and manageability could look like this:
- Instagram: 3 posts per week (e.g., Monday, Wednesday, Friday)
- TikTok: 3 videos per week (e.g., Tuesday, Thursday, Saturday)
- YouTube: 1 long-form video per week (e.g., Sunday)
- Pinterest: 3 pins per week (can be graphics promoting your other content)
- X (Twitter): 1-2 posts per day (can be quick thoughts, questions, or links to your other content)
Your task: Create your own version of this weekly posting goal. Write it down. This is your master plan for the coming weeks. Be honest with yourself about what you can achieve. You can always increase the frequency later as you get more efficient.
4. Step 3: Set Up Your Calendar
The final step is to combine your chosen tool with your new schedule.
- If you chose a template (Google Sheets/Canva): Open your template and create placeholders for your first week. For example, in the slot for Monday, you might write: "Instagram Post - Tip Graphic." For Tuesday: "TikTok Video - Quick Recipe."
- If you chose a scheduling tool (Metricool/Buffer): The process is even more powerful. You can define your ideal posting times, and the tool will automatically schedule content you add to your queue.
This short video shows how to set up a posting schedule in Buffer, and the concept is very similar in Metricool.
How To Create Your Social Media Calendar From Scratch | + Free Calendar Tool
Let's see how to translate your weekly goals into a real schedule within a tool.
Watch from 04:08 to 04:57. This clip shows you how to go into a channel's settings and add or remove time slots for each day of the week. This is how you tell the tool, 'These are the best times I want my content to go out.'
Your task: Go into the tool you chose and set up your desired schedule. Add the time slots for each platform based on the weekly goals you just defined. Don't worry about picking the "perfect" time of day yet; we'll cover that in a future lesson on analytics. For now, just creating the slots is a huge step forward.
Conclusion
Excellent work! You've just laid the foundational structure for a consistent and sustainable content strategy. This planning phase is what separates aspiring creators from successful ones.
Key Takeaways:
- A content calendar is essential for consistency, time management, and reducing stress.
- You can start with simple templates (Canva, Google Sheets) or use a powerful, free scheduling tool like Metricool to automate your posting.
- Your ideal posting frequency is a balance between platform best practices and what you can realistically maintain. Consistency trumps frequency.
- Setting up your schedule in your chosen tool makes your plan actionable.
Preview of the Next Lesson:
You now have the framework for your content—the 'when' and 'how often'. In the next lesson, we'll start filling it in. You will learn how to map out one week of content by assigning a specific post idea and format to each scheduled slot. This is where the real fun of planning begins