
In our previous lesson, we established your app's foundational identity by configuring its applicationId, versioning, and SDK compatibility. With those essential properties in place, we can now turn to the visual aspects that users will see first: the app icon and the launch splash screen.
This lesson will guide you through customizing these assets for Android. We'll use @capacitor/assets, a purpose-built command-line tool that streamlines the process of generating the numerous required image sizes from a small set of master files. You will learn not only how to run the tool but also understand the specifics of modern Android assets, including adaptive icons and the new splash screen system introduced in Android 12.
Introducing the @capacitor/assets Tool
Manually creating and managing the dozens of different icon and splash screen sizes required for various Android screen densities is a tedious and error-prone task. The @capacitor/assets tool automates this entire process. You provide a few high-resolution source images, and the tool handles the resizing, cropping, and placement of the generated files into the correct directories within your native Android project.
First, let's add the tool to your project's development dependencies. Since you are using bun and a Turborepo monorepo, you'll run this command from the root of your workspace:
bun add -D @capacitor/assets
Preparing Your Source Assets
The asset generator expects a specific set of source images. By convention, these are placed in a folder named resources or assets in the root of your project. Let's stick with resources.
Create a resources folder at the root of your Turborepo workspace. Inside this folder, you will need to provide the following PNG files:
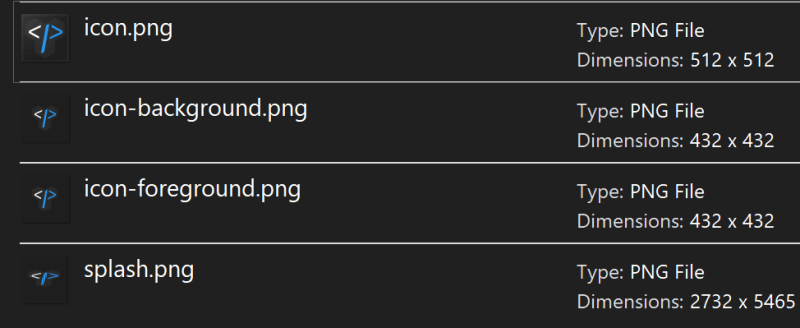
Here is a breakdown of the files needed for Android:
icon-only.png: A1024x1024pxsquare image that represents your legacy app icon. This is used on older Android versions that do not support adaptive icons.icon-foreground.png: A1024x1024pximage containing the primary artwork for your adaptive icon (e.g., your logo). The design should be contained within a "safe zone" circle of about682pxin diameter, as the system may crop the outer edges.icon-background.png: A1024x1024pximage that serves as the background layer for your adaptive icon. This can be a solid color or a simple, subtle pattern.splash.png: A2732x2732pximage for the splash screen. For modern Android, this is primarily used to extract the icon for the new animated splash screen.splash-dark.png(Optional): A2732x2732pxversion of the splash screen for dark mode.
The official Capacitor documentation provides a clear guide on this setup.
Splash Screens and Icons | Capacitor Documentation
This guide from the official Capacitor documentation outlines the asset generation process.
Focus on the section that details the source image structure. This reinforces the file names and folder structure required by the @capacitor/assets tool.
Understanding Android Adaptive Icons
Since Android 8.0 (API level 26), Google introduced adaptive icons to bring visual consistency to device home screens. An adaptive icon is composed of two layers: a foreground and a background.
- Foreground (
icon-foreground.png): This is your app's logo or primary graphic. - Background (
icon-background.png): This sits behind the foreground.
The Android system then applies a mask (e.g., circle, squircle, rounded square) defined by the device manufacturer to both layers. This ensures all app icons on the home screen share a uniform shape. This layered approach also enables subtle visual effects, like parallax scrolling on the home screen, where the foreground moves slightly independently of the background. Your experience with layered composition in design tools or even CSS stacking contexts provides a good mental model for this concept.
Generating the Android Assets
Once your source images are in place inside the resources folder, you can run the generator. To target only the Android platform, use the --android flag.
From your project root, run:
bunx capacitor-assets generate --android
This command will:
- Read your source images from the
resourcesdirectory. - Generate dozens of properly sized
.pngfiles for different screen densities (mdpi,hdpi,xhdpi, etc.). - Place these files into the appropriate
res/mipmap-*andres/drawable-*directories in yourandroidproject. - Configure the adaptive icon XML files in
res/mipmap-anydpi-v26.
After the command completes, you should sync your project to ensure the native project is fully updated:
bunx cap sync android
The Android 12+ Splash Screen
A significant change occurred with splash screens in Android 12. Previously, developers could display a custom, full-screen image. On Android 12 and newer, the system enforces a standardized splash screen experience to create a more consistent app launch flow.
This new splash screen consists of:
- An app icon.
- A solid background color.
- A transition to your app itself.
The @capacitor/assets tool automatically configures your project for this new API. The icon is extracted from your splash.png, and a default background color is applied.
Splash Screens and Icons | Capacitor Documentation
The documentation briefly explains this important shift in Android behavior.
Read the short section titled "Android 12+". This context is crucial for understanding why your splash screen might look different on newer vs. older devices.
To customize the splash screen's behavior (e.g., background color, duration, spinner), you need the @capacitor/splash-screen plugin and must configure it in capacitor.config.ts.
Ionic 6+ Capacitor - Generate custom Icons & Splashscreens | Android & iOS
This video demonstrates the practical steps of installing and configuring the splash screen plugin.
Watch the segment from "installing the plugin", where the presenter adds @capacitor/splash-screen and modifies the capacitor.config.ts file. Pay attention to properties like launchShowDuration and backgroundColor which give you control over the launch experience.
Here's an example configuration you might add to your capacitor.config.ts:
// capacitor.config.ts
import { CapacitorConfig } from '@capacitor/cli';

const config: CapacitorConfig = {
  // ... your existing config
  plugins: {
    SplashScreen: {
      launchShowDuration: 3000,
      launchAutoHide: true,
      backgroundColor: '#ffffffff',
      androidSplashResourceName: 'splash',
      androidScaleType: 'CENTER_CROP',
      showSpinner: false,
    },
  },
};

export default config;
Troubleshooting and Fine-Tuning in Android Studio
While the automation is powerful, sometimes you may need to make manual adjustments, especially for the adaptive icon. Android Studio provides an excellent built-in tool called Image Asset Studio for this purpose. If the generated icon doesn't look quite right, you can use this tool to regenerate it with more granular control.
The following video segment demonstrates exactly how to resolve a common issue where generated icon assets are not correctly processed by the build tools.
Ionic 6+ Capacitor - Generate custom Icons & Splashscreens | Android & iOS
This part of the video is an excellent guide for hands-on troubleshooting within Android Studio.
Watch the section from "resolving icon errors". The presenter opens the project in Android Studio, identifies a build error related to icon resources, and uses the Image Asset tool (right-click res folder > New > Image Asset) to correctly configure the foreground and background layers, trim whitespace, and set a background color. This is a valuable fallback technique to have in your toolkit.
After generating the assets and syncing, you can open your project in Android Studio (bunx cap open android) and run it on an emulator or a physical device to see your new icon and splash screen in action.
Conclusion
In this lesson, you've replaced the default Capacitor branding with your app's own unique visual identity. You now have a repeatable, automated workflow for managing icons and splash screens, which is essential for maintaining a professional application.
Here are the key takeaways:
- The
@capacitor/assetstool automates the generation of platform-specific icons and splash screens from a few source images. - Modern Android apps require adaptive icons, which consist of separate foreground and background layers for visual consistency and effects.
- Android 12+ introduced a standardized splash screen system, which
@capacitor/assetsconfigures automatically. Behavior can be fine-tuned via the@capacitor/splash-screenplugin incapacitor.config.ts. - Android Studio's Image Asset Studio is a powerful tool for manually tweaking or regenerating icons if the automated output needs adjustment.
Your app now not only has its programmatic identity configured but also its visual identity. The next step in preparing for distribution is to create a secure digital signature. In the next lesson, we will use the Java keytool to generate a private signing key and keystore, which are mandatory for creating release builds for the Google Play Store.
Can't find a good explanation? Sign up and we'll make it for you
Sign up