
Welcome to the next lesson in our journey to prepare your application for the Google Play Store. In our last session, we gave your app its visual identity by customizing the icon and splash screen. Now, we'll establish its digital identity by creating a cryptographic signing key. This is a critical, one-time step that is mandatory for publishing and updating your app.
This lesson addresses a cornerstone of Android security and distribution: app signing. You will learn what a signing key is, why it's essential, and how to generate one using the standard Java keytool utility. Most importantly, we'll cover how to securely manage the key and its passwords, as losing them would prevent you from ever updating your app on the Play Store.
The What and Why of Android App Signing
Every Android application must be digitally signed with a certificate before it can be installed on a device or uploaded to Google Play. This signature is not like a web SSL certificate from a Certificate Authority; you create it yourself. It serves two vital purposes:
- Authenticity: It proves that future updates to your app come from you, the original author. Android will only install an update if it's signed with the same key as the original installation.
- Integrity: It guarantees that the app's code has not been altered or tampered with since you signed it.
When you run bunx cap run android, Capacitor and the Android build tools use a temporary debug key to sign the app. This is sufficient for development and testing, but Google Play will reject any app signed with this key. For a production release, you need to create your own permanent release key.
This excerpt from the book Elements of Android Jetpack provides a concise introduction to production signing keys.
Read the initial section, up to "Creating a Production Signing Key". Pay close attention to the paragraphs explaining key validity and the distinction between immutable versus confirmed identity.
The Key, the Keystore, and the Alias
Before we generate the key, let's clarify the terminology. You'll encounter three main components:
- Keystore: This is a file, typically with a
.jksor.keystoreextension, that acts as a secure container or vault. - Key: This is the cryptographic key pair (private and public) stored inside the keystore. The private key is what you use to sign your app. A single keystore can hold multiple keys.
- Alias: This is a human-readable name you give to a specific key within the keystore, allowing you to identify it.
The keystore itself is protected by a password, and each key alias within it also has its own password. For simplicity, these two passwords are often set to be the same.

Generating a Keystore with keytool
The standard tool for creating a Java keystore is keytool, a command-line utility included with the Java Development Kit (JDK), which you already have installed as part of the Android Studio setup.
Let's create the key. It's good practice to keep project-specific files organized. You can run this command from the root of your Turborepo workspace. We'll generate the keystore file directly into the mobile app directory you created earlier (apps/mobile), but we will make sure to add it to your .gitignore file immediately after.
Open your terminal at the root of your project and execute the following command:
keytool -genkey -v -keystore apps/mobile/my-release-key.keystore -alias my-app-alias -keyalg RSA -keysize 2048 -validity 10000
Let's break down these parameters:
-genkey: Instructskeytoolto generate a new key.-v: Enables verbose output, showing you more detail about the process.-keystore apps/mobile/my-release-key.keystore: Specifies the path and filename for the new keystore file.-alias my-app-alias: Sets the alias (the name) for the key we're creating. You should replacemy-app-aliaswith something unique to your app.-keyalg RSA: Specifies the RSA algorithm, the standard for signing keys.-keysize 2048: Sets the key size to 2048 bits, a secure and recommended length.-validity 10000: Sets the key's validity period in days. 10,000 days is over 27 years. The Google Play Store requires that your key remains valid until at least 2033, so a long validity period is essential.
After running the command, keytool will prompt you for several pieces of information.
This section provides a detailed walkthrough of the keytool command and the subsequent interactive prompts.
Focus on the example keytool command and its breakdown. Then, review the sample output that shows the series of prompts you will need to answer. You'll be asked for a keystore password, your name, organization, and so on. At the final prompt, "Enter key password for...", you can simply press Enter to make the key password the same as the keystore password.
When you're finished, the my-release-key.keystore file will be located in your apps/mobile directory.
Securing Your Keystore and Credentials
This is the most critical part of the lesson. You now possess the one and only key that can be used to publish updates for your app.
Immediately add your keystore file to your project's root .gitignore file.
# .gitignore


# Android
apps/mobile/my-release-key.keystore
There are two primary security risks you must mitigate:
- Loss: If you lose your keystore file or forget its passwords, you will never be able to publish an update to your app. You would have to publish a brand new app with a new
applicationId. - Theft: If someone else gets your keystore and passwords, they could sign and distribute malicious versions of your app under your name, and users' devices would accept it as a legitimate update.
This final reading selection emphasizes the importance of securing your production key.
Read the section titled "Two Types of Key Security". The advice here for solo developers and teams is practical and essential.
Here's your action plan for securing these assets:
- Back up the keystore file: Copy the
.keystorefile to at least one other secure location. This could be an external hard drive, a USB stick stored in a safe place, or encrypted cloud storage. - Secure the credentials: Store the keystore password, the key alias, and the key password in a password manager (e.g., 1Password, Bitwarden). Do not store them in a plain text file next to the keystore.
Alternative Method: Android Studio GUI
While keytool is the fundamental method, Android Studio provides a convenient graphical interface for the same process. This is useful to know, as it guides you through the same steps visually.
To access it, you would open your Android project in Android Studio (bunx cap open android), then navigate to Build > Generate Signed Bundle / APK.... From there, you would choose Android App Bundle and click the "Create new..." button.
This opens a dialog that mirrors the keytool prompts.
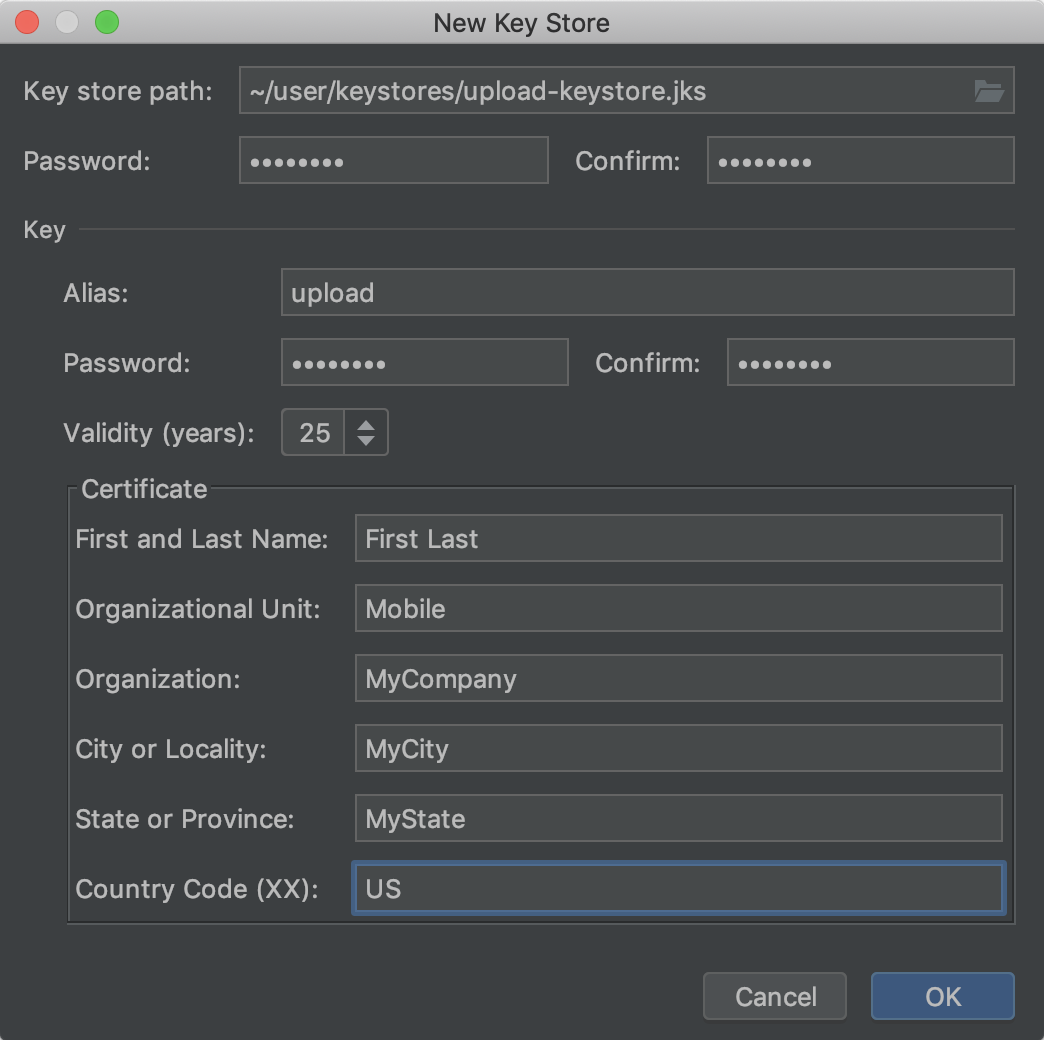
This video gives a quick visual demonstration of the process.
How to Generate a Signed AAB File in Android Studio | Step-by-Step Guide
This short clip shows the Android Studio GUI flow for creating a keystore.
Watch from the beginning of the key generation process. The presenter clicks "Create new..." and you can see the dialog being filled out. This visual reinforces how the different pieces of information (passwords, alias, etc.) fit together.
Whether you use keytool or the Android Studio GUI, the result is the same: a .keystore file containing your app's unique digital signature.
Conclusion
You have now created and secured one of the most critical assets in your app's lifecycle: the production signing key. This digital signature is your app's unique identity in the Android ecosystem.
Here are the key takeaways from this lesson:
- Every production Android app must be signed with a private release key.
- This key is stored in a password-protected keystore file and is identified by an alias.
- The
keytoolcommand-line utility is the standard way to generate a keystore. - You must back up your keystore file and securely store its credentials. Losing them means you can no longer update your application.
- Never commit your keystore file to version control.
With your signing key generated and secured, the next logical step is to teach your project's build system how to use it. In the next lesson, we will configure your Android project's build.gradle file to reference this keystore, preparing it for creating signed builds.
Can't find a good explanation? Sign up and we'll make it for you
Sign up