
In the last lesson, we successfully deployed and ran your app on a physical Android device, a significant step in the development workflow. This allowed you to see your web application functioning in a true mobile context. Now, we will shift our focus from running the app to formally defining its identity within the Android ecosystem.
This lesson concentrates on configuring the essential properties of your Android project. We will delve into the build.gradle file, the control center for your Android build process. You will learn to set the applicationId, versionCode, versionName, and various SDK versions. Mastering these configurations is not just a procedural step; it's fundamental for how the Android operating system, and ultimately the Google Play Store, will identify, manage, and distribute your application.
Understanding Android's Build Configuration with Gradle
Android projects use Gradle as their build automation system. Gradle processes a set of configuration files to compile your code, package resources, and produce a runnable application package (an APK or AAB). For a Capacitor project, the most important files for this process are located in the android directory:
android/app/build.gradle: This is the module-level configuration file for your main application. It's where we will define the core properties like versioning and the application ID.android/variables.gradle: Capacitor creates this file to centralize version numbers for various Android libraries and SDKs. This practice simplifies dependency management and updates.capacitor.config.ts: As you've seen before, this is Capacitor's primary configuration file. Certain values from here, like theappId, are synchronized to the native project's build files.
Part 1: The Application ID (applicationId)
The applicationId is the single most critical identifier for your app. It must be a unique string that serves as the app's universal identifier on Android devices and within the Google Play Store. Once you publish an app with a specific applicationId, you cannot change it. It follows the reverse domain name convention, similar to Java package names (e.g., com.yourcompany.yourapp).
In a Capacitor project, the source of truth for this ID is your capacitor.config.ts file.
- Set the
appIdincapacitor.config.ts: You should have already done this during theinitprocess, but it's crucial to verify it's correct and final.// capacitor.config.ts const config: CapacitorConfig = { appId: 'com.mycompany.myapp', // This should be your unique ID appName: 'My App', webDir: 'dist', // ... }; - Sync the configuration: When you run
bunx cap sync android, Capacitor reads theappIdfrom this file and writes it to theapplicationIdproperty insideandroid/app/build.gradle.
The following resource discusses this configuration, although it uses Ionic CLI commands, the principle for Capacitor is identical.
Building And Releasing Your Capacitor Android App - Ionic Blog
This blog post from Ionic provides context on Capacitor's configuration.
Focus on the first section, "Your Capacitor Configuration". It emphasizes the importance of setting a unique appId in the config file.
Part 2: Versioning Your App (versionCode and versionName)
Android uses two distinct properties for versioning:
versionCode: An integer that represents the version of your app internally. You must increment this number for every new version you upload to the Google Play Store. The store uses this code to determine if an update is available for users. A common practice is to simply start at1and increment by one for each release.versionName: A string that is displayed to the user (e.g., "1.0.2", "2.1-beta"). This is for human-readable versioning and can follow semantic versioning or any other scheme you prefer.
These values are set directly within the defaultConfig block of your android/app/build.gradle file.
Building And Releasing Your Capacitor Android App - Ionic Blog
This resource contains a clear example of a build.gradle file and explains the update process.
First, in the article, locate the code block showing the contents of the android/app/build.gradle file. Within the defaultConfig section, observe the <tf start="versionCode 1" end="versionName "1.0"">versionCode and versionName properties. Then, scroll down to the "Android App Update Process" section and read the paragraph that explains the role of versionCode in app updates.
Part 3: Defining SDK Compatibility
To ensure your app runs correctly across the vast landscape of Android devices, you must define which versions of the Android OS it supports. This is managed by three key properties:
minSdkVersion: The minimum Android API level required to run your app. A device with an OS version below this level will not be able to install your app.targetSdkVersion: The API level your app is designed and tested for. It's crucial to keep this updated. When Android introduces new security features or behavior changes, they are often applied only to apps that target the corresponding API level or higher.compileSdkVersion: The API level that Gradle uses to compile your app. This should generally be set to the latest available stable Android SDK version to allow you to use the newest APIs.
In a modern Capacitor project, these values are managed as variables in android/variables.gradle and then referenced in android/app/build.gradle. This centralization makes updates easier.
The following resource, an upgrade guide for Capacitor 6, provides the currently recommended values for these variables.
Updating to 6.0 | Capacitor Documentation
This official documentation provides the recommended SDK versions for projects using Capacitor 6.
In the "Android" section of the guide, find the subsection "Update Android Project Variables." Review the list of variables and their recommended values, paying close attention to the SDK versions. These are the standard, recommended settings for a new Capacitor project.
Your android/app/build.gradle file will reference these like so:minSdkVersion rootProject.ext.minSdkVersion
Part 4: Applying Configuration Changes
You can modify these properties in a few ways.
1. Direct Editing and Syncing
The most straightforward method is to open the Gradle files in a text editor or Android Studio and make changes directly.
- For
versionCodeandversionName, editandroid/app/build.gradle. - For SDK versions, edit
android/variables.gradle.
After editing any Gradle file, you must sync the project to make Android Studio aware of the changes. The IDE will usually show a banner prompting you to "Sync Now". If not, you can trigger it manually.
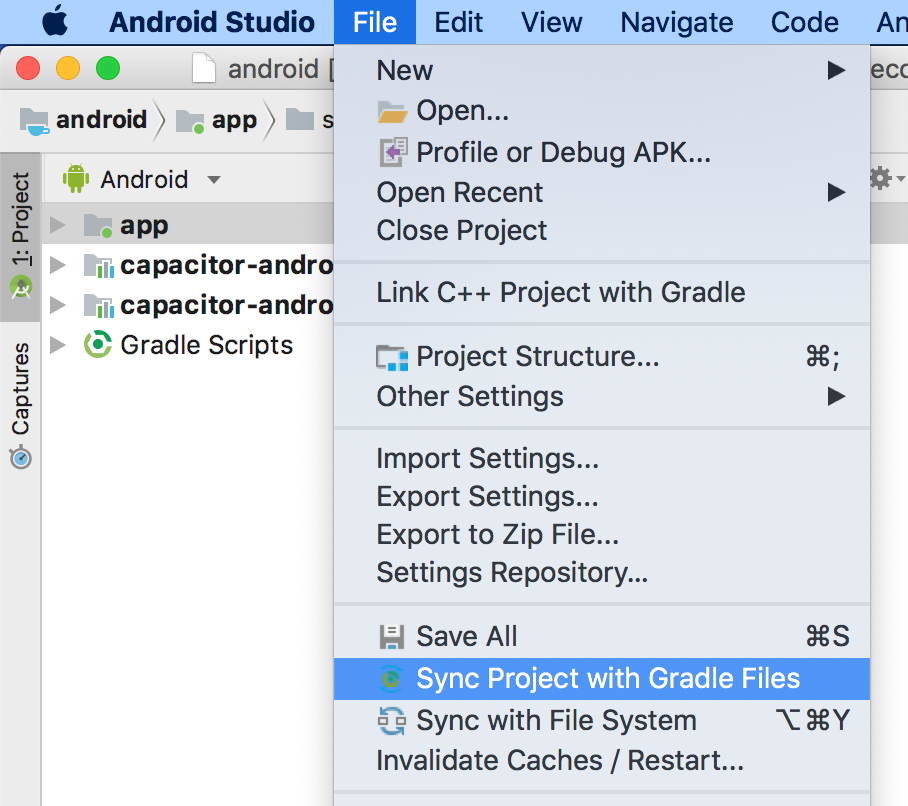
2. Using the Android Studio UI
Android Studio also provides a graphical interface for managing these settings. You can access it via File > Project Structure..., then select the app module.

3. Automation (A Look Ahead)
For your background leading large front-end projects, you'll appreciate that manual configuration can become tedious, especially in complex environments like multi-tenant or white-label applications. The Capacitor ecosystem has a powerful tool for this called capacitor-configure (part of a suite also known as Trapeze or the Project API).
This tool allows you to define all native project modifications—from versionCode increments to adding manifest permissions—in a YAML file or programmatically via a JavaScript API. This enables repeatable, version-controlled configuration changes, which is invaluable for CI/CD pipelines.
We won't implement this now, but understanding its existence is important. The following video by Ionic's co-founder introduces the motivation and capabilities of this tool.
Introducing Capacitor Configure
This video, "Introducing Capacitor Configure," provides a high-level overview of why automated configuration is needed and how the tool addresses it.
Watch the first part to understand the problem space, from the motivation behind building an automation tool. Then, skip to the section on Android capabilities to see what's possible, including modifying Gradle files intelligently. This gives you a glimpse into advanced project management with Capacitor.
Conclusion
In this lesson, you've learned to configure the foundational properties that define your Android application. These settings are no longer abstract placeholders but are now set to values that prepare your app for its lifecycle on user devices and the Google Play Store.
Here are the key takeaways:
- The
applicationIdis your app's permanent, unique identifier, sourced fromcapacitor.config.ts. versionCodeis an internal, incrementing integer for the Play Store, whileversionNameis the user-facing version string. Both are set inandroid/app/build.gradle.minSdkVersion,targetSdkVersion, andcompileSdkVersioncontrol your app's compatibility and behavior across different Android OS versions. They are typically managed inandroid/variables.gradle.- Any changes to Gradle files require a project sync in Android Studio to take effect.
With your app's identity now properly configured, the next logical step is to give it a unique visual identity. In our next lesson, we will focus on branding by customizing the Android app icon, including adaptive icons, and the splash screen that appears on launch.
Can't find a good explanation? Sign up and we'll make it for you
Sign up