
Welcome to our next lesson. In our previous session, we successfully configured the Android development environment and ran your application on an emulator using both the Capacitor CLI and Android Studio. While emulators are excellent for general development, testing on physical hardware is an indispensable part of the process. It allows you to assess real-world performance, interact with actual device sensors, and uncover hardware-specific quirks that emulators cannot replicate.
Today, we will bridge the gap between virtual and physical by deploying and running your Capacitor-wrapped React SPA directly on an Android device. To achieve this, we will cover the essential one-time setup of enabling your device for development and then walk through the deployment process using the same CLI and IDE workflows you learned in the last lesson.
Part 1: Enabling Developer Mode and USB Debugging
By default, Android devices hide settings intended for developers to prevent users from accidentally altering system behavior. To prepare your device for development, you must first unlock this hidden "Developer options" menu and then enable a specific feature called USB debugging.
USB debugging allows your development machine to communicate with the Android device over a USB connection. This communication is facilitated by a tool called the Android Debug Bridge (ADB), which Android Studio and the Capacitor CLI use behind the scenes to install your app, view logs, and perform other debugging tasks.
The process for enabling developer options involves repeatedly tapping the "Build number" in your device's settings. However, the exact location of this item varies by manufacturer. The following guide provides clear, step-by-step instructions for most major Android device brands.
How to Enable or Disable Developer Options on Android - Capawesome
This article from Capawesome provides a concise guide to enabling developer mode and debugging on various Android devices.
First, read the introduction to understand the purpose of developer options. Then, find the section that matches your device's manufacturer (e.g., Google Pixel, Samsung, Huawei, Xiaomi) and follow the specific instructions to unlock the "Developer options" menu. Once enabled, locate and activate the "USB debugging" toggle as described. Finally, read the conclusion for a summary of the general pattern.
After following the steps for your device, you should see a "Developer options" menu, and within it, the "USB debugging" setting will be enabled.
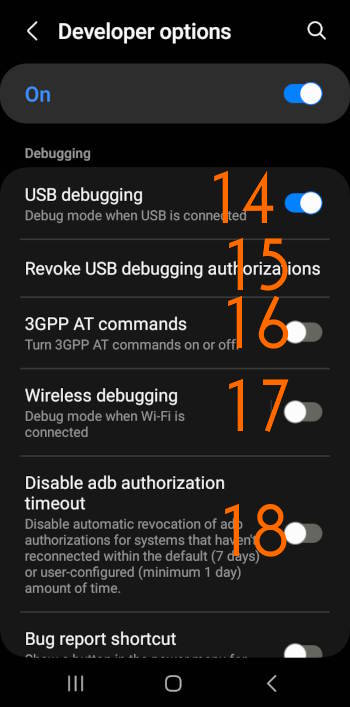
Part 2: Connecting and Authorizing Your Device
With USB debugging enabled, you are ready to connect the device to your computer.
- Connect via USB: Use a high-quality USB cable to connect your Android device to your computer.
- Authorize the Connection: The first time you connect with USB debugging enabled, a dialog box will appear on your device's screen with the message "Allow USB debugging?" and your computer's RSA key fingerprint. You must grant permission for the connection to be established. For convenience, you can check the box that says "Always allow from this computer" to avoid this prompt in the future for your specific machine.
If you don't see this prompt, try unplugging and replugging the device. Ensure your device is unlocked when you connect it.
Part 3: Running the App on Your Physical Device
Now that your device is connected and authorized, it will appear as a valid target for deployment, just like the emulator. You can launch your app using either the Capacitor CLI or Android Studio.
Method 1: Using the Capacitor CLI
The run command remains the quickest way to get your app onto the device.
- Connect your unlocked device to your computer.
- From the root of your Turborepo workspace, execute the following command:
# This command syncs, builds, and runs the app on a connected device
bunx cap run android
The CLI will build the project and then present a list of available targets. In addition to any emulators you have, you should now see your physical Android device listed. Select it, and the CLI will proceed to install and launch the application on its screen.
This workflow is identical to the one you used for the emulator, reinforcing the power of the Capacitor toolchain. The official documentation confirms this process.
Capacitor Android Documentation | Capacitor Documentation
This section of the official Capacitor documentation recaps the run command.
Review the short section Running on the Command-Line. Notice that the command does not change whether you are targeting an emulator or a physical device.
Method 2: Using Android Studio
For tasks requiring deeper native inspection or debugging, launching from Android Studio is the preferred method.
- Make sure your project is open in Android Studio. If it's not, run
bunx cap open androidfrom your terminal. - Once the project has synced, look at the toolbar at the top of the Android Studio window. Your physical device should now be listed in the device selection dropdown menu.
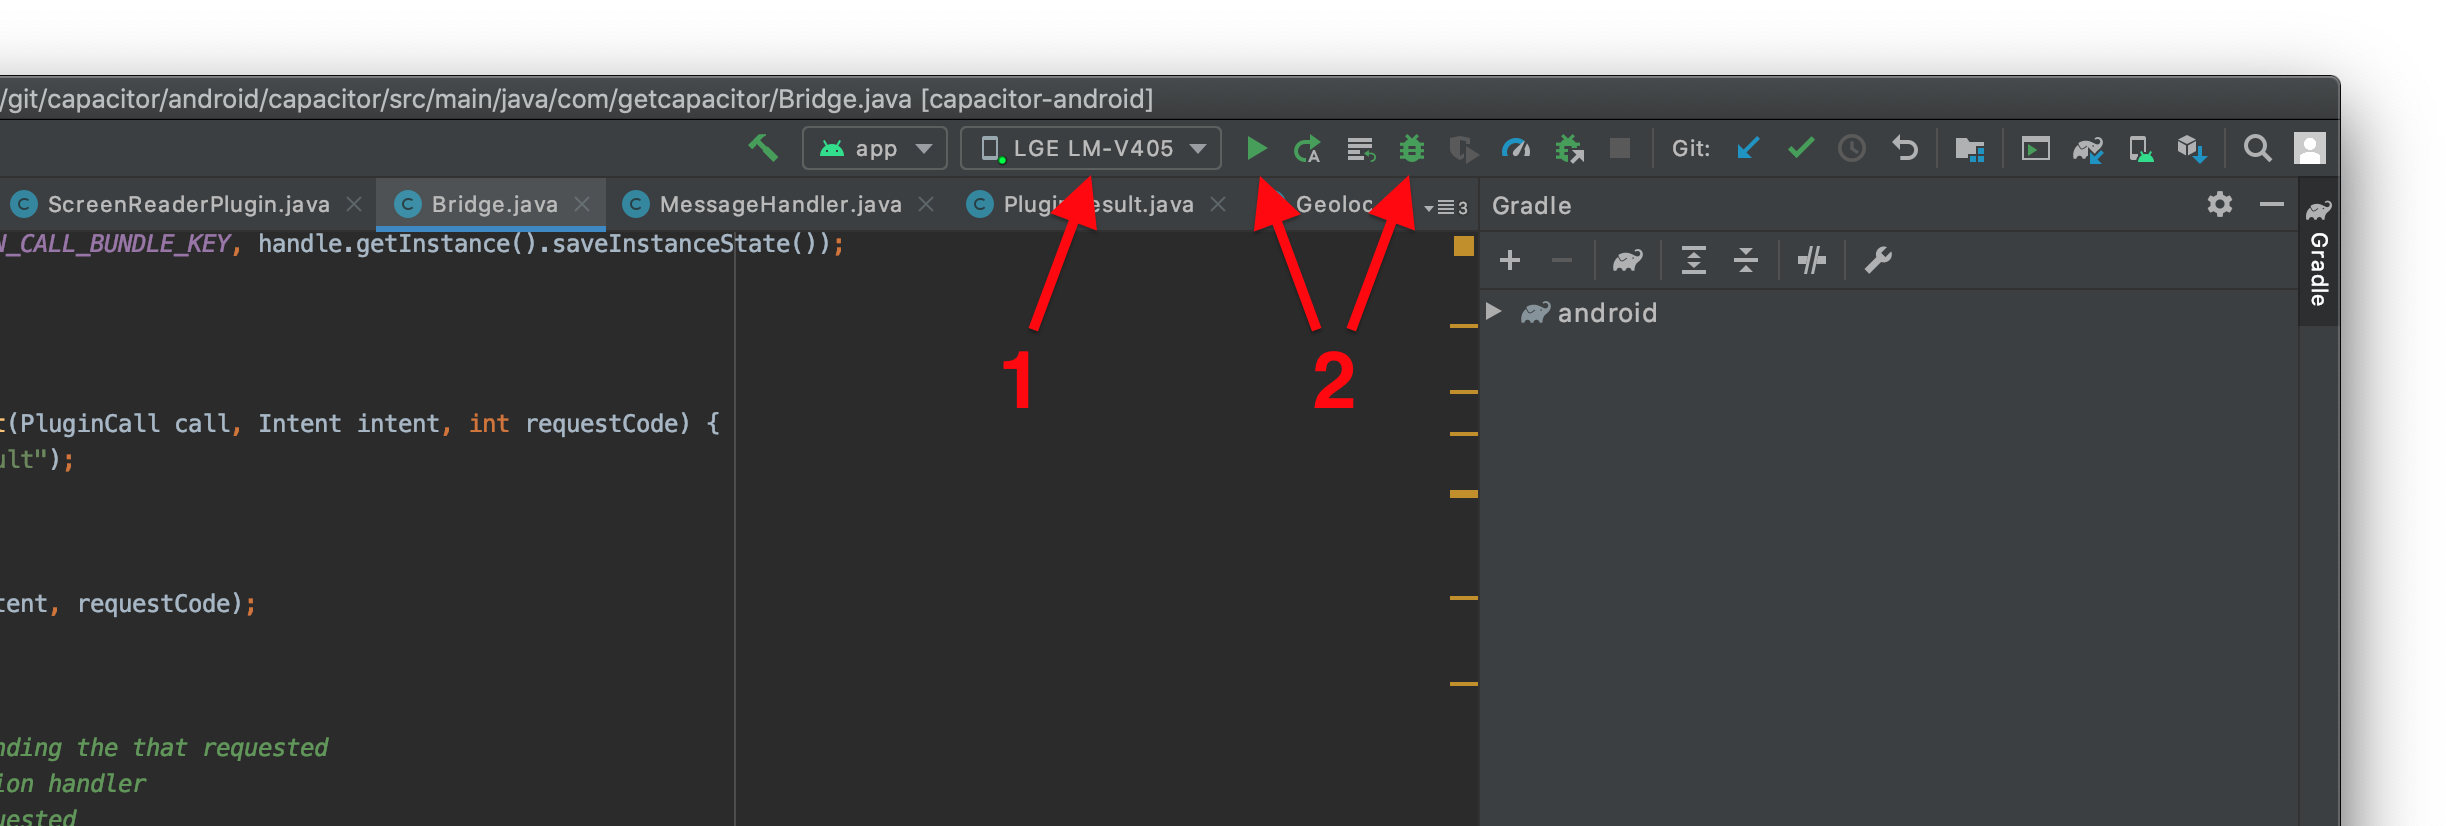
- Select your physical device from the dropdown menu (indicated by arrow
1in the image above). - Click the green 'Run' button (the triangle icon indicated by arrow
2).
Android Studio will compile, install, and launch the app on your connected device. You can now use tools like Logcat (accessible via a tab at the bottom of the IDE) to view real-time logs directly from your physical hardware, which is invaluable for debugging.
Conclusion
You have now successfully deployed and run your application on a physical Android device, completing a critical milestone in mobile development. This allows for authentic testing and provides access to hardware features that emulators can only simulate.
Here are the key takeaways from this lesson:
- Developer Mode must be enabled on your Android device by tapping the "Build number" multiple times.
- USB Debugging must be activated within the Developer options menu to allow your computer to communicate with the device.
- Your computer must be authorized via a prompt on the device screen upon the first USB connection.
- Once configured, a physical device can be targeted for deployment using both the
bunx cap run androidcommand and the device selector within Android Studio.
In our next lesson, we will continue to formalize the Android project by configuring essential properties in the build.gradle file, such as the applicationId, versionCode, and versionName. These settings are crucial for identifying your app on the device and are prerequisites for preparing it for the Google Play Store.
Can't find a good explanation? Sign up and we'll make it for you
Sign up