
Hello! Welcome back.
In our last lesson, we dove deep into the client side, using browser developer tools to dissect and debug the HTML, CSS, and JavaScript that render in the user's browser. This gave you a powerful lens to find vulnerabilities that originate on the client.
Today, we take a step back to look at the server that delivers all that client-side code. The learning outcome for this lesson is to identify web server technologies, frameworks, and potential misconfigurations using tools like Nikto and Wappalyzer. This process, often called fingerprinting, is a critical part of reconnaissance. Knowing what software a target is running allows you to quickly check for known vulnerabilities—a common path to your first bug bounty.
1. What Are We Up Against? The Art of Fingerprinting
Before launching an attack, a skilled professional first identifies their target's technology stack. Is it running on an Nginx or Apache web server? Is the backend built with PHP, Node.js, or Java? Is it a standard WordPress site or a custom-built application?
Answering these questions is crucial because every piece of software has a history of vulnerabilities. If you can identify an outdated version of a framework or server, you can often find a public exploit for it, turning a complex assessment into a straightforward win.
We will explore two complementary approaches:
- Passive Fingerprinting: Analyzing information the server freely gives away without sending suspicious requests.
- Active Scanning: Probing the server with specific tests to uncover misconfigurations and known weaknesses.
Let's start with the simplest and safest method.
2. Passive Fingerprinting: Reading the Signs
Passive techniques are your first step. They are quiet, unlikely to be detected, and can be performed right from your browser. The idea is to gather intelligence from the information a web server willingly provides in its normal operation.
HTTP fingerprinting: reconning for web apps' hidden flaws
The article 'HTTP fingerprinting' from YesWeHack provides an excellent overview of the manual techniques involved. It will help you understand what our automated tools are looking for under the hood.
Please read the introduction ('What is HTTP fingerprinting?'), and then skim the sections on 'HTTP header analysis', 'Default error pages', 'Identifying default file and directory structures', 'Analysing cookie parameters', and 'Passive fingerprinting via third-party services'. Focus on understanding the types of clues a server provides, such as Server headers, cookie names like PHPSESSID, and default error pages.
As the article you just read explains, you can learn a lot by simply observing. Your developer tools from the last lesson are perfect for this. In the Network tab, inspect the response headers for clues.
However, manually checking every site is slow. This is where browser extensions like Wappalyzer come in. Wappalyzer automatically analyzes the page's code, headers, and scripts to identify dozens of technologies in seconds. It is an essential tool for any bug bounty hunter. If you haven't already, you should install its browser extension now. It's the quickest way to get an initial read on a target.
3. Active Scanning with Nikto
Passive fingerprinting is great, but it only shows you what the server wants you to see. To find real weaknesses, you often need to be more aggressive. This is where an active vulnerability scanner like Nikto comes in.
Nikto is a classic, open-source web server scanner that performs thousands of tests to find potential vulnerabilities. It checks for:
- Outdated server software (e.g., Apache 2.4.41)
- Dangerous files left on the server (e.g.,
config.bak,admin.php) - Insecure server configurations (e.g., directory indexing enabled)
- Missing security headers
Let's see how it works in practice.
Scan for Vulnerabilities on Any Website Using Nikto [Tutorial]
First, watch this short segment from the Null Byte channel. It explains Nikto's role within a professional penetration testing workflow, showing how it fits between initial reconnaissance and active exploitation.
Watch from the beginning to 02:45. Pay attention to how Nikto is described as a tool to find a 'weakest link' and guide your next steps.
Now that you understand why we use Nikto, let's look at how to use it. The following video provides a clear, step-by-step tutorial.
Nikto Tutorial | Web Application Security Testing Made Easy
This tutorial from KeepItTechie will walk you through running a Nikto scan and interpreting its results. We will break it down into key steps.
Follow along with the video. You can install Nikto on Kali Linux with sudo apt install nikto. Running a Basic Scan (04:38 - 08:11): Observe the basic command nikto -h <domain> and the initial output. Notice how it identifies the server type (Apache), OS (Ubuntu), and missing security headers. Scanning SSL/TLS (08:30 - 10:18): See how to explicitly scan the HTTPS port using the -ssl flag, which reveals certificate information. Analyzing the Full Output (10:18 - 12:30): The presenter reviews the full scan results, pointing out findings like ETag leaks and links to vulnerability databases (like osvdb.org, now defunct but the principle remains). This is the most important part. Scanning Multiple Targets & Saving Output (12:30 - 17:15): Briefly watch how you can scan a list of hosts from a file and save your output using the -o and -Format flags. This is crucial for managing larger engagements.
Interpreting Nikto's Output
The output from Nikto can be dense, but it's packed with valuable leads. Let's look at a static example to break it down.
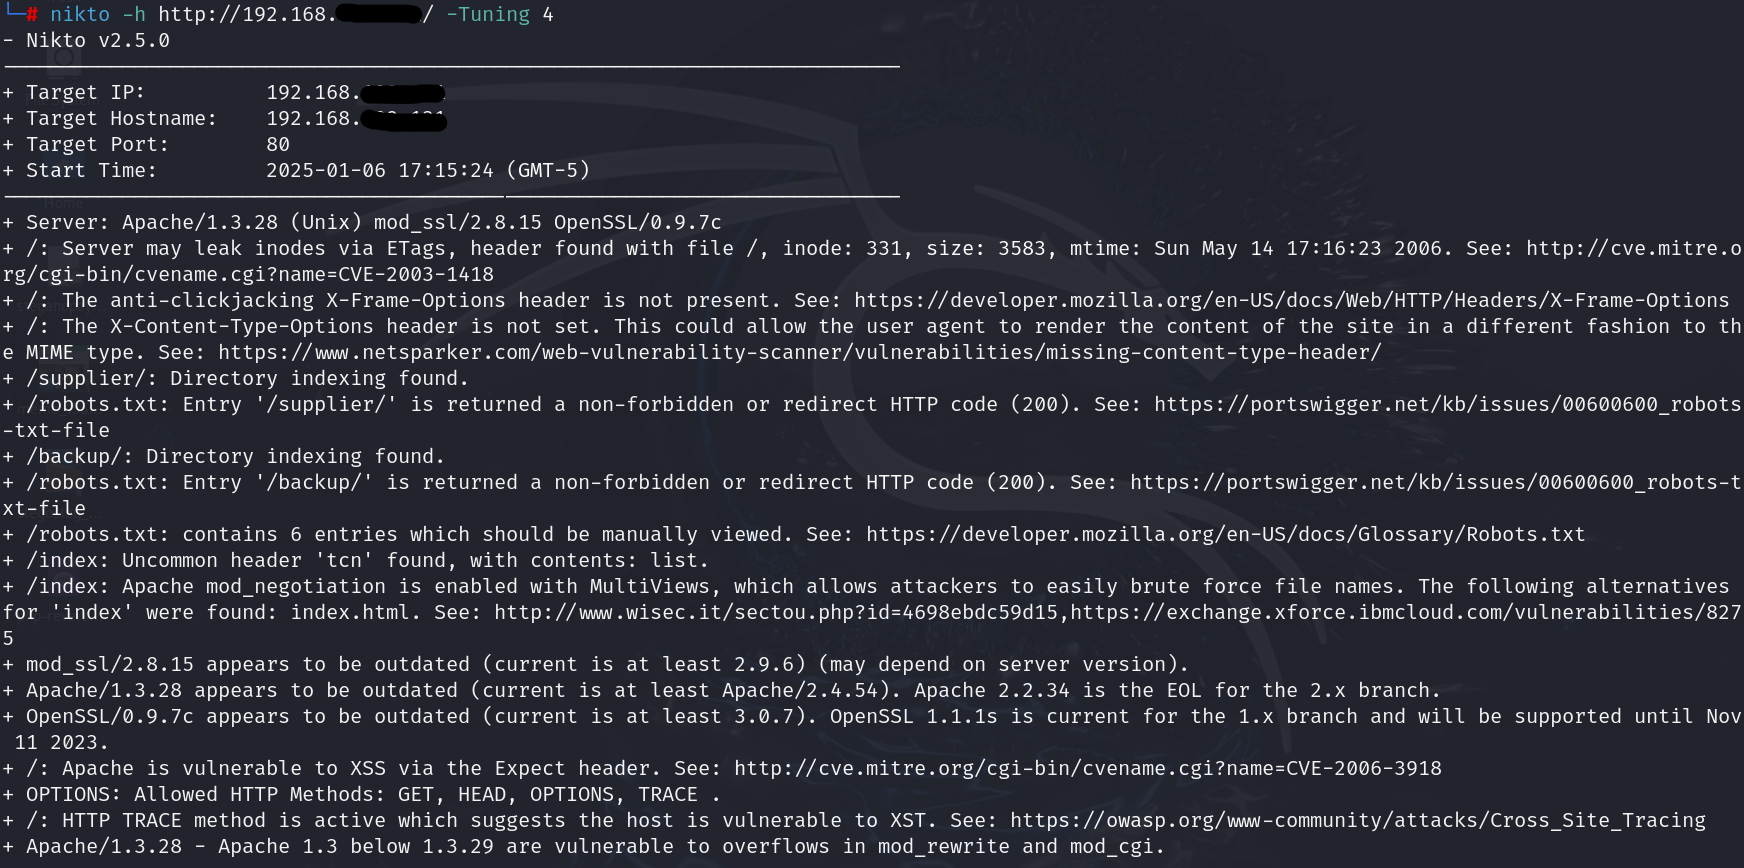
When you get a report like this, here’s what you should look for:
- Server Banner:
Apache/1.3.28,OpenSSL/0.9.7c. Your first action should be to Google these versions followed by "exploit" or "vulnerability." Outdated software is low-hanging fruit. - Misconfigurations:
Directory indexing found for /supplier/. This is a high-priority finding. You should immediately browse to that directory to see if any sensitive files are exposed. - Missing Security Headers:
The anti-clickjacking X-Frame-Options header is not present.While not directly exploitable on its own, this indicates a lack of security hardening and is often worth reporting. - Vulnerability IDs: Nikto often provides OSVDB, BID, or CVE identifiers. These are direct links to databases describing the vulnerability in detail, which is exactly what you need to craft an exploit or write a report.
Test your understanding!
You run a Nikto scan against a target and find the following lines in the output:
+ Server: SomeOldCMS/1.2.3
+ /config.php.bak: A backup of the config file was found.
+ The X-Content-Type-Options header is not set.
+ /admin/: Admin login page found.
Which of these findings is likely the most critical and what would be your immediate next step?
Show answer
The most critical finding is /config.php.bak. A backup configuration file could contain plaintext database credentials, API keys, or other secrets.
Your immediate next step would be to use your browser or a tool like curl to try and download that file (e.g., curl http://target.com/config.php.bak) and examine its contents.
4. Building a Reliable Workflow
While tools are powerful, a professional uses them within a structured workflow, cross-referencing findings to build confidence. A common mistake is to blindly trust the Server: header, which can be easily faked.
The article 'Fingerprinting Web Server' is a fantastic, hands-on guide that summarizes many techniques and provides advice on interpreting results.
Please read sections 2 ('Automated fingerprinting tools'), 5 ('Interpreting results'), and 10 ('How to report findings'). Focus on these key ideas: Tooling: Note the mention of WhatWeb, another excellent fingerprinting tool that complements Nikto. Interpretation: The advice that the Server: header is untrusted and that concordance = confidence is a vital professional lesson. Reporting: The final section gives you a template for turning your findings into a valuable bug bounty report.
A Simple, Effective Workflow
- Initial Fly-by: Browse the target application with Wappalyzer and browser DevTools active. Get a quick feel for the tech stack (React, PHP, etc.) and look at response headers.
- Active Scan: Run Nikto against the host (
nikto -h <host> -ssl). This gives you a broad list of potential issues. - Verification & Deep Dive: For each interesting finding from Nikto:
- Outdated Version? Search Exploit-DB and CVE databases.
- Interesting File/Directory? Try to access it in your browser.
- Misconfiguration? Research the implication and how to test for it.
- Synthesize: Combine your findings. If Wappalyzer says it's a WordPress site, and Nikto finds a vulnerable plugin version, your confidence is high. If the
Serverheader says "IIS" but everything else points to Linux/Apache, you're likely dealing with a proxy, which is itself useful information.
A Word of Caution: Nikto is an active scanner. It sends thousands of requests, many of which look malicious. This is "noisy" and easily detectable. Never run it against a target without permission. On a bug bounty program, ensure such automated scanning is within the scope and rules of engagement.
Conclusion
You've now learned how to peel back the layers of a web application to identify the underlying technologies that power it. This is a fundamental skill that separates script kiddies from professional security researchers. By knowing what you're up against, you can intelligently select your tools and attacks.
Key Takeaways:
- Fingerprinting is the process of identifying a web server's technologies, frameworks, and software versions.
- Passive tools like Wappalyzer provide a quick, safe first look at the technology stack.
- Active scanners like Nikto probe for thousands of known misconfigurations, outdated files, and other vulnerabilities.
- The goal is to connect a specific software version to a publicly known vulnerability (CVE) or to find a critical misconfiguration that grants you access.
- Always cross-reference findings from multiple tools and manual checks to build confidence and avoid being misled by fake server information.
Next Lesson Preview:
In this lesson, we used tools to find known vulnerabilities in common server software. In the next lesson, we will shift our focus back to the custom logic of the application itself. We'll learn how to enumerate API endpoints by analyzing application traffic and client-side JavaScript files. This will bridge the gap between general server scanning and understanding the unique attack surface of the specific application you are testing.