
Hello. In the last lesson, you traced an event from a producer into a topic partition and out to independent consumer groups. Now you will run the broker that makes that path real.
This is the practical portion of the Kafka Foundations and a Local KRaft Lab module. By the end, you will have a single Kafka node running in Docker, understand why it is a KRaft deployment, and verify that a Kafka client can reach it. We will deliberately stop before creating topics and sending records—that is the focus of the next lesson.
KRaft in the local lab
Older Kafka deployments required a separate ZooKeeper service to manage cluster metadata and controller election. KRaft—Kafka Raft—is Kafka’s built-in mechanism for maintaining that metadata and coordinating controllers. A modern Kafka deployment can therefore run without ZooKeeper.
For a production cluster, the roles are commonly separated:
- Brokers store topic partitions and serve producer and consumer requests.
- Controllers manage cluster metadata, such as topic definitions and partition leadership.
- Multiple nodes provide fault tolerance.
For this lab, one Kafka node performs both roles:
| Role | What the local node does |
|---|---|
| Broker | Accepts client connections and will store topic partitions |
| Controller | Maintains the local cluster’s metadata |
| KRaft quorum | Contains one controller voter: itself |
This is called combined mode. It is convenient for development, but it has no redundancy: if the container is unavailable, so is Kafka.
Watch this brief overview to place the lab in context. Focus on the distinction between KRaft itself and the older ZooKeeper-based architecture; you do not need to study multi-node layouts yet.
Kafka Without Zookeeper? Setting Up KRaft Mode!
“Kafka Without Zookeeper? Setting Up KRaft Mode!” by SWE with Vivek Bharatha introduces KRaft as Kafka’s built-in replacement for ZooKeeper in controller election and metadata management.
Watch the KRaft overview. Listen for the two jobs KRaft takes over: controller election and metadata administration.
The official apache/kafka Docker image provides a fast path for this kind of local KRaft broker. Read the setup portion below before running commands, particularly the distinction between starting a process and proving that a Kafka client can communicate with it.
Developing event-driven applications with Kafka and Docker | Docker Docs
Read Docker’s Kafka guide for the official-image launch command and its cluster-ID connectivity check. It also explains why port 9092 must be published when an application runs on your host rather than inside the Kafka container.
In Launching Kafka, read the Starting Kafka subsection from the launch steps. Focus on the docker run command and the kafka-cluster.sh cluster-id verification command; ignore the later Node.js application material. Then, in Connecting to Kafka from a non-containerized app, read the opening explanation in External clients, from the port mapping explanation. Stop before the instructions to download Kafka tools onto the host, since this lesson uses the tools already packaged in the container.
Start the broker
1. Confirm Docker is available
Ensure Docker Desktop or the Docker daemon is running, then run:
docker version
You should see both a Client and a Server section. If the Server section is missing, Docker itself is not running yet.
2. Launch Kafka
Run this command from any working directory:
docker run -d --name kafka -p 9092:9092 apache/kafka:latest
Here is what each part does:
| Fragment | Meaning |
|---|---|
docker run | Creates and starts a container from an image |
-d | Runs the container in the background |
--name kafka | Gives the container a stable, convenient name |
-p 9092:9092 | Publishes container port 9092 on port 9092 of your host |
apache/kafka:latest | Uses the official Apache Kafka image |
Docker will download the image on the first run, which can take longer than subsequent starts. The command returns a long container ID if Docker successfully creates the container.
For a short-lived learning environment, the latest tag is acceptable and matches the curated quick-start material. In a team project or production setting, use a tested, explicitly pinned image version so that a rebuild does not silently change Kafka versions.
3. Check the container lifecycle
Now inspect the container:
docker ps --filter "name=kafka"
You want its status to say Up. A typical abbreviated result looks like:
CONTAINER ID   IMAGE                 STATUS         PORTS
...            apache/kafka:latest   Up ...         0.0.0.0:9092->9092/tcp
There are two distinct checks in that output:
Upmeans Docker still has the Kafka process running.0.0.0.0:9092->9092/tcpmeans Docker has published the broker’s client port to your host.
Neither check alone proves the broker is ready to answer Kafka protocol requests. Kafka needs a brief initialization period, especially immediately after the image download. The next command is the meaningful readiness check.
Verify Kafka, not merely Docker
Run Kafka’s cluster inspection script inside the running container:
docker exec -it kafka /opt/kafka/bin/kafka-cluster.sh cluster-id --bootstrap-server localhost:9092
Expected result:
Cluster ID: <an opaque cluster identifier>
Your identifier will be different. The important fact is that you receive a cluster ID rather than a connection error.
This one command establishes several things:
- the
kafkacontainer is running; - Kafka has completed startup;
- the broker is listening at its client endpoint on port
9092; - a Kafka client can bootstrap against the broker;
- the broker can return cluster metadata.
A bootstrap server is the initial Kafka address a client contacts. It is not necessarily the only broker a client will use in a larger cluster. Kafka returns metadata telling clients which brokers lead the relevant partitions. In this one-broker lab, localhost:9092 is both the bootstrap address and the only broker endpoint you need.
If the first attempt reports a connection failure, wait several seconds and run the same command again. Do not treat a merely running Docker container as proof that Kafka initialization is complete.
For an additional, host-side confirmation of the port mapping, run:
docker port kafka 9092
It should report a host address and port, normally port 9092. This confirms Docker’s forwarding rule. The cluster-ID command remains the stronger test because it checks Kafka communication rather than only Docker networking.
Why localhost needs careful interpretation
The word localhost always means the machine where the client process runs.
- In the
docker execcommand, the client runs inside the Kafka container, solocalhost:9092means the broker listener inside that container. - In the Java and Spring Boot applications you will run later from your host machine,
localhost:9092means your own host. Docker forwards that request through the published port to Kafka.
The Kafka Docker networking paths diagram makes the distinction visible.
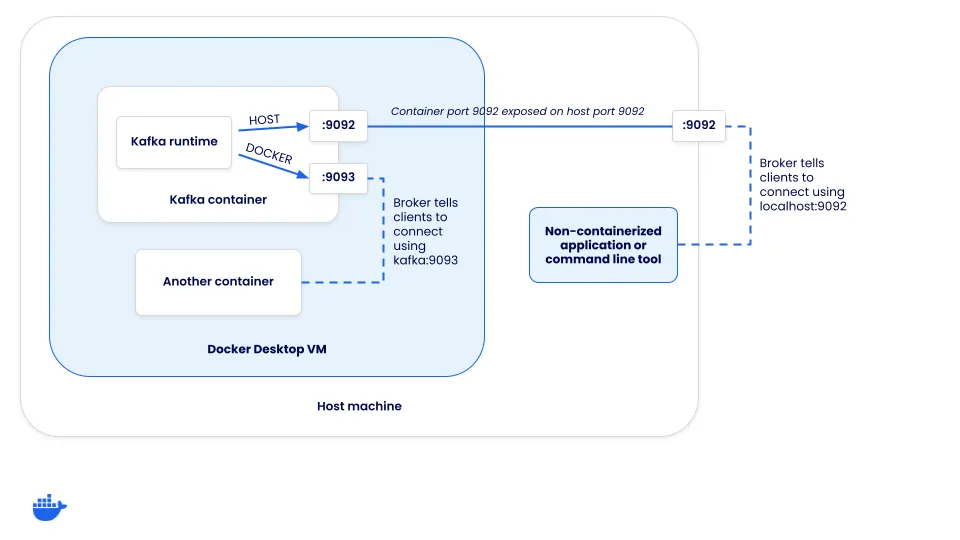
The diagram highlights a Kafka-specific networking issue: a client first contacts a bootstrap address, but then Kafka tells it which address to use for ongoing communication. That returned address is governed by Kafka’s advertised listeners configuration.
For this course’s simple environment, keep the situation narrow:
- run the broker in Docker;
- publish port
9092; - run Java and Spring Boot applications directly on your host;
- connect those applications to
localhost:9092.
When both Kafka and clients run in separate containers, listener configuration becomes more involved. In that situation, Kafka generally needs an address resolvable on the Docker network, rather than an address such as the client container’s own localhost. We will not add that complexity to this single-node lab.
A small operational routine
Keep this broker available for the next lessons. These commands control its lifecycle:
docker stop kafka
Stops Kafka while preserving the container.
docker start kafka
Starts the existing container again.
docker logs kafka --tail 100
Shows the most recent broker startup or error messages.
docker rm -f kafka
Stops and removes the container. Use this only when you deliberately want to discard this local environment. Without a named volume, records stored only in the container filesystem are removed with the container.
Common first-run failures
| Symptom | Likely cause | First action |
|---|---|---|
Cannot connect to the Docker daemon | Docker Desktop or Docker daemon is not running | Start Docker, then rerun the command |
Port binding error mentioning 9092 | Another process or container already uses port 9092 | Find the conflicting service, stop it, or choose a different host port |
Container status is Exited | Kafka startup encountered a configuration or environment issue | Run docker logs kafka --tail 100 |
Connection refused from kafka-cluster.sh | Broker is still initializing, or it exited shortly after startup | Check docker ps -a, wait briefly if it is still Up, then inspect logs |
No such container: kafka | The container name differs, or it was removed | Run docker ps -a and use the actual name |
Avoid trying random Kafka configuration variables at this stage. The point of using the official quick-start image is to establish one known-good baseline before you begin changing topic, producer, consumer, or listener settings.
Takeaways
You now have a local Kafka environment with these properties:
- It runs as one Docker container named
kafka. - It uses modern KRaft operation, with no separate ZooKeeper container.
- Its single node combines the broker and controller roles, which is appropriate for learning but not fault tolerant.
- Docker publishes Kafka’s client port through
-p 9092:9092. docker pschecks the container lifecycle, whilekafka-cluster.sh cluster-idverifies that a Kafka client can actually reach a ready broker.
Next, you will use Kafka’s command-line tools to create and inspect a topic, then produce and consume a few test records.
Can't find a good explanation? Sign up and we'll make it for you
Sign up