
Welcome back. Your shooting-range scene now has a floor, walls, and a directional light. You placed those room pieces by entering positions in the Inspector, but this lesson makes that action predictable: every 3D object has a transform that describes where it is, how it is oriented, and how large it is.
You will use transforms both as precise Inspector values and as viewport tools. More importantly, you will see why a child node’s position is not necessarily its position in the whole game world. This parent-child behavior will soon let us build a player whose body turns horizontally while its camera can look vertically.
One coordinate system, three transform properties
Godot’s 3D world uses meters. Its fixed, global axes are:
- X (red): left and right
- Y (green): up and down
- Z (blue): front and back
A Node3D has three editable transform properties:
| Property | What it changes | Example in the shooting range |
|---|---|---|
| Position | Location | Moving a prop from one side of the room to the other |
| Rotation | Orientation | Turning a light so it shines in a different direction |
| Scale | Size along X, Y, and Z | Making a decorative box wider or shorter |
The Inspector’s Transform section exposes these values. For normal scene building, entering exact values here is often more dependable than dragging objects until they merely look right.
Introduction to 3D — Godot Engine (stable) documentation in English
Read the relevant parts of Godot’s official “Introduction to 3D” documentation. It establishes the world-axis convention, then connects it to the transform gizmos and the local transform stored by every Node3D.
In “Coordinate system,” read the axis convention, paying attention to the fixed meaning of X, Y, and Z. Then continue into “Space and manipulation gizmos” and read the gizmo controls. Finally, in “Node3D node,” read the local-transform explanation. Focus on the word relative: it is the key distinction of this lesson.
The editor’s colored controls represent those same axes. The arrows are for moving, the curved rings are for rotating, and the cubes are for scaling.
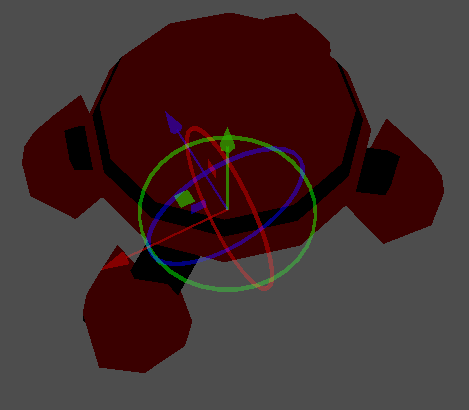
The most useful shortcuts while arranging a scene are:
| Action | Shortcut | Use |
|---|---|---|
| Move mode | W | Drag an axis arrow or a plane handle |
| Rotate mode | E | Drag a colored rotation ring |
| Scale mode | R | Drag an axis cube or the center for uniform scale |
| Frame selected node | F | Bring a distant selected object into view |
| Toggle local gizmo space | T | Align gizmo axes to the selected node’s rotation |
| Toggle snapping | Y | Use increments for steadier editing |
Holding Ctrl while moving or rotating temporarily snaps the action. This is useful for rough room layout, but type exact Inspector values when the geometry must align exactly.
Local space: the coordinate system supplied by a parent
A transform is called local when it is measured relative to the node’s parent. In a scene tree, this is the default meaning of a node’s Position, Rotation, and Scale values.
Consider a DemoBlock that is a child of a Pivot node:
Main
└─ TransformLab
   └─ Pivot
      └─ DemoBlock
If DemoBlock has local position , that does not mean “two meters from the world origin.” It means:
Place this block two meters along the Pivot node’s local negative-Z direction.
If Pivot moves, rotates, or scales, DemoBlock inherits that change. Its own local values can remain unchanged even though its actual location and orientation in the world have changed substantially.
A node’s global transform is its final transform in the game world after Godot combines the transforms of every Node3D ancestor. Conceptually:
You do not need to calculate that product by hand. Godot performs it whenever it draws a node, evaluates its collision, or provides a node’s global_transform to a script. The important design habit is to decide which behavior belongs to the parent and which belongs to the child.
For example:
- Move a parent when an entire assembly should move together.
- Rotate a parent when the assembly should turn together.
- Change a child’s local position when adjusting its offset within that assembly.
- Use a child
Node3Das a pivot when an object should orbit or rotate around a point other than its own center.
This is not merely scene-tree organization. The tree creates a spatial relationship.
Using 3D transforms - Godot Docs
Godot’s “Using 3D Transforms” documentation gives a slightly deeper view of what a transform contains. Read it for the useful mental model of an origin plus oriented axes; do not worry about writing transform math yet.
In “Introducing transforms,” start at the paragraph beginning “Godot uses Transform3D” and read through the explanation of the origin. Note the distinction between transform, which is relative to a parent, and global_transform, which represents world-space data. In the following visualization discussion, use the basis explanation to connect a rotated gizmo to the node’s internal axes. The later scripting techniques are useful reference material, but are not required for this build session.
At the default rotation, local and global directions happen to line up. That agreement can hide the distinction. Rotate a parent by degrees around Y, however, and the child’s local negative-Z direction now points diagonally through the world. This is why a carefully structured hierarchy becomes so valuable in a 3D game.
Global space is the fixed world; local gizmo space follows the node
There are two related ideas that are easy to mix up:
- Local versus global transform data describes how a node is positioned in the scene hierarchy.
- Local versus global gizmo space describes the orientation of the editor handles while you manipulate that node.
Pressing T only changes the second item. It changes the gizmo display; it does not rewrite your node’s transforms or change the parent-child relationship.
Suppose you rotate a box degrees around Y:
- In global gizmo space, its red handle remains parallel to the world X axis and its blue handle remains parallel to world Z.
- In local gizmo space, the handles turn with the box. Dragging the blue handle moves the box along its own facing direction.
For a rotated prop, use local gizmo space when you mean “move it forward relative to itself.” Use global gizmo space when you mean “move it one meter right across the room,” regardless of its rotation.
Watch Brackeys’ “How to make 3D Games in Godot” for a compact visual demonstration of the transform tools and the local-space toggle.
Watch transform editing. Notice the distinction between moving with world-aligned handles and toggling local mode so the handles align with the object. The segment also demonstrates snapping and the move, rotate, and scale tools.
The camera makes local direction especially important. Godot cameras view along their local negative-Z axis. A future player camera can therefore turn with its parent while always viewing “forward” in the camera’s own coordinate system.

For the range you built last lesson, the back wall is at negative Z. A player looking toward that wall will eventually use this camera convention naturally. For now, retain the simpler rule: negative Z is the direction a default Godot camera looks.
Build a small transform lab in your range
Rather than disturb the floor and walls, create a visible three-node assembly solely for experimenting with local and global transforms. It is a temporary scene-building tool, not a gameplay target.
In the Scene dock, select Main and add a child Node3D named TransformLab. Set its local Transform values in the Inspector:
Leave its rotation at and scale at .
Add a Node3D child under TransformLab named Pivot. Give Pivot this local position:
Finally, add a MeshInstance3D as a child of Pivot, name it DemoBlock, and assign a new BoxMesh. Set the BoxMesh Size to:
Then set DemoBlock’s local position to:
Your tree should be:
Main (Node3D)
├─ Ground
├─ BackWall
├─ LeftWall
├─ RightWall
├─ RangeLight
└─ TransformLab (Node3D)
   └─ Pivot (Node3D)
      └─ DemoBlock (MeshInstance3D)
With no rotations or scales, you can calculate the block’s initial world position by adding the offsets:
| Node | Local position | Global position |
|---|---|---|
TransformLab | ||
Pivot | ||
DemoBlock |
The value shown for DemoBlock in the Inspector remains , because the Inspector is showing its local transform. Its computed global position is .
Now select Pivot and set:
The block should sweep around Pivot and rotate with it. Crucially, select DemoBlock afterward: its local Position is still . Nothing about the child’s own offset changed; only the coordinate system supplied by the parent rotated.
Next, move TransformLab along X using the red arrow in global gizmo space. The entire assembly moves. Then rotate TransformLab around Y. Both Pivot and DemoBlock follow because each is a descendant.
This little rig demonstrates the key rule:
Editing a parent changes the global transforms of its descendants. Editing a child’s local transform changes its placement within the parent’s coordinate system.
When finished, leave TransformLab in the scene for now. It is useful visual evidence while learning. You can remove it later once the behavior feels routine.
Resize deliberately: scale is inherited too
Scale is part of a transform, so it also travels down the scene tree. Select DemoBlock and set:
The box becomes wider and flatter. Its local scale says “stretch along my X axis, compress along my Y axis.” Because Pivot is rotated, that local X direction is not necessarily parallel to global X.
Reset the block’s scale afterward:
Then briefly set Pivot’s scale to:
DemoBlock inherits the widened X dimension because it is a child of Pivot. Reset Pivot’s scale to when you have observed the effect.
For simple visual decoration, node scale is convenient. For the physical room, however, preserve the practice from the previous lesson:
- Change the
BoxMeshSize and matchingBoxShape3DSize together. - Keep the
StaticBody3Dparent at a scale of . - Avoid non-uniformly scaling a physics body just to reshape a floor or wall.
That approach keeps the visible mesh, collision boundary, and numerical dimensions easy to inspect. It also avoids later confusion when a player appears to collide with empty space or clip through a scaled object.
A final practical distinction: rotation changes direction; scale changes size; position changes location. Although the Inspector presents them as separate properties, a transform combines them. That combination is exactly why rotating a parent can change where an offset child ends up.
Key takeaways
A Node3D transform combines position, rotation, and scale.
- Local transforms are measured relative to a
Node3Dparent. These are the values you normally edit in the Inspector. - A global transform is the final world-space result after parent transforms are combined with the node’s local transform.
- Parent transforms affect every descendant, making node hierarchies useful spatial rigs rather than mere folders.
- T switches the gizmo between global-axis and local-axis orientation; it does not change transform data.
- Use W, E, and R for move, rotate, and scale tools, but use Inspector values for exact placement.
- Scale visual objects freely enough for simple experimentation; keep physics room pieces sized through matching mesh and collision resources.
Next, you will attach your first GDScript to a node and use a function to change one of its properties during play. The transform lab provides a natural mental model: a script can alter the same position, rotation, or scale values you have just edited in the Inspector.
Can't find a good explanation? Sign up and we'll make it for you
Sign up