
Hello again. In the previous lesson, you manipulated DemoBlock through its local transform in the Inspector and saw how its parent’s transform affected its final world position. This lesson gives code access to the same kind of data: a script can change a node’s properties while the game is running.
You will attach your first GDScript to the DemoBlock mesh and write an engine-called function that continuously changes its Y rotation. This finishes the foundations module with a small but important pattern: a node owns properties, and its attached script can read or change them during play.
A script belongs to a node
In Godot, a GDScript file is usually attached to one node in a scene. The script then gains access to the properties and built-in functions provided by that node’s type.
For this lesson, DemoBlock is a MeshInstance3D. It inherits from Node3D, so it has transform properties such as:
positionrotationscale
You edited those values manually in the Inspector last lesson. A script lets the game edit them while it runs.
Read the following short sections of Godot’s official tutorial before creating your script. The tutorial uses a 2D sprite, but the attachment workflow and the _process() idea work the same way for a 3D mesh.
Creating your first script - Godot Docs
Read Godot’s official introduction to attaching a script, inheritance through extends, and frame-by-frame updates. Translate its Sprite2D example to your DemoBlock MeshInstance3D.
In the section “Creating a new script,” begin with the attachment dialog. Continue through the explanation of extends, paying attention to the idea that inherited properties are available to the script. Then continue to the later explanation beginning the frame update explanation. Focus on why _process(delta) is called repeatedly and why multiplying by delta keeps motion consistent across different frame rates.
The specific node type will differ:
| Tutorial example | Your scene |
|---|---|
Sprite2D | MeshInstance3D |
2D rotation value | 3D rotation.y value |
| A sprite turns in the 2D plane | A box turns around the vertical Y axis |
The underlying structure is the same: a script extends the attached node type, then changes one of its inherited properties.
Attach a script to DemoBlock
Open your Main scene and find the transform lab from the previous lesson:
Main
└─ TransformLab
   └─ Pivot
      └─ DemoBlock
Select DemoBlock in the Scene dock. Right-click it and choose Attach Script. You can also use the small script-with-plus icon above the Scene dock when the node is selected.
The Attach Node Script dialog should automatically recognize that your selected node is a MeshInstance3D.
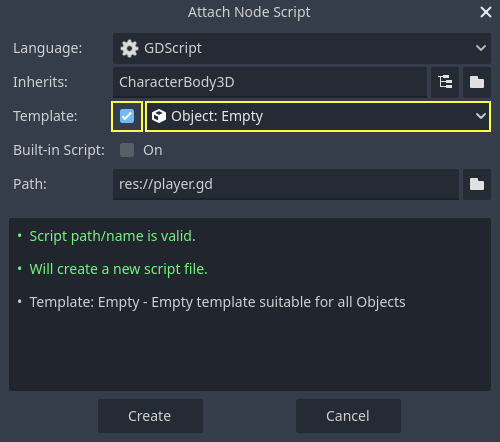
Set the dialog up as follows:
- Leave Language set to GDScript.
- Confirm that Inherits says
MeshInstance3D. Do not change this manually. - Enable the Template option and choose Object: Empty.
- Leave Built-in Script off. This creates a separate script file rather than storing code inside the scene file.
- Set Path to
res://demo_block.gd. - Click Create.
res:// means “the root folder of this Godot project.” The new demo_block.gd file will appear in the FileSystem dock, and Godot should switch to the Script workspace.
With the Empty template selected, the new file should contain only:
extends MeshInstance3D
This is not a comment or a label. It tells Godot that this script extends MeshInstance3D, the type of node it is attached to. Therefore, the script can use the node’s mesh-related features and the transform properties inherited from Node3D.
A useful rule is:
Make the
extendstype match the node to which the script is attached.
Turn the block during play
Replace the whole contents of demo_block.gd with this:
extends MeshInstance3D

var turn_speed = 1.5

func _process(delta):
	rotation.y += turn_speed * delta
Save with Ctrl+S on Windows or Linux, or Cmd+S on macOS.
This short script contains the core pattern used in much larger gameplay systems:
stored value
engine-called function
property update
Let’s unpack it carefully.
var turn_speed = 1.5
var creates a variable. Here, turn_speed stores how quickly the block should rotate.
This value is measured in radians per second, because Godot’s rotation property uses radians in code. A speed of 1.5 is roughly degrees per second, which is quick enough to observe without becoming visually distracting.
Each DemoBlock instance using this script would get its own turn_speed value.
func _process(delta):
func begins a function. _process is a special built-in callback: Godot calls it repeatedly while the game runs, usually once for every rendered frame.
The delta argument is the elapsed time, in seconds, since the previous frame. It matters because frame duration varies. One machine might render 60 frames per second, while another may render 144.
At about 60 frames per second, a frame takes roughly:
On such a frame, the rotation added is approximately:
Using delta means the block rotates by about the same amount over one real-world second regardless of how many frames occurred during that second.
rotation.y += turn_speed * delta
This is the property change.
rotation is a three-component value representing rotation around the X, Y, and Z axes. The .y selects only the vertical-axis component. The += operator means “take the current value and add this amount to it.”
Every frame, the script adds a tiny amount to the block’s local Y rotation. Over time, those tiny additions become a continuous spin.
This directly connects to the transform lesson:
DemoBlock’s local Y rotation changes.PivotandTransformLabkeep their own transforms unchanged.- The final on-screen orientation still includes any rotation inherited from those parents.
Because this script is attached to DemoBlock itself, writing rotation.y means “change this node’s rotation.” You do not need to look up a node path or create a separate reference.
Run and verify the live property change
Run the current scene with F6. If Godot asks which scene to run, choose the current Main scene.
If you already have a camera looking at the transform lab, you should see DemoBlock spinning in the running game. If your project does not yet have a gameplay camera, that is fine: the next module builds one as part of the first-person player. You can still verify the result through the Remote scene tree.
While the game is running:
- In the Scene dock, click Remote rather than Local.
- Expand
Main, thenTransformLab,Pivot, andDemoBlock. - Select the remote
DemoBlock. - In the Inspector, open Transform and watch its rotation change.
The editor may display the rotation in degrees for convenience, even though rotation.y in the script uses radians. What matters is that the Y rotation steadily changes while the game runs.
Press F8 to stop. Then switch back to the Local scene tree. The original editor-side transform returns, because your script modified the runtime instance, not the scene file saved on disk.
This distinction is fundamental:
| Where you make the change | When it exists |
|---|---|
| Inspector, then save scene | Persists for future runs |
_process() while the game runs | Exists only in that running session, unless code later saves data deliberately |
Make the behavior easy to control
For now, change the number in this line and run again:
var turn_speed = 1.5
Try these values one at a time:
| Value | Expected behavior |
|---|---|
0.0 | The block remains still |
0.4 | Slow rotation |
3.0 | Faster rotation |
-1.5 | Rotation reverses direction |
This works because the property update stays the same; only the stored speed changes. Keep the final value at 1.5 unless you prefer a different visual speed.
Be careful not to change the indentation inside _process(). In GDScript, the indented line belongs to the function. If the editor shows a red error marker, check that the script has:
extends MeshInstance3Don the first line,func _process(delta):ending with a colon,- one indented
rotation.yline beneath it, - no accidental text before or after the code.
If the code runs but the block does not move, confirm that the script icon appears beside DemoBlock in the Scene dock. A script attached to Pivot would rotate the whole assembly instead, and a script attached to TransformLab would rotate everything beneath it.
Key takeaways
A GDScript is attached to a node and normally begins with extends followed by that node’s type. Because demo_block.gd extends MeshInstance3D, it can directly access inherited Node3D properties such as rotation.
The _process(delta) function is called continuously while the game runs. Using delta makes changes based on elapsed time rather than on a particular frame rate.
Your script changes DemoBlock’s local rotation.y property every frame:
rotation.y += turn_speed * delta
That is your first runtime behavior: code changing a node property during play.
Next, you will begin the first-person movement module by defining named input actions for movement and pausing. Those actions will eventually control a player node with the same basic pattern used here: read game state, then update node properties.
Can't find a good explanation? Sign up and we'll make it for you
Sign up