
Hello again. In the previous lesson, you created a Godot 4 project and selected the Compatibility renderer so the eventual shooting range can run reliably in a browser. The project is still intentionally empty. Before we build walls, a player, or targets, it is important to understand the three ideas that organize nearly every Godot project: nodes, scenes, and scripts.
By the end of this lesson, you should be able to look at an item in Godot and identify whether it is an individual building block, a reusable arrangement of building blocks, or code that gives a building block behavior.
The core model: a game is a tree
Godot represents a running game as a hierarchy: some objects are parents, and others are their children. The individual objects are nodes. A saved, reusable arrangement of nodes is a scene. Scripts are files of GDScript code that give nodes custom behavior.
The official Godot documentation introduces nodes and scenes together because they are inseparable in practice: nodes do specific jobs, while scenes organize those jobs into meaningful game objects.
Nodes and Scenes — Godot Engine (stable) documentation in English
Read this official Godot documentation for the foundational definitions. It establishes the vocabulary you will use when building the range, player, targets, and interface.
In the “Nodes” section, read the node overview, paying attention to names, editable properties, callbacks, and parent-child relationships. Then read the “Scenes” section, beginning with the scene explanation. Continue through the paragraph explaining the main scene, the scene Godot loads first when the game runs.
A useful first approximation is:
| Concept | What it is | Shooting-range example |
|---|---|---|
| Node | One object with a specific job | A Camera3D, a light, or a collision shape |
| Scene | A saved tree of nodes, reusable as one unit | The player, a target, or the whole shooting range |
| Script | GDScript code that adds decisions and behavior to a node | Code that makes the player move or a target react to a hit |
This is a model, not a strict size rule. A scene can be as small as one node or as broad as a complete level. What matters is whether it is a useful unit to save, reuse, and reason about.
Nodes: the individual pieces
A node is the smallest building block that appears in the game’s hierarchy. Godot provides many node types, each designed for a particular responsibility.
For the 3D shooting range, you will soon encounter nodes such as:
Node3D: a general-purpose 3D organizational node with a position, rotation, and scale.MeshInstance3D: displays a 3D mesh, such as a box used for a wall.StaticBody3D: represents fixed physical geometry, such as a floor or wall.CollisionShape3D: supplies the shape physics uses for collision detection.Camera3D: defines what the player sees.DirectionalLight3DorOmniLight3D: illuminates the room.CharacterBody3D: provides the physics-oriented foundation for the player.
Every node has a name and editable properties. Select a node in the Scene dock and its properties appear in the Inspector. For example, a Camera3D has properties controlling its field of view, while a MeshInstance3D has a property identifying which mesh it displays.
Nodes also become more useful when placed in a parent-child relationship. Consider the eventual player:
Player (CharacterBody3D)
├─ CollisionShape3D
└─ Head (Node3D)
   └─ Camera3D
Here, the root Player node is responsible for the player’s physical body. Its CollisionShape3D child describes the body’s physical boundary. The Head is an organizational Node3D, and the Camera3D is a child of that head so it can move and turn with it.
For 3D nodes, this hierarchy also matters spatially. When a parent moves or rotates, its Node3D children move or rotate with it. That is why a camera belongs beneath a player rather than sitting elsewhere in the scene. We will examine local and global transforms carefully after building the room.
The following Scene dock example uses 2D node types, but the structural idea is exactly the same in 3D: one root node combines children that handle camera, visuals, and collision.
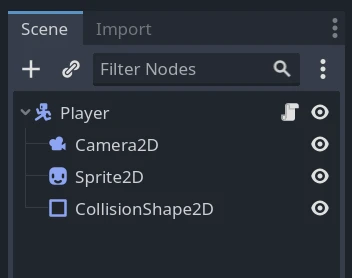
A node is not automatically a visible object. CollisionShape3D is essential to physics but generally not visible during gameplay. A Node3D can exist purely to organize child nodes. Conversely, a visible wall may require several nodes working together: one for the mesh the player sees, another for the collision body, and another for its collision shape.
Scenes: saved node trees you can reuse
A scene begins as a tree of one or more nodes. When you save that tree, Godot writes it as a .tscn file. It is now a reusable scene.
Scenes are Godot’s answer to a recurring game-development problem: how do you build something once without rebuilding its internal parts every time you need it?
For example, suppose a target consists of:
Target (StaticBody3D)
├─ MeshInstance3D
└─ CollisionShape3D
Saving that arrangement as target.tscn gives you a reusable target scene. Later, you can place several instances of target.tscn in the shooting range. Each instance starts with the same mesh and collision setup, but each can be placed at a different location.
This has an important consequence:
A scene is both a saved design and, when instanced, a usable component in another scene.
In the editor, an instance often appears as a single node in its parent scene. Godot hides the internal nodes by default so that a level containing several targets, a player, lights, and interface elements remains manageable.
It is therefore normal for the word scene to mean different scales of thing:
main.tscncan be the overall shooting-range level.player.tscncan be the reusable first-person player.target.tscncan be one reusable target design.- A later user-interface scene can contain the score, timer, and crosshair.
All are scenes because all are saved trees of nodes.
The main scene
A Godot project may contain many .tscn files, but the project needs one main scene when you run the whole game with F5. Godot starts by loading that saved scene.
For this course, the main scene will eventually contain the 3D room, player, targets, and user interface. It does not need to contain every node directly. It can instance a Player scene and several Target scenes, allowing the project to stay modular.
A small setup step: create the level’s initial scene
Create a minimal scene now so the next lesson has a home for the room.
- In the empty Scene dock, choose Other Node.
- Search for
Node3Dand create it. - Rename the root node Main.
- Press Ctrl+S on Windows/Linux or Cmd+S on macOS.
- In the save dialog, create a folder named
scenesif needed, then save the file asmain.tscn.
Your Scene dock should currently contain only:
Main (Node3D)
This is already a valid scene: it has exactly one root node and has been saved as a reusable file. It will not display anything yet because Node3D is only an organizer with a transform; it has no mesh, light, or camera. In the next lesson, this root will hold the room’s visible and physical parts.
For now, do not worry about choosing it as the project’s main scene or running it. Once the room has a camera, Godot can run it meaningfully.
Scripts: behavior attached to nodes
A script is a code file, usually with the .gd extension, written in Godot’s language, GDScript. In this course, scripts will give nodes game-specific behavior that built-in node types do not provide on their own.
For example:
- A
CharacterBody3Dnode already has physics-related capabilities, but it does not know your chosen keyboard controls. A player script will read input and move it. - A target scene can have visible geometry and collision, but it does not inherently know what should happen when shot. A target script will define that response.
- A
Labelnode can show text, but it does not choose the current score. A score-management script will update its text.
A script normally begins by extending a node type. That means it inherits the features of the node it is attached to while adding your own variables and functions. If a script extends CharacterBody3D, it can use the movement-related capabilities Godot provides for CharacterBody3D; your code supplies the particular movement rules for this game.
Scripts respond to moments the engine recognizes, often called callbacks. Later, you will use callbacks such as:
_ready(), called when a node enters the running scene tree._process(delta), called repeatedly each rendered frame._physics_process(delta), called repeatedly at the physics update rate.
For the moment, treat these as places where behavior can be written. You do not need to memorize their details yet.
The short segment below demonstrates the central relationship: a script is attached to a node, and code in that script can run when the node becomes part of the game.
How to program in Godot - GDScript Tutorial
Watch “How to program in Godot - GDScript Tutorial” by Brackeys for a compact first look at creating a script and seeing a node execute its code.
Start at the script example, when the tutorial opens a blank Godot project. Watch through the Console output. Focus on the sequence: create a node, attach a script, place instructions in _ready(), run the project, and observe the result. The exact code is less important than seeing that the script belongs to a node and is triggered when that node enters the running game.
In the editor, selecting a node and using Attach Script creates this connection. The attached-script icon then appears beside the node in the Scene dock.
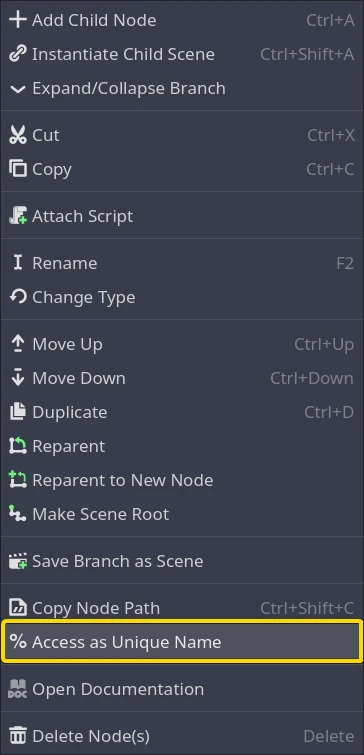
A script is not a replacement for the node or scene:
- The node still provides the object’s type, properties, and place in the hierarchy.
- The scene still stores the arrangement of nodes.
- The script supplies instructions for behavior at runtime.
Keeping these responsibilities separate makes debugging easier. If a wall appears in the wrong place, inspect its node’s transform. If every target has the wrong collision arrangement, inspect target.tscn. If a target does not react after being shot, inspect its attached script.
One idea, viewed at three levels
The player provides the clearest example of how these concepts cooperate.
| Level | What it means for the player |
|---|---|
| Nodes | CharacterBody3D, CollisionShape3D, Node3D, and Camera3D each perform a focused job. |
| Scene | player.tscn saves those nodes as one reusable first-person player design. |
| Script | player.gd attaches to the player’s root node and implements mouse look, movement, gravity, and pointer capture. |
When player.tscn is instanced inside main.tscn, it appears in the level’s hierarchy as a Player node. That can seem confusing at first: the instance is displayed as a node, but it represents an entire saved scene with hidden internal children.
This is the normal pattern in Godot, not an exception. A scene can be nested inside another scene, and the complete running game becomes one larger scene tree.
Key takeaways
- Nodes are individual objects with focused responsibilities, editable properties, and positions in a parent-child hierarchy.
- Scenes are saved trees of nodes. They are reusable units: a level, player, target, or interface can all be scenes.
- Scripts are GDScript files that attach custom logic to nodes, telling them how to respond during play.
- An instanced scene appears in its parent as a node, even though it contains its own internal node tree.
- You now have
main.tscn, a minimal 3D scene that will become the shooting-range level.
Next, you will turn that currently empty Main node into a simple 3D room using primitive meshes, collision shapes, and a light.
Can't find a good explanation? Sign up and we'll make it for you
Sign up