
Hello, and welcome to the first step in building your game. This course will take you from an empty Godot project to a small first-person browser shooting range: movement, targets, scoring, a timed round, and a web release.
Today’s goal is deliberately practical: create the project that will hold the entire game and select the renderer that matches a browser release. The renderer is worth choosing before building scenes, because it determines which graphics features Godot makes available.
Why choose Compatibility for this project?
Godot 4 offers three rendering methods: Forward+, Mobile, and Compatibility. They are not simply “high,” “medium,” and “low” graphics settings. Each is built on a different graphics path and has a different target platform range.
For this course, select Compatibility because the eventual target is a web browser. Godot’s documentation identifies Compatibility as the renderer for web builds; it uses OpenGL and emphasizes broad hardware support. It still supports the core 3D features needed for our shooting range: meshes, lights, cameras, collisions, and basic materials.
This choice involves a tradeoff: some advanced visual features available in Forward+ or Mobile are absent. That is appropriate here. A small, responsive browser game benefits more from predictable compatibility than from expensive lighting effects.
Overview of renderers - Godot Docs
Read Godot’s official renderer decision guide to understand why Compatibility is the correct starting point for a web-targeted game.
In the “Choosing a renderer” section, read the Compatibility guidance beginning with the web and hardware criteria. Focus on the distinction between a renderer chosen for advanced desktop graphics and one chosen for browser reach.
A useful rule for this project is:
Build and test using the same renderer your players will use.
Godot lets you switch renderers later from the editor’s upper-right corner, but a change can require revisiting lighting, materials, and scene appearance. Selecting Compatibility now reduces that risk.
Create a clean project folder
A Godot project is a normal folder on your computer containing game assets, scenes, scripts, and a central configuration file. Give it its own dedicated folder. Do not place it inside a folder belonging to another Godot project.
Before opening Godot, decide on a parent location for your development work. For example:
Documents/
  GodotProjects/
    ShootingRange/
The exact name is your choice. Use something readable and stable, such as ShootingRange, aim-trainer, or web-shooting-range. Avoid creating this project in temporary folders, Downloads, cloud-sync folders that frequently show conflict warnings, or inside the Godot installation directory.
Now open Godot Project Manager.
Using the Project Manager — Godot Engine (latest) documentation in English
Use this short official guide as a reference while creating the project. It explains the Create New Project dialog, folder selection, and renderer selection.
In “Creating and importing projects,” read from the instruction about selecting a save location at the project creation steps. Notice that Godot expects either an empty project folder or permission to create one automatically.
Click Create in the Project Manager. In the Create New Project dialog:
- Enter a project name, for example Shooting Range.
- Set a project path beneath your chosen parent folder, such as
Documents/GodotProjects/shooting-range. - Turn on Create Folder if the final project folder does not exist yet. Godot will create it for you.
- Select Compatibility under Renderer.
- Leave version-control metadata at its default for now. We can add source control later without making it a prerequisite for building the game.
- Keep Edit Now enabled, then click Create.
The location should show a green confirmation mark before you create the project. That indicates Godot can use the selected folder safely.
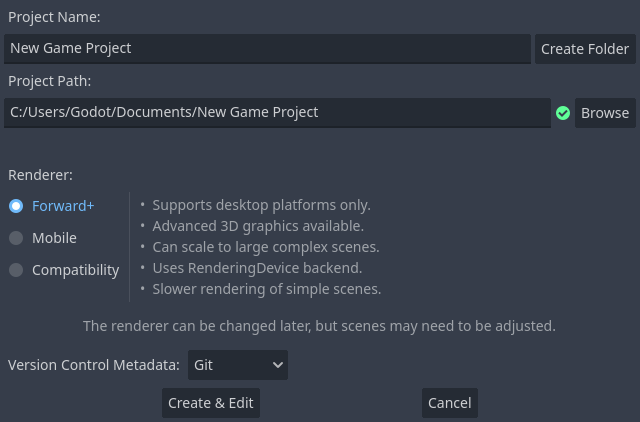
Make the renderer choice deliberately
In the dialog, it may be tempting to select Forward+ because it sounds newer or more powerful. For a desktop-only 3D title, that may be reasonable. But it does not suit this project’s release goal.
| Renderer | Best fit | Use for this course? |
|---|---|---|
| Forward+ | Advanced desktop 3D visuals on modern hardware | No |
| Mobile | Modern mobile devices and desktop targets | No |
| Compatibility | Web, older hardware, 2D, and modest 3D scenes | Yes |
The key distinction is not whether the game is 3D. Compatibility can render 3D scenes. The question is whether the game requires advanced features that browsers cannot use through Godot’s web pipeline. Our room, targets, and simple lighting do not.
Once the editor opens, look in the upper-right area of the editor window. Godot displays the active renderer there. Confirm that it says Compatibility.
If it says Forward+ or Mobile, do not discard the project:
- Click the renderer name in the upper-right corner.
- Select Compatibility.
- Let the editor restart or reload if Godot requests it.
- Confirm the label now shows Compatibility.
Treat this as a configuration verification, not merely a visual preference. It confirms the project is being authored against the graphics capabilities of its intended browser build.
A quick orientation after creation
The editor may look busy, but you only need to recognize three areas today:
- Scene dock, usually on the left: this will list the objects in the current game scene.
- FileSystem dock, usually lower-left: this shows the project folder’s files and assets.
- 3D viewport, in the center: this is where we will construct the shooting room in the next lessons.
At this moment, it is normal for the FileSystem dock to be nearly empty. Godot has created the project configuration, but we have not yet created a scene.
Avoid manually moving, renaming, or deleting files in the project folder through your operating system while Godot is open. Use Godot’s FileSystem dock for routine project-file organization once assets exist. This helps Godot keep references between scenes, scripts, and resources accurate.
Completion check
Before ending the session, confirm each item:
- The project opens in the Godot 4 editor.
- The FileSystem dock shows
res://, which represents the project’s root folder. - The active renderer in the upper-right corner is Compatibility.
- The project has its own dedicated folder in a location you can find again.
- You have not created a scene yet; that is expected.
You have now made the first technical decision that protects the eventual web release. The next lesson introduces Godot’s basic building blocks—nodes, scenes, and scripts—so the initially empty project becomes something you can assemble and program.
Can't find a good explanation? Sign up and we'll make it for you
Sign up