
Hello again. Your RestaurantApp solution now runs locally. Before you add restaurant logic, preserve this clean starting point in a Git repository and publish it to GitHub. This gives you a recoverable history, an off-device copy of your work, and a visible portfolio trail that recruiters can inspect.
In this lesson, you will create a local Git repository at the solution root, make purposeful commits, push them to GitHub, and complete one small change on a feature branch. These are the everyday mechanics behind professional collaboration.
Git, GitHub, and the three places your code can live
Git is version-control software on your computer. It records the history of a folder. GitHub is an online service that hosts Git repositories, making them available for backup, review, and collaboration.
A Git commit does not automatically appear on GitHub. The key distinction is:
| Location | What it contains | Typical action |
|---|---|---|
| Working directory | Files you are editing in RestaurantApp | Save changes |
| Staging area | The exact changes selected for the next commit | git add |
| Local repository | Commit history on your machine | git commit |
| GitHub remote repository | The shared online copy | git push |
Use git status frequently. It tells you which branch you are on, which files changed, and whether anything is staged for commit.
Before starting, open the RestaurantApp root folder in VS Code and open its integrated terminal. Confirm Git is available:
git --version
If the command is not found, install Git for your operating system, restart VS Code, then run the command again.
Git and GitHub Tutorial for Beginners
Watch Git and GitHub Tutorial for Beginners by Kevin Stratvert for a terminal-based explanation of local repository setup, staging, ignored files, and an initial commit.
Watch local setup to see author configuration and repository initialization. Then watch first commit for the practical meaning of status, .gitignore, staging, and committing. Use the commands in this lesson for your RestaurantApp folder rather than copying the tutorial's example filenames.
Configure Git and initialize the restaurant solution
Git writes an author name and email into each commit. Configure these once on your machine, replacing the placeholders with your own name and the email you use for GitHub:
git config --global user.name "Your Name"
git config --global user.email "your-email@example.com"
git config --global init.defaultBranch main
You can verify the setup without exposing unnecessary configuration details:
git config --global --get user.name
git config --global --get user.email
Now ensure the terminal is in the folder containing RestaurantApp.sln and src. For example:
cd path/to/RestaurantApp
Initialize Git and inspect its view of the project:
git init
git status
Git creates a hidden .git directory in the solution root. Do not edit that directory manually; it contains Git’s internal history and configuration.
At this point, git status should list your solution, C# project, and source files as untracked. It may also list bin and obj, which are generated during dotnet build or dotnet run. These must not be committed.
Add a focused .gitignore
At the root of RestaurantApp, create a file literally named .gitignore—with no .txt extension—and add:
# .NET build artifacts
bin/
obj/

# Visual Studio local settings
.vs/
The .gitignore file tells Git which untracked generated files to leave out. It is itself important project configuration, so it should be committed.
Run:
git status
You should see .gitignore, the solution file, and src files. You should not see bin or obj as files waiting to be added.
Important habit: Never commit passwords, API keys, connection strings containing real credentials, access tokens, or private certificates. A
.gitignorehelps prevent accidents, but always reviewgit statusbefore staging files.
Make a meaningful initial commit
Your initial commit should represent a working baseline: the .NET 8 solution and console project from the previous lesson, along with the .gitignore rules.
First, inspect exactly what Git will stage:
git status
Then stage the project:
git add .
git status
The files should now appear under “Changes to be committed.” Staging is a deliberate selection step: it lets you make one coherent commit even when multiple unrelated changes exist in your working directory.
Create the commit:
git commit -m "chore: initialize .NET restaurant solution"
A good commit message states what changed, using an imperative, specific summary. The conventional prefix chore: fits repository setup work. Future examples in this project might be:
feat: calculate order subtotalfix: reject cancelled order paymenttest: cover tax calculation boundariesdocs: add local setup instructions
Confirm that the repository is clean and inspect the short history:
git status
git log --oneline
A clean status means your saved files match the latest local commit. It does not yet mean they are safely on GitHub.
Create the GitHub repository and push the baseline
In your browser, sign in to GitHub and create a new repository with these settings:
- Repository name:
restaurant-app - Description:
Portfolio restaurant ordering application built with .NET and React. - Visibility: Public, if this contains only safe portfolio code and no credentials.
- Initialize with a README /
.gitignore/ license: leave these unchecked.
Leaving initialization options unchecked matters because you already have a local repository with its own initial commit. An empty remote avoids creating unrelated histories that need to be reconciled.
After GitHub creates the repository, copy its HTTPS repository URL. It will have a form similar to:
https://github.com/YOUR-USERNAME/restaurant-app.git
Back in the RestaurantApp terminal, attach that GitHub repository as a remote named origin:
git remote add origin https://github.com/YOUR-USERNAME/restaurant-app.git
git remote -v
origin is simply the conventional local name for the remote GitHub repository. The git remote -v command should display the same address for fetching and pushing.
Ensure your branch is called main, then publish the initial commit:
git branch -M main
git push -u origin main
The -u option establishes an upstream relationship between your local main branch and origin/main. Afterwards, ordinary pushes from main can use the shorter command:
git push
Your first push may open a browser window for GitHub authentication or ask you to complete the sign-in flow. Complete it rather than entering a GitHub password into an unexpected terminal prompt.
Refresh your GitHub repository page. You should see:
RestaurantApp.slnorRestaurantApp.slnx- the
src/Restaurant.Consoleproject .gitignore- the commit message
chore: initialize .NET restaurant solution
Git and GitHub Tutorial for Beginners
Continue with Kevin Stratvert’s tutorial for the connection between a local repository and GitHub’s remote repository.
Watch remote push. Focus on the difference between adding origin, pushing main, and publishing additional branches. The repository name and URL in the video are examples; use your own GitHub URL.
Work safely on a feature branch
A branch is an independent line of work that begins from a particular commit. main should remain a stable, working version of the application. When implementing a feature or fix, make a branch, commit work there, and propose it for review before merging it into main.
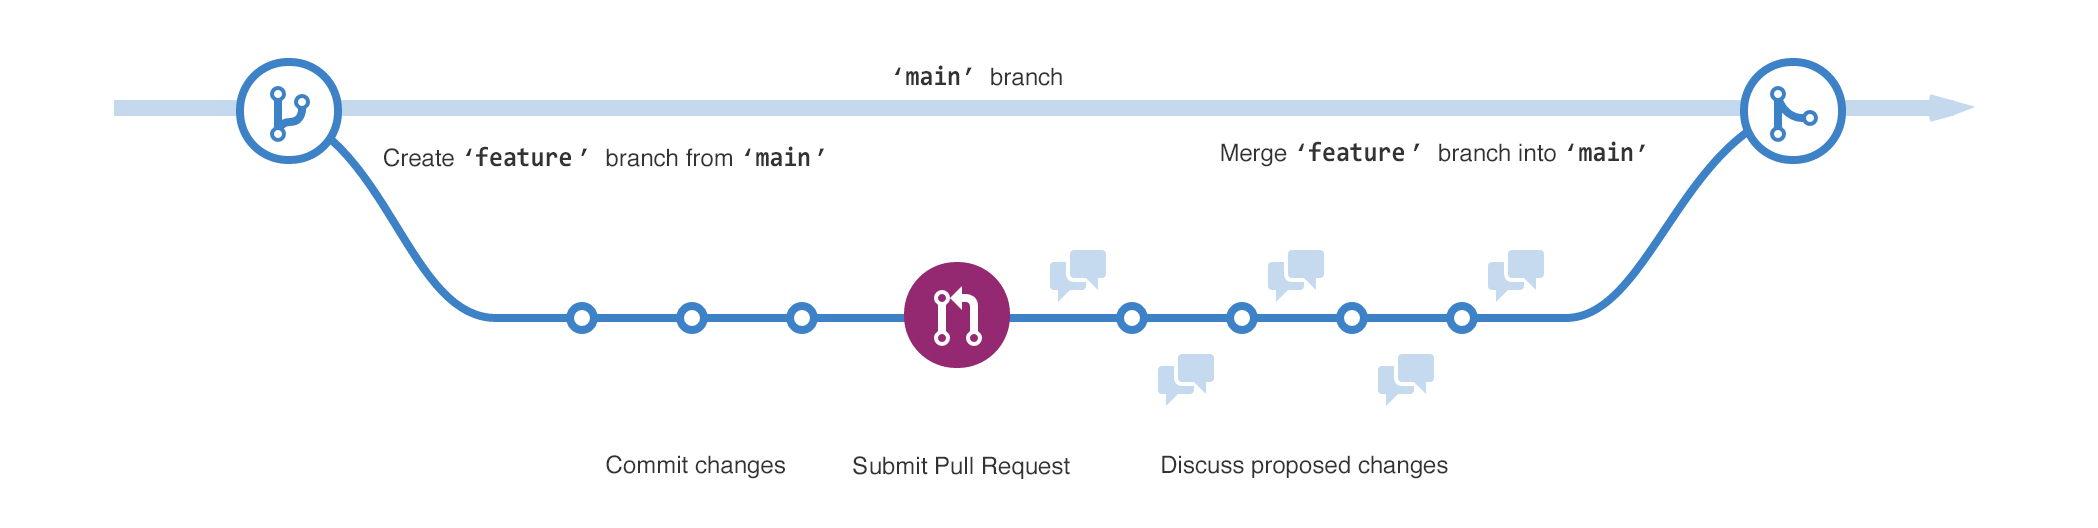
Create a small practice branch. The branch name describes the type and purpose of the work:
git switch -c feature/menu-startup-message
git branch
git switch -c both creates the branch and moves you onto it. In the git branch output, the active branch is marked with an asterisk.
Open src/Restaurant.Console/Program.cs and update it to:
Console.WriteLine("Restaurant backend workspace is running.");
Console.WriteLine("Menu feature branch is ready for development.");
This is intentionally a very small change. Its purpose is to prove the workflow while leaving the real restaurant-domain implementation for later lessons.
Run the application before committing:
dotnet run --project src/Restaurant.Console/Restaurant.Console.csproj
Then examine the changed lines and commit them:
git status
git diff
git add src/Restaurant.Console/Program.cs
git commit -m "feat: add menu branch startup message"
Notice the sequence:
- You changed and tested code in the working directory.
git diffshowed the unstaged difference.git addselected the one intended file.git commitsaved the selected change in the local feature branch.
Push the branch to GitHub:
git push -u origin feature/menu-startup-message
Now GitHub has both main and feature/menu-startup-message. Pushing a branch does not change main; it merely publishes the separate work for backup and review.
Git and GitHub Tutorial for Beginners
This segment of Git and GitHub Tutorial for Beginners shows the practical reason branches protect the main line of development.
Watch branch workflow. Watch for the distinction between creating a branch, committing work while that branch is active, switching back to main, and merging only after the change is ready. You do not need to practice merge-conflict resolution yet.
Open a pull request and bring main up to date
On GitHub, the page should offer a Compare & pull request button after the branch push. Select it and create a pull request with:
- Base branch:
main - Compare branch:
feature/menu-startup-message - Title:
Add menu branch startup message - Description:
Adds a temporary console message to verify the feature branch workflow.
A pull request is not the same as a Git command named “pull.” It is a GitHub review request asking to merge one branch into another. In a team, reviewers inspect the changed files, discuss concerns, and approve the work. For your portfolio project, using pull requests still demonstrates a disciplined workflow.
Review the “Files changed” tab. Since this is your own small, tested change, merge the pull request into main on GitHub. GitHub will offer to delete the remote feature branch afterward; choose Delete branch once it is merged.
Your local copy of main does not update automatically. Return to the terminal and run:
git switch main
git pull --ff-only origin main
git branch -d feature/menu-startup-message
git status
git pull --ff-only origin main downloads the merged main history and updates your local main only when Git can move it forward cleanly. git branch -d removes the now-merged local feature branch. Your final git status should say that the working tree is clean and that main is up to date with origin/main.
From now on, a compact routine for each focused piece of work is:
git switch main
git pull --ff-only

git switch -c feature/descriptive-name

# Edit and test code

git status
git add path/to/changed-file
git commit -m "feat: describe the change"
git push -u origin feature/descriptive-name
Then create a pull request, review it, merge it, and update local main.
Troubleshooting essentials
| Problem | Likely cause | Fix |
|---|---|---|
fatal: not a git repository | Terminal is not in RestaurantApp | Use cd to return to the folder containing the solution file, then run git status. |
| Git refuses to commit because author identity is unknown | Name and email are not configured | Run the two git config --global commands from this lesson. |
bin or obj appears in staged files | .gitignore was added after staging, or files were already tracked | Unstage with git restore --staged bin obj, confirm .gitignore exists, then check git status again. |
remote origin already exists | A remote was already configured | Inspect it with git remote -v; do not add another remote unless the URL is wrong. |
| Push is rejected | GitHub has commits that your local branch does not contain | First inspect the GitHub repository. This lesson avoids the issue by creating an empty remote. Do not use force-push as a quick fix. |
| GitHub does not show the feature branch | The branch was committed locally but not pushed | Run git push -u origin feature/menu-startup-message. |
git branch -d refuses to delete the branch | The feature work has not been merged into local main | Switch to main, pull the merged pull-request result, then retry. |
You now have a public GitHub repository containing your working .NET 8 solution, a clear initial commit, and evidence of a feature-branch and pull-request workflow. Remember the central distinction: commit saves history locally; push publishes that history to GitHub.
Next, you will begin writing the restaurant application’s first real behavior: calculating an order with C# types, nullable values, conditions, and loops.
Can't find a good explanation? Sign up and we'll make it for you
Sign up