
Hi. In the last lesson, you practiced starting schoolwork with one small action instead of waiting to feel fully ready. Once you have completed that work, there is one more important step: making sure it actually leaves your device and becomes visible to your teacher.
A finished assignment sitting in a document, backpack, downloads folder, or “draft” screen cannot help your grade yet. This lesson gives you a short submit-and-verify checklist you can use every time. It will help prevent common problems such as uploading the wrong file, stopping at “Save draft,” or assuming work was submitted without checking.
“Finished” and “submitted” are different
Think of submission as a separate task with its own ending. You might finish the last math problem at 5:00, but the assignment is not submitted until you complete the platform’s final action and see proof that it was accepted.
Most school platforms have several stages:
- You create or complete the work.
- You attach or upload it to the correct assignment.
- You click the final button, often called Turn in, Submit, or Submit assignment.
- You confirm that the platform now shows a submitted status, date, time, file name, or receipt.
The easiest mistake is confusing an attachment with a submission. Seeing your file listed on the page is useful, but it may only mean that the file is attached or saved as a draft. Look specifically for the final submission status.

Also remember: submitted does not mean graded yet. Submission confirms that the system received the work and made it available to the teacher. Your teacher may read and grade it later, especially if it is late. Still, a confirmed submission is a real step forward—and much better information than wondering whether the work got through.
Your submit-and-verify checklist
Use this checklist after every completed assignment. Keep it in your planner, notes app, or near your study space.
1. Check that you are in the right place
Before attaching anything, pause for ten seconds and check:
- Is this the correct class?
- Is this the correct assignment title?
- Does the assignment require a file, a link, a typed response, a quiz submission, or something else?
- Are there required parts, such as a worksheet and a written response?
This protects you from a frustrating mistake: submitting good work to the wrong assignment.
2. Check the actual work
Open the document, photo, slide deck, or file once more. Make sure it is the version you mean to send.
Look for simple problems:
- an unfinished page or blank response;
- the wrong document with a similar name;
- a photo that is blurry, sideways, or missing a page;
- a file with someone else’s name on it;
- a document that did not save your latest changes.
You do not need to reread every sentence forever. This is a quick “right assignment, right version, complete enough” check.
3. Attach the correct item and inspect it
Upload or attach the work under Your work, Attachments, or a similar area. Then inspect what appears on screen:
- Does the file name look right?
- If possible, can you open or preview it?
- If there are multiple required files, are all of them there?
- Did you accidentally attach an old draft instead of the final version?
If your teacher gave you a personal copy with your name in the title, use that copy unless the directions say otherwise.
4. Use the final submission button
Now look for the platform’s final action: Turn in, Submit, Hand in, or a similar label. Click it and read any confirmation box before accepting it.
Be especially careful with buttons labeled Save draft, Save, or Upload. Those often preserve your work in the platform but do not send it as a completed assignment.
5. Verify visible proof
After submitting, do not immediately close the tab. Find at least one clear piece of evidence, such as:
- a status that says Turned in or Submitted;
- a submission date and time;
- the attached file name listed under your submitted work;
- a button such as View submission;
- a downloadable receipt or confirmation number.
If available, reopen the submitted work and make sure the teacher-facing copy includes the correct file.
6. Record it in your missing-work inventory
Update the assignment in the inventory you made earlier:
Biology: Cell Diagram — Submitted Tuesday, 4:18 p.m. — waiting for grade
Mark it submitted, not graded, until your grade portal changes. This makes your next weekly review much clearer: you will know which assignments still need action and which are simply awaiting a teacher’s review.
Watch the final confirmation happen
If your school uses Google Classroom, this short demonstration shows the exact difference between adding a file and fully turning work in.
Google Classroom - How To Submit An Assignment
Watch “Google Classroom - How To Submit An Assignment” by Think Tutorial to see the submission process on screen, including the final status check.
Watch attaching work to see both a teacher-provided document and a file from Google Drive. Then watch confirming submission closely: notice the confirmation prompt and the “Turned in” status that appears afterward.
The official Google Classroom guide gives the same process in writing. Use it when you need a slower walkthrough while submitting an actual assignment.
Turn in an assignment - Computer - Classroom Help
Read Google Classroom Help’s official guide if your school uses Google Classroom. It explains what can be attached, where to find the final “Turn In” action, and the status that confirms the assignment was sent.
In the section “Turn in an assignment,” begin with the attachment options. Then read the six numbered steps, starting with signing in and opening Classwork and continuing through the sentence explaining that the assignment status changes to “Turned in.” Focus on the difference between adding work under “Your work” and clicking the final “Turn In” button.
Some platforms give stronger proof than a status label. They may show a receipt, submission date, file size, or confirmation number.
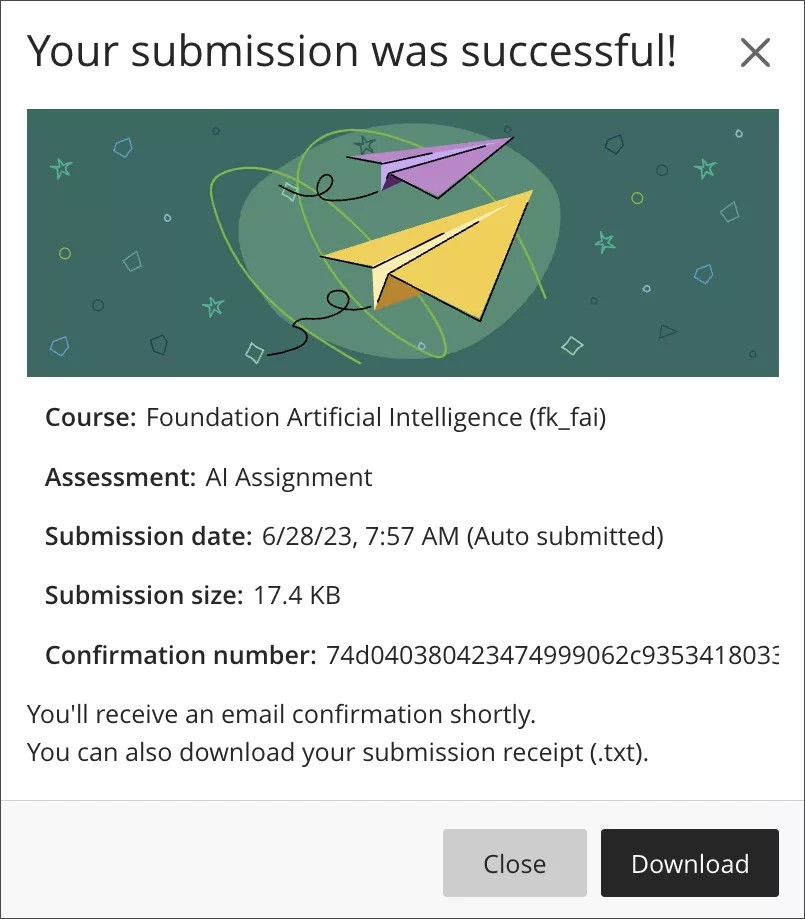
You do not need to take a screenshot of every ordinary assignment unless your school requires it. But if an assignment is very important, overdue, or the website acted strangely, keeping a receipt or screenshot of the confirmation can be sensible.
If something goes wrong
A problem during submission is not proof that you failed or that your work is worthless. It is a technical or communication problem with a specific next action.
| What you notice | What to do next |
|---|---|
| You see an error after clicking Submit. | Do not assume it went through. Refresh carefully, reopen the assignment, and look for a submitted status. If there is none, tell the teacher promptly. |
| The file is wrong or incomplete. | If the platform allows it, unsubmit or replace the file, then submit again and verify the new version. |
| You cannot upload the file. | Check the file type and size, then try a different approved format if the directions allow it. If the problem continues, contact the teacher rather than waiting. |
| You submitted after the deadline. | Still verify the submission. The platform may label it late, but submitted work gives the teacher something to review. |
| The assignment still appears missing later. | Reopen the assignment and check its status and your attached file. If you have proof of submission, send the teacher a calm message with the assignment name and submission date. |
For a serious problem, keep your message short and factual:
Hello, I completed and submitted [assignment name] on [date]. The platform showed [submitted status or error]. Could you please let me know whether you can see it? Thank you.
This is not an argument or an excuse. It gives the teacher the exact information needed to help.
A quick routine for today
The next time you finish even a small assignment, take three extra minutes before leaving the site:
- Read the assignment title and check the final version of your work.
- Attach it and inspect the file name or preview.
- Click the final submission button and accept any confirmation.
- Find the submitted status, date, or receipt.
- Write “submitted” with the date in your inventory.
Treat this as part of completing the assignment, just like answering the last question. A checklist is not there because you are bad at schoolwork; it is there because tired, rushed people make predictable mistakes, and a routine catches them.
Key takeaways
Completing work and submitting work are two separate steps.
- An uploaded attachment or saved draft may not be submitted.
- Check the correct class, assignment, required pieces, and final version before submitting.
- Click the platform’s final Turn in or Submit action, including any confirmation prompt.
- Verify a clear status, time, file name, view-submission page, or receipt before closing the site.
- Record the assignment as submitted, then wait for it to be graded.
- If the platform gives an error or no proof of submission, act promptly and tell the teacher exactly what happened.
Next, you will build a short weekly review that updates your missing-work list, deadlines, and plan for the coming week.
Can't find a good explanation? Sign up and we'll make it for you
Sign up